
Operating Instructions

E-2
SAVE THESE INSTRUCTIONS.
ASSEMBLY INSTRUCTIONS
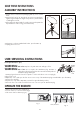
1. Gently remove contents from packaging and lay out in a clear
area.
2. Push the ball end of “A” through the projection ring and base.
Tighten ring and adjust the angle of Projection™. (See Illustration
1) and tighten screw B.
3. Get together the Tripod Stake for outdoor using, and separate the
Tripod Stake for indoor using. (See Illustration 2).
4. Plug power cord into standard wall socket. (See Illustration 3)
5. Unplug when not in use.
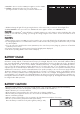
USER SERVICING INSTRUCTIONS
Fuse Replacement (Fuse: 2pcs)
WARNING: Risk of Fire: Replace only with same size and type of fuse.
WARNING: Risk of Fire: Do not replace the attachment plug. Contains a
safety device (fuse) that should not be removed. Discard product if
attachment plug is damaged.
1. Grasp plug and remove from the receptacle or other outlet device. Do not unplug by
pulling on the cord.
2. Open fuse cover. Slide open the fuse access cover on top of the attachment plug towards blades. (See illustration)
3. Remove fuse carefully.
4. Replace fuse only with 5 Amp Max, 125 Volt fuse (provided with product).
5. Close the fuse cover. Slide closed the fuse access cover on top of the attachment plug.
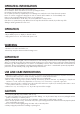
OPERATE THE REMOTE:
1. Remove the remote from its packing box.
2. Use the remote to control the effect. (Fig.1)
3. The remote has four buttons (Fig. 2).
illustration 2
Fig. 1
Fig. 2
ON/OFF
EFFECT COLORS
STATIC/MOTION
Working
Fuse
Replace
Fuse
illustration 1 illustration 2
B
A
Ground