
User Manual Part 3

LAN Setup
4020210 Rev
A
109
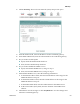
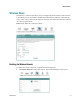
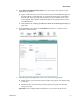
2 Click LAN Setup. The Local Area Network (LAN) setup screen opens.
3 In the IP Address field, enter the IP address for the residential gateway.
4 In the Subnet Mask field, enter the subnet mask for the residential gateway.
5 Do you want to enable UpnP?
If yes, check the Enable UPnP check-box.
If no, clear the Enable UPnp check-box.
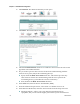
6 Do you want to Enable the DHCP server?
If yes, select Enable DHCP Server, and go to step 7.
If no, select Disable DHCP Server, and go to step 8.
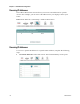
7 Under Enable DHCP server, enter the following information:
a In the Start IP Address field, enter the first IP address in the range for the
DHCP IP address lease pool.
b In the End IP Address field, enter the last IP address in the range for the
DHCP IP address lease pool.
c In the Subnet Mask field, enter the subnet mask for the DHCP server.
d In the Leased Time (hour) field, enter the duration of the DHCP lease
address.
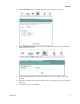
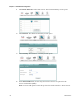
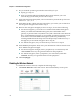
8 Click Save to save the changes or click Save/Reboot to save the changes and
reboot the residential gateway.