
User's Manual Part 1


User’s Guide Chapter 7 – Reference Manual
Update – add new specified RADIUS server.
Cancel – restore all previous values.
After adding a new RADIUS server or editing an existing one, the following controls appears:
Apply Changes – save changed configuration.
Discard Changes – discard all changes.
Restart – after applying changes to the system, you should restart the controller to make applied
changes work.
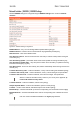
Network Interface | RADIUS | WISP
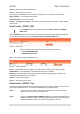
Up to 32 WISP entries can be defined using the network interface | RADIUS |
WISP menu.
Different WISPs (Wireless Internet Service Providers) can be associated with appropriate RADIUS
servers and device interfaces using the network interface | RADIUS | WISP menu:
Figure 72 – WISP Menu
Hotspot subscribers user name format from WISP table is as follows:
username@WISPdomain
WISPdomain/username
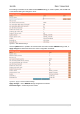
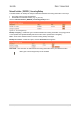
New – click to define WISP for RADIUS server.
Figure 73 – Define New WISP
Name – new WISP domain name [string, up to 256 symbols, no space, dot or dash allowed].
RADIUS Name – select RADIUS for new WISP from list box [non editable].
Bound To – select the WISP binder interface [none/eixp0/ixp1/ixp2/vlan[n]]. The WISP can be
associated with appropriate device interface.
Update – system with new WISP.
Cancel – restore all previous values.
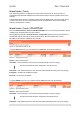
Network Interface | RADIUS | Proxy
The P560 (AC) can forward the RADIUS authentication and accounting requests from Access Point
(AP) to the real RADIUS server. To configure the RADIUS proxy, follow the steps:
Step 1 Connect the Access Point to any LAN port available on the Access Controller
(P560). The AP should be in the bridge mode.
Step 2 Using the network interface | RADIUS | proxy menu configure the RADIUS proxy
parameters: RADIUS authentication port (UDP), RADIUS accounting port (UDP) -
different from authentication port and Accounting detection timeout:
Gemtek Systems Page 67