Contents: 802.11g Wireless USB Adapter User Guide About the 802.11g Wireless USB Adapter > Network Configuration and Planning Adapter Installation and Configuration for Windows 98SE/2000/Me/XP Navigating the Wireless Configuration Utility Troubleshooting About the 802.11g Wireless USB Adapter Glossary Product Specifications for 802.11g Wireless USB Adapter U.S. Robotics Corporation Limited Warranty Regulatory Information The 802.
Contents: 802.11g Wireless USB Adapter User Guide About the 802.11g Wireless USB Adapter Network Configuration and Planning Network Configuration and Planning > The 802.11g Wireless USB Adapter supports legacy Ethernet LAN network configuration options as defined by the IEEE 802 standards committee. Adapter Installation and Configuration for Windows 98SE/2000/Me/XP The 802.
than one BSS can be configured as an Extended Service Set (ESS). The continuous network allows users to roam freely within an ESS. All 802.11g Wireless USB Adapters and Wireless Access Points within one ESS must be configured with the same ESS ID and use the same radio channel. Before enabling an ESS with roaming capability, choose a feasible radio channel and optimum Access Point position. Proper Wireless Access Point positioning and a clear radio signal will greatly enhance the performance.
Contents: About the 802.11g Wireless USB Adapter Network Configuration and Planning Adapter Installation and Configuration for Windows 98SE/2000/Me/XP Navigating the Wireless Configuration Utility 802.11g Wireless USB Adapter User Guide Adapter Installation and Configuration for Windows 98SE/2000/Me/XP SYSTEM REQUIREMENTS In order to install and use the 802.
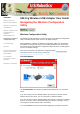
Click 802.11g Wireless USB Adapter Utility and Drivers. Follow the on-screen instructions to finish the installation procedure.* If you are prompted, select Yes, I want to restart my computer now and click Finish. You are now ready to connect the 802.11g Wireless USB Adapter. If you had to restart your computer, wait until it finishes rebooting before proceeding to Step Two. *Note: You may receive a “Digital Signature Not Found” or “Windows Logo testing” screen. Click Yes or Continue Anyway. U.S.
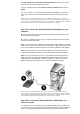
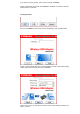
Adapter. The Configuration Utility icon will be colored to indicate the status of your wireless network: red for disconnected and green for connected with good quality. Double-click the Configuration Utility icon. When the Configuration Utility launches, you can either scan for a network to connect to or enter the information for a specific network. To scan for a network, click the Available Networks tab. Locate the network you want to connect to in the list, select it, and then click Connect.
Contents: About the 802.11g Wireless USB Adapter Network Configuration and Planning 802.11g Wireless USB Adapter User Guide Navigating the Wireless Configuration Utility Adapter Installation and Configuration for Windows 98SE/2000/Me/XP Wireless Configuration Utility Navigating the Wireless Configuration Utility The following section describes the various functions of the Wireless Configuration Utility. This utility provides quick access to all adapter settings.
Click Back to return to the main Link Information screen. Available Networks: Selecting this tab opens the Available Networks area. This is where you will find options for configuring your 802.11g Wireless USB Adapter. On the left, you will see a list of the available wireless networks to which you can connect. Select the appropriate network name and click Connect. Next to the Network Name list is the Band column. This lets you know what frequency each wireless network is operating on. The 802.
Adapter is backwards compatible with earlier 802.11 versions. Next to this column is the Signal column. This provides a percentage indicator of how strongly you are receiving the signal from each wireless network to which you can connect. When you select a network, you will see the available information regarding this network in the site information window on the right.
If you want to remove a profile, select it in the list and click Delete. Select a profile from the list and click Connect to establish a connection with that wireless device or network. Creating a Profile After you click Add, the first screen you see will prompt you for a Profile Name. Supply a name that will allow you to easily identify the profile in the Profile Setting screen. After you have entered a name, click Next.
You will then need to select the network type: Access Point or Peer to Peer. Access Point: Select this mode if you will be connecting to an access point or wireless router. This type of mode is also called Infrastructure. Infrastructure mode provides additional features, such as WEP security, power saving, and extended range. Peer to Peer: Select this mode if you will be connecting to another wireless device without the use of an access point or wireless router. This type of mode is also called Ad-Hoc.
Authentication Off Open System Shared Key WPA-PSK Authentication Off If you select Off, no security settings will be enabled. Click Next. On the next screen, you can select either Enable or Disable for the IP Setting. If you select Disable, click Complete to finish the profile setup.
If you select Enable, click Next to proceed to the next screen, where you can select or specify the IP address information. If you select Enable for the DHCP Status, the 802.11g Wireless USB Adapter will automatically obtain an IP address. Click Complete to finish the profile setup.
If you select Disable for the DHCP Status, you will need to enter the appropriate IP address information. You will need to do this if your computer cannot automatically obtain an IP address for the 802.11g Wireless USB Adapter. When you have entered all the information, click Complete to finish the profile setup. Open System If you select Open System, you will then need to select the level of Encryption. You can select either 64 bit or 128 bit. This encryption is known as WEP.
You can select either Alphanumeric, Hexadecimal (0-9, A-F), or Passphrase. The Passphrase is any text string with a maximum of 32 characters. Enter your key or passphrase in the Key line. After you have selected the Input Method, you will need to select the Key Index. When you are finished, click Next. On the next screen, you can select either Enable or Disable for the IP Setting.
If you select Disable, click Complete to finish the profile setup. If you select Enable, click Next to proceed to the next screen, where you can select or specify the IP address information. If you select Enable for the DHCP Status, the 802.11g Wireless USB Adapter will automatically obtain an IP address.
finish the profile setup. If you select Disable for the DHCP Status, you will need to enter the appropriate IP address information. You will need to do this if your computer cannot automatically obtain an IP address for the 802.11g Wireless USB Adapter. When you have entered all the information, click Complete to finish the profile setup. Shared Key If you select Shared Key, you will then need to select the Input Method level. You can select either 64 bit or 128 bit.
You will then need to select your Input Method. You can select either Alphanumeric, Hexadecimal (0-9, A-F), or Passphrase. The Passphrase is any text string with a maximum of 32 characters. Enter your key or passphrase in the Key line. After you have selected the Input Method, you will need to select the Key Index.
When you are finished, click Next. On the next screen, you can select either Enable or Disable for the IP Setting. If you select Disable, click Complete to finish the profile setup. If you select Enable, click Next to proceed to the next screen, where you can select or specify the IP address information.
If you select Enable for the DHCP Status, the 802.11g Wireless USB Adapter will automatically obtain an IP address. Click Complete to finish the profile setup. If you select Disable for the DHCP Status, you will need to enter the appropriate IP address information. You will need to do this if your computer cannot automatically obtain an IP address for the 802.11g Wireless USB Adapter. When you have entered all the information, click Complete to finish the profile setup.
When you have made your selection, click Next. You will then need to enter a Key. When you are finished, click Next. On the next screen, you can select either Enable or Disable for the IP Setting.
If you select Disable, click Complete to finish the profile setup. If you select Enable, click Next to proceed to the next screen, where you can select or specify the IP address information. If you select Enable for the DHCP Status, the 802.11g Wireless USB Adapter will automatically obtain an IP address.
finish the profile setup. If you select Disable for the DHCP Status, you will need to enter the appropriate IP address information. You will need to do this if your computer cannot automatically obtain an IP address for the 802.11g Wireless USB Adapter. When you have entered all the information, click Complete to finish the profile setup. About: Within this section, you can view the version information for your 802.11g Wireless USB Adapter.
1 2412 X X X 2 2417 X X X 3 2422 X X X 4 2427 X X X 5 2432 X X X 6 2437 X X X 7 2442 X X X 8 2447 X X X 9 2452 X X X 10 2457 X X X 11 2465 X X X 12 2467 X 13 2472 X 14 2484 X
Contents: About the 802.11g Wireless USB Adapter Network Configuration and Planning Adapter Installation and Configuration for Windows 98SE/2000/Me/XP Navigating the Wireless Configuration Utility Troubleshooting 802.11g Wireless USB Adapter User Guide Troubleshooting Windows could not locate the drivers for the 802.11g Wireless USB Adapter. Possible Solution: The software must be installed before the 802.11g Wireless USB Adapter is connected to your computer.
D:\setup (if your CD-ROM drive uses a different letter, type that letter in place of “D”) and click OK. I accidentally clicked Cancel during the installation procedure. Possible Solution: Remove and reinsert the U.S. Robotics Installation CD-ROM into your CD-ROM drive. Repeat the installation procedure of the software before you install any hardware. My computer does not recognize the 802.11g Wireless USB Adapter. Possible Solution: The 802.11g Wireless USB Adapter may not be properly connected.
Austria 900116 Belgium (Flemish) +32 (0) 7 023 3545 (Flemish) http://www.usr.com/emailsupport/de Monday - Friday emea_modemsupport@usr.com 9:00 - 18:00 Monday - Friday (French) +32 (0) 7 023 3546 (French) Denmark +45 70 10 4030 emea_modemsupport@usr.com 9:00 - 17:00 Monday - Friday Finland +358 emea_modemsupport@usr.com 981710015 10:00 - 18:00 Monday - Friday France +33 082 507 0693 http://www.usr.com/emailsupport/fr 8:00 - 17:00 Monday - Friday Germany 0180 567 1548 http://www.usr.
Contents: About the 802.11g Wireless USB Adapter 802.11g Wireless USB Adapter User Guide Glossary Network Configuration and Planning Access Point A networking device that seamlessly connects wired and wireless networks together. AdHoc An AdHoc wireless LAN is a group of computers, each with wireless adapters, connected as an independent wireless LAN.
Contents: About the 802.11g Wireless USB Adapter Network Configuration and Planning Adapter Installation and Configuration for Windows 98SE/2000/Me/XP 802.11g Wireless USB Adapter User Guide Product Specifications for the 802.11g Wireless USB Adapter Radio: Frequency Band: Modulation Type: Navigating the Wireless Configuration Utility Troubleshooting Glossary Product Specifications for 802.11g Wireless USB Adapter > U.S.
Contents: About the 802.11g Wireless USB Adapter Network Configuration and Planning Adapter Installation and Configuration for Windows 98SE/2000/Me/XP Navigating the Wireless Configuration Utility Troubleshooting Glossary Product Specifications for 802.11g Wireless USB Adapter U.S. Robotics Corporation Limited Warranty > Regulatory Information 802.11g Wireless USB Adapter User Guide U.S. Robotics Corporation Two (2) Year Limited Warranty 1.0 GENERAL TERMS: 1.
3.4 CUSTOMER should have the following information / items readily available when contacting U.S. ROBOTICS Technical Support: · Product Model Number · Product Serial Number · Dated Proof of Purchase · CUSTOMER contact name & telephone number · CUSTOMER Computer Operating System version · U.S. ROBOTICS Installation CD-ROM · U.S. ROBOTICS Installation Guide 4.0 WARRANTY REPLACEMENT: 4.1 In the event U.S. ROBOTICS Technical Support or its authorised U.S.
5.3 TO THE FULL EXTENT ALLOWED BY LAW, THE FOREGOING WARRANTIES AND REMEDIES ARE EXCLUSIVE AND ARE IN LIEU OF ALL OTHER WARRANTIES, TERMS, OR CONDITIONS, EXPRESS OR IMPLIED, EITHER IN FACT OR BY OPERATION OF LAW, STATUTORY OR OTHERWISE, INCLUDING WARRANTIES, TERMS, OR CONDITIONS OF MERCHANTABILITY, FITNESS FOR A PARTICULAR PURPOSE, SATISFACTORY QUALITY, CORRESPONDENCE WITH DESCRIPTION, AND NON-INFRINGEMENT, ALL OF WHICH ARE EXPRESSLY DISCLAIMED. U.S.
Contents: 802.11g Wireless USB Adapter User Guide About the 802.11g Wireless USB Adapter Regulatory Information Network Configuration and Planning Adapter Installation and Configuration for Windows 98SE/2000/Me/XP Navigating the Wireless Configuration Utility Troubleshooting Glossary Product Specifications for 802.11g Wireless USB Adapter U.S. Robotics Corporation Limited Warranty Regulatory Information> FCC Declaration of Conformity These devices comply with FCC Rules Part 15.
CE Declaration of Conformity We, U.S. Robotics Corporation of 935 National Parkway, Schaumburg, Illinois, 60173-5157,USA, declare under our sole responsibility that the U.S. Robotics 802.
documentation, even if advised of the possibility of such damages. This document contains materials protected by copyright. All rights are reserved. No part of this manual may be reproduced or transmitted in any form, by any means or for any purpose without expressed written consent of its authors. Product names appearing in this document are mentioned for identification purchases only.