User Manual USB Wireless 802.11 a/b/g Adaptor V 1.
Information in this document is subject to change without notice. Microsoft, Encarta, MSN, and Windows are either registered trademarks or trademarks of Microsoft Corporation in the United States and/or other countries. Copyright reserved. © 2006 Gemtek Technology Corporation. All rights Other trademarks and trade names may be used in this document to refer to either the entities claiming the marks and names or their products.
TABLE OF CONTENTS 1 INTRODUCTION Inventory Checklist Supported Security 3 3 2 SECURITY SETTING 3 WINDOWS VISTAWIRELESS AUTO CONFIGURATION Launching Microsoft Windows Vista Wireless Network Configuration Setting the Network Key Automatically 8 Setting the Wireless Network Connection Manually 11 GLOSSARY 17 TROUBLESHOOTING 19 REGULATORY NOTICES 21 PRODUCT SPECIFICATION INDEX 26 i 24 7
ii
Introduction 1 Your PC comes with a built-in USB Wireless 802.11a/b/g adaptor which allows it to function as a Wireless Local Area Network (WLAN) connecting with other wireless product(s). This product is an IEEE 802.11a/b/g Compliant device. It features automatic rate selection and advanced security features like WEP, 802.1x, WPA/WPA2 with TKIP and AES for stronger data encryption.
4
2 Security Setting Security can be set up using WEP (Wired Equivalency Protocol), WPA (Wi-Fi Protected Access), WPA2 (Wi-Fi Protected Access 2) or 802.1X (with EAP-TLS and PEAP authentication method). It is important to set up matching security types between devices. Be certain to check the type of security on your other wireless device(s) in order to decide which type of security needs to be set up on your PC. WEP security was the original security standard provided for wireless 802.11 devices.
6
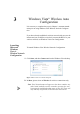
Windows Vista® Wireless Auto Configuration 3 It is necessary to complete the steps in Chapter 2, Antenna Attachment prior to using Windows Vista Wireless Network Configuration. If you have already established a wireless network with access to the internet and you would like to wirelessly connect this HP PC to your wireless network, use Windows Vista Auto Configuration. Launching Microsoft Windows Vista ® Wireless Network Configuration To launch Windows Vista Wireless Network Configuration: 1.
Setting the Network Key Automatically The PC will begin functioning in Station Mode (as a Client) with your Wireless LAN Network as soon as the Network Key is set-up. Note: If you do not have an existing wireless network you will need to set up your Wireless Router/ Access Point prior to using your PC in Station Mode. 1. Find the Network Key (WEP Key or WPA Key) for your Wireless Network. 2. Launch the Connect to a Network dialog box. (See above for instructions) 3.
6. Display characters Specifies whether you want to view the value typed in Security Key/Passphrase. Note: If your network is using WEP encryption, then a HEX or an ASCII format is necessary when entering your Network Key: z HEX: 10 characters in HEX notation for 40 bit or 26 characters for 128 bit encryption. z ASCII: 5 characters for 40 bit or 13 characters for 128 bit encryption. If your network is using WPA it is necessary to enter an 8 – 63 character alphanumeric key-phrase.
Network LAN icon, as shown below will appear in the system tray. Figure: 4.
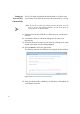
Setting the Wireless Network Connection Manually After launching the application (See Section See "Launching Microsoft Windows Vista Wireless Network Configuration" on page 7), you may click Set up a connection or network at the lower left corner to set up your wireless network connection manually.(See Figure 5.
Figure: 4.5Choose a connection dialog box 1. To manually configure the wireless settings for a wireless network, click Manually connect to a wireless network, and then click Next. Windows Vista displays the following page. Figure: 4.6Manually setup a wireless connection On the Enter information for the wireless network you want to add page, configure the following: 1. Network name Type the name of the wireless network 2.
z When the WEP (802.
the Connect to a network dialog box. To configure the properties of the wireless network you have just created, click Change connection settings. Windows Vista displays the following dialog box.. Figure: 4.8Wireless Network Connection Properties dialog box From the Connection tab, you can view the wireless network's name, SSID, network type (either Access point for infrastructure mode networks or Computer-to-computer for ad hoc mode networks), and availability.
The following figure shows the Security tab: Figure: 4.9Wireless Network Security Properties dialog box Based on the selected security type, you can configure either a network security key or specify and configure a network authentication method. If you specify WPA-Enterprise, WPA2-Enterprise, or 802.
16
G Glossary Terms Terms Continued Access Point (AP) MAC Address A hardware device (possibly a PC) Media Access Control Address. On that an can act as athe communication 802.11 network MAC address is hub used for to identify node of the network. wireless each devices enabling them to connect x Network Name See oneSSID. another. xx Network password.
Continued x MAC Address Media Access Control Address. On an 802.11 network the MAC address is used to identify each node of the network. x Network Name See SSID. x Network Key Network password. x SSID (Service Set Identifier) The unique identifier attached to the header of packets sent over a Wireless Local Area Network (WLAN). The SSID differentiates Wireless LANs from one another. For this reason an SSID must be entered on each wireless device attempting to connect on the WLAN.
Troubleshooting Problems Recommended Solutions My WPA security settings are not Verify that your Network Keys are working properly. entered correctly. If the problem persists......... Reconfigure your wireless network setting to WEP security. I am unable to see my Network name in the Available wireless networks section of the Wireless Network Connection dialog box on my HP PC. Verify your Network name and Security settings. If the problem persists.............
20
Regulatory Notices Regulatory Notices To identify this product refer to the part or model number on the product label Federal Communication Commission Notices This equipment has been tested and found to comply with the limits for a Class B digital device, pursuant to Part 15 of the FCC Rules. These limits are designed to provide reasonable protection against harmful interference in a residential installation.
This transmitter must not be co-located or operating in conjunction with any other antenna or transmitter. Operations in the 5.15-5.25GHz band are restricted to indoor usage only IEEE 802.11b or 802.11g operation of this product in the U.S.A. is firmware-limited to channels 1 through 11.
Canada (Industry Canada) This device complies with RSS-210 of the Industry Canada Rules. Operation is subject to the following two conditions: 1) this device may not cause interference and 2) this device must accept any interference, including interference that may cause undesired operation of the device This device has been designed to operate with an antenna having a maximum gain of 1.95 dBi. Antenna having a higher gain is strictly prohibited per regulations of Industry Canada.
Product Specifications Model Number WUBR180AG Functional Criteria Data Rate Up to 54 Mbps Operating Range 802.11b/g: 30m (indoor), 200 m (outdoor) Radio Signal Modulation Orthogonal Frequency Division Multiplexing (OFDM) Operating Frequency USA (FCC), Canada (IC): 802.11b & 802.11g: 2.412~2.462 GHz 802.11a: 5.150~5.250 GHz, 5.725~5.850 GHz Operating Channel USA, Canada: 11 Channels (802.11b/g) Europe: 13 Channels (802.11b/g) Physical Characteristics Power Consumption TX: 350/305mA Max in 802.
Model Number WUBR180AG Connector I-PEX Connector Gain 802.11b/g: Peak gain: 1.95dBi Radiation Omni-directional Frequency Band 2.4 ~ 2.5GHz, 4.9 ~ 5.
INDEX Numbers W 802.