
User Manual


General Description
The Genelec 7350A smart active subwoofer
is a very compact low frequency monitor,
intended to extend the bass reproduction
of Genelec 8320A active monitors in stereo
or multichannel applications and 8330A in
stereo applications. The 7350A can be used
in multichannel applications with the 8330A
when SPL capacity of the 7350A subwoofer
suits the application. 7350A can be used a
general purpose Smart Subwoofer solution
with any analog or digital audio monitor.
Driver
The 7350A contains one 205 mm (8”) low
frequency driver housed in a Genelec’s pro-
prietary Laminar Spiral Enclosure
TM
(LSE
TM
)
bass reflex cabinet.
Amplifier
The D Class power amplifier outputs 150 W
with very low THD and IM distortion. Driver
overload, amplifier thermal overload, and
driver short circuit protections are included
in the amplifier electronics.
Installation
The subwoofer is supplied with a mains
cable, a GLM network cable, and this operat-
ing manual. Inspect the subwoofer to ensure
that it has not been damaged in transport.
Check that the mains voltage marking on
the device matches your local mains voltage.
Before connecting turn off the subwoofer
and the monitors. Once all connections have
been made, the subwoofer and monitors can
be powered up.
Audio Connections
Audio connections are made with balanced
XLR cables. The 7350A has IN/OUT connec-
tor pairs for five analogue channels and an
analogue LFE channel input. There is also
one IN/OUT connector pair for AES/EBU
digital audio signal.
Connect signal cables from your audio
source to the female XLR "IN" connectors.
Next, connect XLR cables from the corre-
sponding "OUT" male XLR connectors to the
input connector of each monitor.
Connect the "LFE IN" connector to the LFE
or .1 output of a multichannel sound source.
The digital audio input (DIGITAL IN)
accepts a male XLR connector carrying an
AES/EBU formatted signal. The digital audio
signal can be routed to the next monitor or
subwoofer (DIGITAL OUT). The AES/EBU
digital audio subframe A or B is selected
using the GLM software. The default setting
for the subframe selection A+B meaning that
the subwoofer reproduces audio in both sub-
frames.
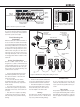
GLM Network Connection
Using the GLM Adapter all monitors and
subwoofers in the system are connected to a
computer running the Genelec Loudspeaker
Manager (GLM) software (See Figure 3.) A
GLM network cable with RJ45 connectors is
supplied with each monitor and subwoofer
for this. Start control network cabling from
the GLM Adapter to the first monitor or
subwoofer. Continue daisy-chaining to all
monitors and subwoofers in the system.
No special sequence is necessary. You can
choose the easiest control network cabling
route.
Settings and Acoustic
Calibration
The 7350A subwoofer and Smart Active
Monitors are extremely flexible in compensat-
ing the acoustic influences of the room where
the products have been installed and support
automated setup using the GLM User Kit and
software. The 7350A subwoofer is compatible
with GLM 2.0 and later.
The GLM software can be downloaded
from Genelec web site (www.genelec.com/
glm). The GLM 2.0 User Kit is needed for
the setup. The User Kit contains the GLM
Adapter and GLM measurement microphone.
The GLM Adapter is connected to the
computer USB port and the GLM network. If
the 7350A is the only smart device, the GLM
Adapter is only connected to the subwoofer.
The GLM measurement microphone is
placed at the listening location.
Execute the setup process in the GLM
software to align and set up the subwoofer
and any other smart devices as a system on
the GLM network. After calibration, keep the
computer connected to maintain the settings
or save the settings to the subwoofer using
the GLM 2.0 software.
ISS
TM
Autostart Function
Intelligent Signal Sensing
TM
(ISS
TM
) enables
less than 0.5 W standby power consumption.
As a factory default, the ISS function is
disabled. The ISS function can be enabled
and configured in the GLM software by click-
ing the “ISS Power Saving” pulldown menu.
This menu also provides selection of the
time before entering standby. Playback auto-
matically resumes once an input signal is
detected. There is a slight delay before play-
back resumes.
Placement in the Room
Subwoofer placement affects the frequency
response and sound level dramatically. At
low frequencies the acoustical effects of the
room are strong. Even a slight change in the
subwoofer's location can make a marked
difference. The placement affects the fre-
queny response, phase difference between
the monitors and subwoofer, as well as the
subwoofer roll-off rate.
Place the subwoofer on the floor, slightly
offset from the room centre line, at the front
wall. Distance to the front wall should be
less than 0.6 m (24 in) measured from the
subwoofer's driver. Proximity to the wall
can increase acoustic output and maximum
sound level. Larger distance to the wall can
cause acoustical cancellation and reduce
subwoofer output.
Moving the subwoofer slightly to the left
or right can improve the flatness of the fre-
quency response. Positioning the subwoofer
close to a corner can boost the bass level
more but may cause asymmetrical sound
imaging at low frequencies.
Use the GLM to automatically calibrate
the frequency response of the subwoofer for
maximal flatness. If the monitors are Smart
Monitors, GLM also automatically aligns the
output level and crossover phase in relation
to the monitors.
Minimum Clearances to
Walls or Other Objects
Do not cover the driver of the subwoofer.
Allow at least 10 cm (4 in) of space in front of
the driver grille.
Thick carpets under the subwoofer can
block ventilation.
Genelec 7350A Smart Active Subwoofer