
User Manual


4
NOTE 2:
In battery sleep mode, if the wall transformer is plugged into the
unit, it will take up to one minute to recognize this fact.
INSTALLATION
GENERATOR SIDE TRANSCEIVER INSTALLATION
INSTRUCTIONS
The following steps will illustrate how to mount the generator side
transceiver to the generator.
Disconnect all power sources prior to opening
the control panel.
1. Set the Auto/Off/Manual switch to the Off position.
2. Remove the 15Amp control panel fuse.
3. Disconnect the Positive battery cable.
4. Turn off the 240Vac Utility source voltage to the control
panel.
5. Remove the control panel cover.
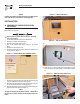
6. Remove the metal plate and rubber gasket from the back side
of the generator. (Figure 1.)
Figure 1 — Remove Metal Plate & Rubber Gasket
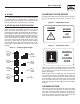
7. Remove the generator transceiver from the anti static bag and
verify the gasket is properly fitted in the groove.
8. Mount the generator transceiver to the generator using the two
(2) screws and flat washers provided (Figure 2).
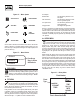
9. Plug the wire harness into the transceiver module aligning the
plug latch with the header latch (Figure 3).
NOTE:
The plug will only plug into the header one way – DO NOT force
the plug into the header; gently insert the plug until it locks into
place.
Figure 2 — Mount Transceiver
Figure 3 — Plug in Wire Harness
10. Undo the four (4) screws holding the control panel and raise
up the front end of the control panel so it's standing up (Figure
4).
Figure 4 — Stand Up Control Panel Front
Wireless Display System