
User Manual
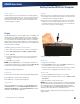
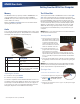
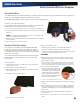
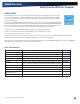
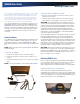
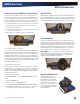
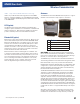
Table Of Contents
- Notices and Compliance
- Getting Started
- Getting Familiar With Your Computer
- Top View
- Left Side View
- Right Side View
- Back Edge View
- Bottom View
- Keyboard Basics
- Primary Keys
- Keyboard ergonomics
- LED Status Indicators
- Touchpad
- Display
- Memory
- Audio
- The PC Card Slot
- The Hard Disk Drive
- The Optical Disk Drive (option)
- Smart Card or EXPRESS Card Slot (option)
- Computer Security
- ENERGY STAR®
- Ports and Connectors
- Making Connections
- Wireless Communication
- Operating with Battery Power
- Customizing Your BIOS Settings
- Optional Equipment and Accessories
- Maintenance
- Service
- Troubleshooting
- Application Troubleshooting
- Battery Troubleshooting
- Display Troubleshooting
- Hard Disk Troubleshooting
- Keyboard and Mouse Troubleshooting
- Modem Troubleshooting
- Miscellaneous Troubleshooting
- The computer shuts off unexpectedly
- The speaker volume is too high or too low
- The computer won’t turn on
- The computer will not come on when the power button is pressed but the power, external power and battery indicators flash in sequence.
- The computer won’t turn off
- The computer enters suspend mode too quickly
- The computer doesn’t automatically suspend
- The system date and time are incorrect
- I receive an “out of memory” error message
- PC Card Troubleshooting
- FAQs
- I’ve heard that cleaning up and rearranging files on the hard drive will improve the startup speed of my programs. How do I do this?
- How do I adjust the volume?
- How do I change the battery?
- How long will the battery last?
- How do I change the display brightness?
- How do I clean the display?
- How do I calibrate the touch screen?

General Dynamics Itronix | 72-0136-004
GD6000 User Guide
Getting Familiar With Your Computer
Memory
The GD6000’s memory capacity is 1024 to 4096MB with one
user accessible memory socket supporting a 1024MB or
2048MB memory module. Please consult your dealer if you
need to add more memory.
Refer to the Memory Upgrade section for information about
replacing the memory module.
Audio
Your computer includes 16-bit high-fidelity stereo audio output
and an integrated microphone. The speakers are located above
the display. The microphone is under the display.
# Feature Description
1 Speakers Integrated stereo speakers for
audio output.
2 Microphone Integrated microphone for audio
input.
3 Audio in/out jacks Attach an external microphone or
speakers using the jacks on the left
side of the computer.
Adjusting the Volume
To increase volume, press FN+F9
To decrease volume, press FN+F8
You can also adjust the volume with the Windows volume con-
trol applet located on the taskbar. However, the volume control
function keys override the Windows volume control applet. If
your volume is too low or too high after setting the volume in
the applet, adjust the volume with the function keys.
The PC Card Slot
The computer has a built-in CardBus PC Card slot on the right
side of the computer that can accommodate one Type II PC
Card. It accepts credit-card sized cards that enhance the usabil-
ity and expandability of the computer. The PC Card slot can
be used as an interface between your computer and a variety
of communications devices, such as network adapters, SCSI
adapters, or fax/modems. They can also be used to provide
additional data storage capacity. Please consult your dealer
for PC Card options available that you can purchase for your
computer.
note Refer to your card’s instructions on how to install and
use the card and its functions.
Inserting a Card
1. The top side of a PC Card is usu-
ally identified with a label. Insert
the card into the slot with the top
up and the edge with pinhole
contacts going in first. You will
feel some resistance as the card
slides into the back of the slot.
2. PC Cards require drivers, or a
program that allows the operat-
ing system A set of programs
that manage the overall operation of the computer. to use a
specific device. Many drivers are included with Windows, but
if not, you will be prompted to install the driver included with
your card.
3. The computer will beep twice to indicate successful installation.
A single beep means that there was a problem recognizing the
card.
note Please read the instructions included with individual
PC Cards. Some cards may be inserted with power on, while
others require that the computer be turned of.
Ejecting a Card
For Windows XP and Windows Vista:
1. First, exit the application using the card.
2. Left-click on the Safely Remove Hard-
ware
icon on the taskbar and stop
the card operation.
3. Press the slot eject button once to pop it out; then press it again
to eject the PC Card.