
User Manual
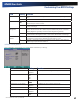
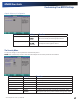

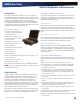
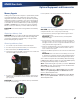
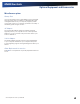
Table Of Contents
- Notices and Compliance
- Getting Started
- Getting Familiar With Your Computer
- Top View
- Left Side View
- Right Side View
- Back Edge View
- Bottom View
- Keyboard Basics
- Primary Keys
- Keyboard ergonomics
- LED Status Indicators
- Touchpad
- Display
- Memory
- Audio
- The PC Card Slot
- The Hard Disk Drive
- The Optical Disk Drive (option)
- Smart Card or EXPRESS Card Slot (option)
- Computer Security
- ENERGY STAR®
- Ports and Connectors
- Making Connections
- Wireless Communication
- Operating with Battery Power
- Customizing Your BIOS Settings
- Optional Equipment and Accessories
- Maintenance
- Service
- Troubleshooting
- Application Troubleshooting
- Battery Troubleshooting
- Display Troubleshooting
- Hard Disk Troubleshooting
- Keyboard and Mouse Troubleshooting
- Modem Troubleshooting
- Miscellaneous Troubleshooting
- The computer shuts off unexpectedly
- The speaker volume is too high or too low
- The computer won’t turn on
- The computer will not come on when the power button is pressed but the power, external power and battery indicators flash in sequence.
- The computer won’t turn off
- The computer enters suspend mode too quickly
- The computer doesn’t automatically suspend
- The system date and time are incorrect
- I receive an “out of memory” error message
- PC Card Troubleshooting
- FAQs
- I’ve heard that cleaning up and rearranging files on the hard drive will improve the startup speed of my programs. How do I do this?
- How do I adjust the volume?
- How do I change the battery?
- How long will the battery last?
- How do I change the display brightness?
- How do I clean the display?
- How do I calibrate the touch screen?

General Dynamics Itronix | 72-0136-004
GD6000 User Guide
Optional Equipment and Accessories
Memory Upgrade
Adding memory allows the computer to operate faster, handle
more tasks simultaneously, and work more smoothly with
large files. Users who increase memory demands - by adding
additional programs, for example - may notice a slowdown in
operating speed, and wish to increase memory. The GD6000
comes with one user accessible memory socket supporting a
1024MB or 2048MB memory module for memory upgrades.
Please consult your dealer if you need to add more memory.
Caution First read and follow the guidelines in the Safety
section.
Replacing a Memory Card
Caution Memory modules can be easily damaged by static
electricity. Leave the module inside its static-proof bag until
it is ready for installation and make sure you are grounded
before attempting this procedure.
Removing a Memory Card
1. Turn off the computer and disconnect the AC adapter.
2. Turn the computer upside down and lay it on a flat surface.
3. Remove the battery (see Battery Removal).
4. Carefully remove the two RAM compartment cover screws and
remove the RAM compartment cover (1).
5. If a memory card is inserted, use your finger to gently pull the
tabbed latches in the direction of the arrows (2). The card will
pop up slightly.
Caution Do not use tools to pull the memory card latches.
Tools may cause damage.
6. Pull upwards on the card and then slide the card out (3).
Inserting a Memory Card
Caution Only use memory cards approved for use in your
computer. Failure to do so may void your warranty.
1. Hold the memory card by its edges with the edge-connector
side towards the slot.
Caution Do not touch the memory card anywhere
except the edges.
2. Hold the card at a shallow angle (about 25 degrees) and insert
the edge connector into the connector slot. The “gold teeth” of
the edge connector should no longer be visible when the card
is fully inserted. (See image 3 above).
3. Press the card downwards so that it is flat inside the compart-
ment. You may hear an audible click as the latches of the con-
nector lock the card in place.
4. Replace the RAM compartment cover and secure it with the two
screws.
Caution If the cover does not close easily, do not force
it. The memory card may not be properly installed. Careful-
ly remove and reinstall the card following the steps above.
Your notebook computer will automatically detect the change
in RAM capacity when it restarts. You can verify RAM capacity
has changed in the Setup Utility or in Windows:
setuP: Press F2 during boot-up when you see the “Press F2 to
enter Setup” prompt. The information menu shows the base
memory and the extended memory.
WindoWs xP: Right click on My Computer and select Prop-
erties to open System Properties. The General tab lists the
memory detected by Windows.
WindoWs vista: Right click on Computer and select Proper-
ties to open the System Screen. This will show the memory
detected by Windows.