GD8000 User Guide German French Spanish General Dynamics Itronix | 72-0137-001
GD8000 User Guide Table of Contents Notices, Compliance and Safety..........................5 Copyright Notices................................................. 5 Disclaimer.............................................................. 5 Trademark and Patent Notice............................. 5 Compliance Statements...................................... 5 Compliance Statement for Canada.................... 6 Fax Branding......................................................... 6 Warnings and Cautions......
GD8000 User Guide Table of Contents Wireless Communication.....................................29 WLAN radio option............................................ 29 About WLAN...................................................................... 29 Tip 6. Clean terminals........................................................ 36 Tip 7. Storing batteries....................................................... 36 Customizing Your BIOS.........................................37 UMTS/GPRS/GSM Network...........
GD8000 User Guide Table of Contents Option 1: Restoring System Information . ....................... 50 I can’t remove the PC card................................................ 54 Option 2 : Restoring a Backup . ........................................ 50 Read Error........................................................................... 54 Option 3: Restoring Drive C:.............................................. 50 The computer locks up when I remove the PC card........
GD8000 User Guide Identification: GD8000 User Guide Copyright Notices © Copyright 2009 General Dynamics. All rights reserved. No part of this document may be reproduced, transmitted, transcribed, stored in a retrieval system, or translated into any other language or computer language in whole or in part, in any form or by any means, whether it be electronic, mechanical, magnetic, optical, manual, or otherwise, without the prior written consent of General Dynamics Itronix Corporation, 12825 E.
GD8000 User Guide Notices, Compliance and Safety company will provide advance notice in order for you to make the necessary modifications in order to maintain uninterrupted service. If trouble is experienced with this equipment, please contact the equipment manufacturer for repair and/or warranty information. Do not attempt repairs of this equipment yourself without obtaining manufacturer authorized parts and documentation.
GD8000 User Guide Notices, Compliance and Safety Only the antenna with which an intentional radiator is authorized may be used with the intentional radiator. The WAN embedded antenna location is in the upper center edge of the display screen and is not to be modified. The WPAN embedded antenna location is near the lower left edge of the Keyboard and is not to be modified.
GD8000 User Guide Notices, Compliance and Safety instructions are followed. Adjust only those controls that are covered by the instructions in this manual. If the product exhibits a distinct change in performance, indicating a need for service. Before performing any manufacturer authorized service or upgrade, first follow these instructions: Prevent damage from static electricity by following ESD precautions. Place Turn the computer on a clean, flat surface.
GD8000 User Guide Standard Features DynaVue® Touch Screen Display Shock-mounted, ruggedized, removable Hard Disk Drive with heater Fully-rugged magnesium case Full-size keyboard with embedded numeric keypad and 12 function keys Touchpad Capacitive Internal Switch: The lid switch can be configured to suspend your computer when the lid is closed and to resume when the lid is opened.
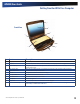
GD8000 User Guide Getting Familiar With Your Computer 1 Front View 2 3 11 4 5 10 6 9 7 8 # Feature Description 1 Display Latch The display latch holds the display when closed 2 Display 13.
GD8000 User Guide Getting Familiar With Your Computer Left Side View 1 # Icon 2 3 4 5 6 7 8 9 Feature Description 1 Back Handle Mount The back handle mount, located on both sides of the computer is used with an optional back handle 2 DC-in Jack Connects to an AC power adapter 3 Network Jack (RJ45/LAN) Connects to an Ethernet-based network. Connection speed is 10/100/1000 Mbps 4 Modem Jack (RJ11) Connects a phone line to the internal fax/data modem.
GD8000 User Guide Getting Familiar With Your Computer Right Side View 1 # Icon 2 3 4 5 Feature Description 1 Three USB 2.0 Ports Connects to USB devices (e.g., USB digital camera) 2 Serial Port Connects your computer to serial devices such a fax/modem or a serial mouse.
GD8000 User Guide Getting Familiar With Your Computer Bottom View 1 10 2 9 8 3 7 4 6 5 # Feature Description 1 Dual External Antenna Connector (DEAC) The DEAC gives you the ability to switch the internal WLAN and WWAN to an external antenna to gain better performance when you are in a vehicle.
GD8000 User Guide Getting Familiar With Your Computer Keyboard Basics The GD8000 features: Full size, glow-in-the-dark (GID) keys on a 85-key keyboard Twelve function keys Embedded numeric keypad Application Radio Launch Key (programmable button) ON/OFF Switch (option) Ergonomically designed wide palm rest located below the keyboard. Primary Keys Key Description Alt The Alt (alternate) key is used with other keys to perform special tasks.
GD8000 User Guide Getting Familiar With Your Computer Arrow Keys The arrow keys are defined by the software application. up arrow: usually moves the cursor up one line. In some cases, you can use the up arrow to make selections from menus and scrollable list boxes. Arrow Keys down arrow: usually moves the cursor down one line. In Windows, you can use the down arrow to make selections from menus and scrollable list boxes. right arrow: usually moves the cursor one character position to the right.
GD8000 User Guide Getting Familiar With Your Computer Numeric Keypad Standard Key Key with Numlock On 7 7 8 8 9 9 0 * U 4 I 5 O 6 P - J 1 K 2 L 3 ; + M 0 . . / / Enter Carriage Return The embedded numeric keypad consists of sixteen keys that make number intensive input more convenient. It is indicated by small characters located on the lower right corner of the key. Press NumLk to enable or disable the numeric keypad.
GD8000 User Guide Getting Familiar With Your Computer Windows Keys The keyboard has two keys that perform Windows-specific functions. Key Icon Windows Logo Key Description Start button. Combinations with this key perform special functions.
GD8000 User Guide Getting Familiar With Your Computer Touch Screen Display The GD8000 features a 13.3-inch, XGA, outdoor-viewable, color display with an integrated touch screen. You can start programs and input data on the touch screen using an approved pen (stylus) that comes with the computer. The Colorvue™ Transmissive display technology uses a built-in backlight for easy reading in most ambient light conditions.
GD8000 User Guide Getting Familiar With Your Computer Auto Dim Feature Cursor Visibility To save the battery power, your computer automatically dims the display when the computer is not attached to external power. To improve the visibility of the mouse cursor, you should: NOTE You may still use the display brightness function keys (Fn+F6 and Fn+F7) to adjust display brightness. See Managing Power for more information on power management features.
GD8000 User Guide Getting Familiar With Your Computer LED Status Indicators The activity indicators, located above the keyboard, light up when a particular function of the computer is active. Each indicator is marked with an icon.
GD8000 User Guide Getting Familiar With Your Computer LED Icon LED Description Power Lit Flashing Power is ON Suspend to RAM Wireless Modem Lit LED off One or more installed radios are ON All installed radios are OFF Audio Your computer includes 24-bit high-fidelity stereo audio output and an integrated microphone. You can also attach external audio devices via the audio in and out jacks on the left side of the computer.
GD8000 User Guide Getting Familiar With Your Computer Ejecting a Card 1. First, exit the application using the card. 2. On the taskbar, left-click on the Safely Remove Hardware icon or . 3. Press the slot eject button once to pop it out; then press it again to eject the PC Card. PC Card Eject Button Touchpad Touchpad The integrated touchpad is a pointing device that senses movement on its surface so the cursor responds as you move your finger over of the touchpad.
GD8000 User Guide Getting Familiar With Your Computer Smart Card or EXPRESS Card Slot (option) Your computer comes with a Smart Card Reader or ExpressCard slot (option) that supports ExpressCard/34 and ExpressCard/54. This slot is located on the left side of the computer. To Insert a Card Insert the compatible card with the label side up into the slot until it clicks into place. The card will appear as a removable storage device that you can copy files to and from. To Remove a Card 1.
GD8000 User Guide Getting Familiar With Your Computer Hard Disk Drive Heater To Change Swappable Media Bay Device The hard disk drive heater warms the HDD before spinning up in temperatures below 5°C, the minimum safe operating temperature for the HDD. The heater is integrated and operates as needed when the computer is on. If the temperature is below 5°C when booting or resuming you will see the message “Warming internal hard drive. Please wait...”.
GD8000 User Guide Getting Familiar With Your Computer remove a disk while this light is active. Smart Card Reader (Option) If your computer has the Smart Card Reader option, you can use smart card technology for added security. Precautions for Handling DVDs and CDs Keep these precautions in mind when handling DVDs and CDs: Always hold the disk by the edges; avoid touching the surface of the disk Use a clean, dry, cloth to remove dust, smudges, or fingerprints.
GD8000 User Guide Getting Familiar With Your Computer Ports and Connectors Icon Connection Location RJ-11 Phone line/modem (internet and fax) Left Side RJ-45 Ethernet Left Side DC-in AC Adapter (power) Left Side 3 USB Universal Serial Bus 2.
GD8000 User Guide Making Connections This section describes how to connect peripherals and hardware options that help you maximize your computer’s features. To Use the Vehicle Adapter (optional) 1. Insert the vehicle adapter’s power cord into the DC-in jack on the left side of the computer. Before connecting peripherals, first read the manual included with the peripheral for connection and operation instructions. You can purchase most of these and other options directly from authorized dealers. 2.
GD8000 User Guide Making Connections Ethernet (LAN) connect to the line-out jack. With the built-in Ethernet LAN, you can make LAN connections with 10/100/1000 Mbps connection speed. To use the network feature, connect an Ethernet cable from the network jack on the left side of the computer to a network jack or hub on your network.
GD8000 User Guide Wireless Communication Your GD8000 supports up to four integrated radios for superior wireless communication (One radio per category listed below).
GD8000 User Guide Wireless Communication compatibility to support slower technologies when necessary to provide the greatest possible coverage to the user. do degrade the signal and reduce its range. EVDO Rev. A Antennas EVDO Revision A (1x Evolution-Data Optimized) is a wireless radio broadband data standard that offers download speeds up to 3.1 Mbps (500 to 800 Kbps typical). Revision A integrates faster data technology and improves latency.
GD8000 User Guide Wireless Communication Improving Radio Coverage Radio connectivity between your computer and your wireless network may vary at different times of the day and in different types of weather. It may also be influence by terrain, buildings or even a crowded room. Follow these tips to improve radio coverage between your computer and your wireless network, depending on your location. On the Street Try all sides of a building to see which side provides the strongest radio signal.
GD8000 User Guide The computer operates on AC or battery power. This section contains the information you need to know to operate the computer on battery power and describes how your computer manages and saves power. Effective use of power management options can greatly conserve and extend your battery life. Be sure to read the Battery Safety and Precautions section. Frequently Asked Battery Questions Does it harm the Li-Ion battery pack to frequently “top off” the batteries? No.
GD8000 User Guide Operating with Battery Power When to Replace the Battery Over time, the battery’s capacity gradually decreases. We recommend that you replace your battery if it no longer provides 70% of its original rated capacity. WARNING Only use approved batteries when replacing the battery. Heat Considerations To Install the Battery: 1. Turn the computer over so you are looking at the bottom. 2. Line up the battery connector. 3. Press gently on the battery until it clicks into place.
GD8000 User Guide Operating with Battery Power Monitoring Battery Power Windows Vista Battery Calibration 1. Right click on the DynaPower icon 2. Select DynaPower Battery Calibration from the menu on the left side of the screen. The Calibration window will pop up asking if you’d like to start the calibration process. in the Taskbar. NOTE The battery calibration process may take up to 8 hours to complete. 3. Select Start to begin calibrating or Cancel to Exit.
GD8000 User Guide Operating with Battery Power referred to as Suspend to RAM. When the computer returns from Standby mode, the desktop appears with the same files and programs open as when the computer was suspended. Resume time is very quick. For Windows Vista Select Start, Turn off computer, Stand by to enter Standby/Sleep mode. For Windows XP: Select Start, Shut Down, Stand by to enter Standby/Sleep mode.
GD8000 User Guide Operating with Battery Power 2. Select the Performance tab to view running applications, and the Process tab to view running processes. 3. Watch the CPU Usage. It is okay if the processor usage is occasionally 100 percent, but if it is 100 percent most of the time, this may indicate a problem. Tip 7. Storing batteries Stored Li-Ion battery packs gradually deteriorate, particularly if they are not stored in ideal conditions, and their life expectancy decreases.
GD8000 User Guide Customizing Your BIOS When you turn your computer on, the system reads the BIOS Settings to test and initialize components and make sure everything runs properly when the system is operating. You can use the Setup Utility to change your computer’s startup configuration. For example, you can change your system’s security routine. The GD8000 is configured with a set of default values. The default values may not be appropriate for your work environment.
GD8000 User Guide Customizing Your BIOS The Main Menu You can change the system date and time on the main menu, and view processor and memory information. Field Setting Description AMIBIOS Version N/A Displays the AMIBIOS version detected during boot up. This is a display only field. Motherboard NA Displays the motherboard version detected during boot up. This is a display only field. Processor N/A Displays the processor type and speed detected during boot up. This is a display only field.
GD8000 User Guide Customizing Your BIOS The Advanced Menu Field Setting Description Trusted Computing sub-menu Configure settings related to Trusted Computing Security SuperIO Configuration sub-menu Configure SuperIO Chipset Fan Learning Function sub-menu Fan calibration (learning) will take about two (2) minutes to finish.
GD8000 User Guide Customizing Your BIOS Super I/O Configuration Field Setting Description Serial Port1 Address Disabled Allows the BIOS to select Serial Port1 Base Addresses. 3F8/IRQ4 3E8/IRQ4 2E8/IRQ3 Serial Port2 Address Disabled 2F8/IRQ3 Allows the BIOS to select Serial Port2 Base Addresses. 3E8/IRQ4 2E8/IRQ3 Serial Port2 Mode NORMAL Allows the BIOS to select the mode for Serial Port2.
GD8000 User Guide Customizing Your BIOS Fan Learning Function Field Setting Description Start Fan Learning OK If FAN PWM shows DFLT the fan learning process has not been previously performed. To begin the learning process press Enter. It will take about 120 seconds to finish. The keyboard will not work during fan learning. Cancel NOTE Fan learning is not required for fan function. It is a calibration process to optimize fan speed control.
GD8000 User Guide Customizing Your BIOS Field Setting Desription Stealth Mode Disabled Enable or disable stealth mode. If disabled, the computer functions normally and the options listed below are not accessible. Off Off: LEDs are disabled On: LEDs function normally Off The fan is disabled. Heat management is then controlled solely through throttling. The fan functions normally Off Off: Volume is set to 0 across suspend/resume and boot. Use the existing audio function keys to adjust volume.
GD8000 User Guide Customizing Your BIOS Field Setting Description LID Open Wakeup Disabled If enabled, opening the display lid will wake up the system. Disabled If enabled, the power button will turn on the LCD if it is off. Disabled Use this option to conserve battery life. When enabled, the display will dim automatically when AC power is removed. VGA Share Memory Size 32MB 64MB Select the amount of system memory that will be used by the internal graphics device.
GD8000 User Guide Customizing Your BIOS Radio Configuration sub-menu Field Bluetooth Wireless LAN CRMA Express Setting Description Disabled Turn the Bluetooth radio on/off during a system reboot. Enabled Disabled Turn the WLAN port on the Mini PCI WLAN or MiniCard WLAN on/off during a system reboot. Disabled Turn the CRMA Express radio on/off during a system reboot.
GD8000 User Guide Customizing Your BIOS The Security Menu Field Setting Description Change Supervisor Password Enter New Password Install or Change the Supervisor password. This field must be set before a user level password can be set. You will be prompted to set and then verify a new password. Type in six or fewer keystrokes. If you make an error, press Esc to start over. Change User Password Enter New Password Install or Change the User password.
GD8000 User Guide Optional Equipment and Accessories The GD8000 computer has several equipment and accessory options to further enhance your mobile computing experience from an optional shoulder strap to docking solutions. Click here for a current list of optional peripherals and accessories. To connect the vehicle adapter 1. Insert the vehicle adapter power cord into the power port on the computer. 2.
GD8000 User Guide Optional Equipment and Accessories CAUTIONS to Battery Tips for recommended charging temperature ranges and other recommendations Refer If you charge the battery daily rely on the gas gauge reading to determine battery capacity. The gas gauge may show that the battery is full while still charging. This happens because the charging process is trying to put a little more capacity into the battery. External power can be removed at this time since the battery is virtually full.
GD8000 User Guide Maintenance and Storage Taking care of your AC adapter The GD8000 is rugged and weather resistant and you can use it under a wide range of environmental conditions. However, to ensure long use and continued high performance, follow these tips and precautions: Do Taking Care of Your Computer When all warnings and instructions noted in this documentation and in the operating system documentation. Do not step on the power cord or place anything on top of it.
GD8000 User Guide Maintenance and Storage Dispose of used batteries according to local regulations. Recycle if at all possible. exposing batteries to extremely hot or cold temperatures for long periods. To prevent possible damage to the battery, the GD8000 does not allow the battery to charge if the internal temperature of the battery gets too low (< 5°C or < 41°F) or too high (> 50°C or > 122°F).
GD8000 User Guide Maintenance and Storage Data Backup Regularly backup your data to ensure the greatest data integrity, provide the fastest recovery options, and minimize downtime. After you have installed all applications and have your computer configured as desired, create a backup of drive C: using the Hard Disk Backup and Recovery Utility. Then use the Windows Backup Utility frequently to backup data. It is recommended you set the backup utility to run automatically.
GD8000 User Guide Service and Support We are committed to providing you world class support services that ensure the lowest total cost of ownership for your hardware investment. The icareServices program will help you maximize end user productivity and decrease overall system operating cost.
GD8000 User Guide Troubleshooting This section is designed to help you determine and fix issues you might encounter while operating the GD8000 computer. Try the following things in order: Battery Troubleshooting First To look through the categories in this section for a solution. If you are having a problem with a computer application, use the Help that comes with the application to find a solution.
GD8000 User Guide Troubleshooting The gas gauge isn’t full after charging the battery I can’t see the cursor while using the DOS editor This may indicate that the charging process terminated prematurely. Press Fn+Ins to change from insert mode to overwrite mode and enable a block cursor. When it defaults to insert mode, the DOS editor uses an underline cursor which is less visible than the block cursor for overwrite mode.
GD8000 User Guide Troubleshooting Keyboard and Mouse Troubleshooting PC Cards Something unexpected happens when I press a key I can’t remove the PC card You may have pressed a key combination that performs a Windows function. Make sure you are pressing the correct keys for the application you are running. Press Incorrect characters appear on the screen when I press certain keys You may be in Num Lock mode. Press Num Lock to toggle Num Lock mode off.
GD8000 User Guide Troubleshooting one and select End Task. Repeat this until all programs are closed. 4. Select Start, Shut down, Shut down again. 5. If that still does not work, press ctrl+alt+del and select Shut Down. 6. If that still does not work, press and hold the Power Button for approximately ten seconds and then release it. For Windows Vista: Select Start, Control Panel. Then select Clock, Language and Region. Under Date and Time, make the appropriate changes.