
User's Manual

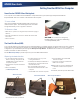
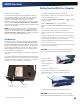
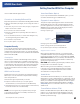

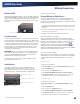
Table Of Contents
- Notices, Compliance and Safety
- Getting Started
- Getting Familiar With Your Computer
- Front View
- Left Side View
- Right Side View
- Back Edge View
- Bottom View
- Keyboard Basics
- Radio ON/OFF Switch (option)
- Application Launch Key
- Touch Screen Display
- Lid Switch
- LED Status Indicators
- Audio
- The PC Card Slot
- Touchpad
- Smart Card or EXPRESS Card Slot (option)
- The Hard Disk Drive (HDD)
- The Media Bay
- Computer Security
- Ports and Connectors
- ENERGY STAR®
- Making Connections
- Wireless Communication
- Operating with Battery Power
- Customizing Your BIOS
- Optional Equipment and Accessories
- Maintenance and Storage
- Service and Support
- Troubleshooting
- Application Troubleshooting
- Battery Troubleshooting
- Display / Touch Screen
- The display performance is slow
- I can’t read the display
- The underlined, inverse, and hypertext characters are difficult to read on the screen
- I can’t see the cursor while using the DOS editor
- I changed my display resolution, but I see no difference on the screen
- Nothing happens when I try to use the stylus on my touch screen
- The touch screen doesn’t respond after a suspend
- Hard Disk
- Keyboard and Mouse Troubleshooting
- Modem Troubleshooting
- PC Cards
- Miscellaneous Troubleshooting
- The computer shuts off unexpectedly
- The speaker volume is too high or too low
- The computer won’t turn on
- The computer won’t turn off
- The computer enters suspend mode too quickly
- The computer doesn’t automatically suspend
- The system date and time are incorrect
- I receive an “out of memory” error message
- Holding down the Power button to reset the computer doesn’t always work
- The computer doesn’t make any sounds, even during boot-up
- The fan stopped running
- Can I improve the startup speed of my programs by cleaning up and rearranging files on the hard drive?

General Dynamics Itronix | 72-0137-001
GD8000 User Guide
Hard Disk Drive Heater
The hard disk drive heater warms the HDD before spinning
up in temperatures below 5°C, the minimum safe operating
temperature for the HDD. The heater is integrated and
operates as needed when the computer is on. If the
temperature is below 5°C when booting or resuming you will
see the message “Warming internal hard drive. Please wait...”.
The unit will continue booting when it detects the HDD is warm
enough to operate safely.
NOTE If you are using the computer in a cold temperature
environment and the battery level is too low for the heater to
operate, you will see the error message “Battery too low to
warm the hard drive. Shutting down...” and the computer will
shut down. Apply external power and reboot.
The Media Bay
Depending on your configuration, your computer may have
an optional DVD multi-drive (DVD-RAM/DVD-ROM/DVD-RW/
CD-R/CD-ROM/CD-RW) or media bay battery. The multi-drive
allows you to read data from DVDs and CDs, including audio
or video CDs, and enables you to burn your data onto a CD or
DVD recordable disc. Please refer to the recording software
online help for more information.
If you have the media bay battery, it extends your unplugged
runtime.
Your notebook identifies the drive with the letter following the
hard drive and/or recovery partition letter. If your hard drive is
C, then the media bay will be E if you have a recovery partition.
It will be D if you do not have a recovery partition.
To Change Swappable Media Bay Device
1.
Make sure the computer is not accessing the media bay drive.
2.
Open the media bay door cover.
3.
Double-click the Safely Remove Hardware icon on the Win-
dows tray taskbar.
4.
Select the Media Bay device, then select Stop.
5.
Wait for the “safe to remove hardware” message, then click
OK.
6.
Turn your computer over so you are looking at the bottom.
7.
If installed, remove the screw in the media bay lock.
8.
Slide the media bay lock toward the back of the computer and
hold.
9.
While holding the media lock in the unlocked position, slide the
media bay release toward the outside of the computer. The me-
dia bay should come part way out of the computer.
10.
Grasp the media bay device by the edges and pull straight out
until it is clear from the slot.
11.
Re-insert the next media bay device by firmly pushing it back into
the slot until it clicks into place.
CAUTION Do not remove or change any hardware while
your computer is hibernating or in a Sleep/Standby state.
To Insert a Disk
1.
Open the media bay door
cover.
2.
Insert the disk into the
media bay slot.
To Remove a DVD or CD
1.
Make sure the computer is not accessing the DVD drive.
2.
Press the eject button. The disk will automatically eject.
3.
Pick up the disk by the edges and remove it from the slot.
CAUTION When the computer is reading from a DVD or
CD, the Optical Disk Drive LED will flash on. Do not attempt to
Media Bay
Screw and Lock
Media Bay
Release
Getting Familiar With Your Computer
Multi Drive Eject Button