
User's Manual

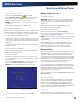
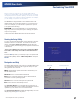
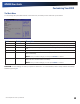
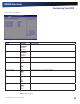
Table Of Contents
- Notices, Compliance and Safety
- Getting Started
- Getting Familiar With Your Computer
- Front View
- Left Side View
- Right Side View
- Back Edge View
- Bottom View
- Keyboard Basics
- Radio ON/OFF Switch (option)
- Application Launch Key
- Touch Screen Display
- Lid Switch
- LED Status Indicators
- Audio
- The PC Card Slot
- Touchpad
- Smart Card or EXPRESS Card Slot (option)
- The Hard Disk Drive (HDD)
- The Media Bay
- Computer Security
- Ports and Connectors
- ENERGY STAR®
- Making Connections
- Wireless Communication
- Operating with Battery Power
- Customizing Your BIOS
- Optional Equipment and Accessories
- Maintenance and Storage
- Service and Support
- Troubleshooting
- Application Troubleshooting
- Battery Troubleshooting
- Display / Touch Screen
- The display performance is slow
- I can’t read the display
- The underlined, inverse, and hypertext characters are difficult to read on the screen
- I can’t see the cursor while using the DOS editor
- I changed my display resolution, but I see no difference on the screen
- Nothing happens when I try to use the stylus on my touch screen
- The touch screen doesn’t respond after a suspend
- Hard Disk
- Keyboard and Mouse Troubleshooting
- Modem Troubleshooting
- PC Cards
- Miscellaneous Troubleshooting
- The computer shuts off unexpectedly
- The speaker volume is too high or too low
- The computer won’t turn on
- The computer won’t turn off
- The computer enters suspend mode too quickly
- The computer doesn’t automatically suspend
- The system date and time are incorrect
- I receive an “out of memory” error message
- Holding down the Power button to reset the computer doesn’t always work
- The computer doesn’t make any sounds, even during boot-up
- The fan stopped running
- Can I improve the startup speed of my programs by cleaning up and rearranging files on the hard drive?

General Dynamics ITRONIX | 72-0137-001
GD8000 User Guide
Operating with Battery Power
Windows Vista Battery Calibration
1.
Right click on the DynaPower icon in the Taskbar.
2.
Select DynaPower Battery Calibration from the menu on the
left side of the screen. The
Calibration window will pop up
asking if you’d like to start the calibration process.
NOTE The battery calibration process may take up to 8 hours
to complete.
3.
Select Start to begin calibrating or Cancel to Exit.
About Battery Calibration
Battery calibration may take up to 12 hours to complete. After
starting calibration, the application requires no further input
from the user. During calibration it goes through three steps:
1.
Charge - the battery is fully charged to 100 %.
2.
Discharge and calibrate - the battery is discharged to zero, then
calibrated but not charged. You may stop the process after this
point and let the battery charge outside of the battery calibration
application.
3.
Charge - if battery calibration continues running, the battery will
fully charge to 100%.
BIOS Level Battery Calibration
You can also calibrate the battery from within the BIOS Setup
Utility by following these steps:
1.
Plug in the AC adapter.
2.
Restart the computer. When the startup screen appears, just
prior to the Windows logo screen, press the
DEL key to enter the
BIOS Setup Utility.
3.
At the “Choose the setup function” screen, use your arrow
keys to select
Battery Calibration and press ENTER.
NOTE Make sure the AC adapter and battery are present.
4.
Choose Primary or Secondary battery and press ENTER.
Monitoring Battery Power
Low Battery Alarms
CAUTION When battery power is low, the alarm beeps or
displays a warning on your screen. Take immediate action,
such as saving files or connecting to the AC adapter or data
may be lost.
When the computer alerts you that the battery is low,
immediately do one of the following:
Connect the AC power adapter.
Save your work and then select Start, Shut Down.
Turn off the computer and replace the discharged battery with a
charged battery (see
Battery Charging).
NOTE Do not restart the computer until you have connected
to an AC adapter or replaced the discharged battery with a
charged battery.
Refer to Battery Tips for more information about how you
can conserve battery power. Refer to Managing Power for
information about how you can setup your computer to
effectively manage power for your unique use patterns.
Managing Power
Your computer has power management capability so you can
reduce the amount of energy used, especially during periods
of inactivity. Effective use of power management options
can greatly conserve and extend your battery life. The power
management unit monitors system activity, such as hard drive,
keyboard, mouse, or any devices attached to a port. If it does
not detect activity for a period of time, the computer stops
some or all of these devices to conserve energy.
Your computer employs a power management scheme that
supports ACPI (Advanced Configuration and Power Interface),
allowing for maximum power conservation and maximum
performance at the same time. Windows handles all power-
saving chores for your computer.
For more information search for Power Options in Microsoft®
Help and Support.
Low-Power States
Your computer can enter three different low-power states to
conserve power: Standby/Sleep, Hibernate and Power Off.
These states can be entered manually or after a period of
inactivity. From the Power Saver or DynaPower utilities, you
can configure the Power Button, Sleep Button (FN+F3) and Lid
Switch to initiate any of the low-power states.
Standby/Sleep
Most system devices are powered off, but the contents of
system memory are retained. Standby/Sleep is sometimes
Select Battery Calibration