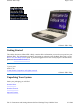
GoBook XR-1 Help Page 1 of 92 GoBook® XR-1 Help Getting Started This online document, GoBook XR-1 Help, contains all the information you need to set up and use your GoBook XR-1. For information on printing, navigating or otherwise using GoBook XR-1 Help, see the How to Use This Help System topics. If you have suggestions for how we may improve this document, please see Documentation Feedback. 72_0130_001 2006-07-10 © 2006 Itronix Corporation. All rights reserved.
GoBook XR-1 Help Page 2 of 92 Optional Parts and Accessories Where to Look For Information About Your Computer About Windows 72_0130_001 2006-07-10 © 2006 Itronix Corporation. All rights reserved.
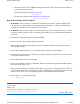
GoBook XR-1 Help Page 3 of 92 Safety Read these instructions carefully. Following these guidelines will help prevent damage to your computer and help protect your personal safety.
GoBook XR-1 Help z z z z Page 4 of 92 Do not push foreign objects into the computer through any of the slots or openings. Dangerous voltages are present, which could cause electric shock, fire, or damage sensitive components The computer is designed to withstand spills. If a spill occurs, power off the computer and wipe it down before continuing to use the computer For best results, use a power strip with a built-in surge protector.
GoBook XR-1 Help { Page 5 of 92 Remove any PC Cards, EXPRESS Cards, Smart Cards, CDs, DVDs or any other media in your computer's slots or bays { Remove the battery (See Battery Removal) { Remove the hard drive (See Hard Disk Drive Removal) Battery Pack Safety and Precautions z z WARNING! There is danger of explosion if the battery is incorrectly replaced. Replace only with the same or equivalent type recommended by the manufacturer.
GoBook XR-1 Help Page 6 of 92 Tips for New Owners z z Take responsibility for backup Back up files often. Users who need to manage large amounts of data may wish to use backup devices Create a set of recovery CDs or DVDs to recover your hard disk in case it becomes corrupted. To do this, use the Recovery CD Wizard by selecting Start, Programs, Mobile Computer Tools.
GoBook XR-1 Help Page 7 of 92 Select Start, Shut Down, Shut Down and follow the instructions on the screen. If you are going to be away from the computer for a short period, there are ways to conserve power without shutting down the system. See Power Management and Battery Tips for details. NOTE If you are unable to shut down your computer normally, follow the instructions in Troubleshooting. CAUTION Shutting off the computer improperly may result in data loss.
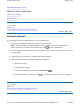
GoBook XR-1 Help Page 8 of 92 Front View Hover the mouse over each number on the picture to see a description Feature Description 1 Display Latch The display latch holds the display when closed 2 Pen / Stylus Two custom touch screen pens (styluses) are stored in slots on Slot each side of the display 3 Keyboard Standard keyboard with embedded numeric keypad 4 Fingerprint The optional swipe style fingerprint scanner can be used for all Scanner standard security uses 5 Touchpad Use like the buttons on a mo
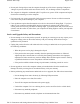
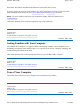
GoBook XR-1 Help Page 9 of 92 72_0130_001 2006-07-10 © 2006 Itronix Corporation. All rights reserved. GoBook® XR-1 Help Left Side View Hover the mouse over each number on the picture to see a description 1 Feature Back Handle Mount 2 3 DC-in Jack Network Jack (RJ45/LAN) 4 Modem Jack (RJ11) 5 Microphone Jack 6 Audio Out Jack Connect external speakers or a stereo headset to this jack to listen to multimedia 7 Cooling Fan Exhaust 8 External Monitor Port Cooling Fan exhaust area.
GoBook XR-1 Help Page 10 of 92 resolution) 9 Pen / Stylus Slot Two custom touch screen pens (styluses) are stored in slots located on each side of the display. Smart Card Reader or EXPRESS Depending on your configuration, use with a Smart Card Slot option Card EXPRESS Card Front Handle Mount The front handle mount, located on both sides of the unit, is used with an optional front handle. 10 11 72_0130_001 2006-07-10 © 2006 Itronix Corporation. All rights reserved.
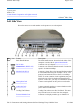
GoBook XR-1 Help Page 11 of 92 devices, such as digital cameras, to the computer 8 Back Handle Mount The back handle mount, located on both sides of the computer is used with an optional back handle 72_0130_001 2006-07-10 © 2006 Itronix Corporation. All rights reserved.
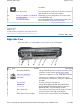
GoBook XR-1 Help 7 Media Bay Release 8 Media Bay Lock Page 12 of 92 After unlocking the media drive, slide this to release the media drive Slide this to unlock the media drive before releasing it 72_0130_001 2006-07-10 © 2006 Itronix Corporation. All rights reserved.
GoBook XR-1 Help z Full size, glow-in-the-dark (GID) keys on a 85-key keyboard z Twelve function keys z Embedded numeric keypad z Application launch button (programmable button) z Radio ON/OFF switch (option) z Ergonomically designed wide palm rest located below the keyboard. Page 13 of 92 72_0130_001 2006-07-10 © 2006 Itronix Corporation. All rights reserved. GoBook® XR-1 Help Primary Keys Key Alt Description The Alt (alternate) key is used with other keys to perform special tasks.
GoBook XR-1 Help spacebar Tab Page 14 of 92 Use the spacebar to enter a space and move the cursor one character to the right. The Tab key moves the cursor to the next tab stop or field. Tab stops are defined by your operating system or application program. Press the Tab key to move from one field or text box to another. 72_0130_001 2006-07-10 © 2006 Itronix Corporation. All rights reserved. GoBook® XR-1 Help Arrow Keys The arrow keys are defined by the software application.
GoBook XR-1 Help Page 15 of 92 Fn+F2 Display toggle Fn+F3 Standby Fn+F4 Keyboard Backlight Brightness Down Fn+F5 Keyboard Backlight Brightness Up Fn+F6 Display Brightness Down Fn+F7 Display Brightness Up Fn+F8 Audio Volume Down Fn+F9 Audio Volume Up Fn+F10 Speaker on/off Fn+Right Touchpad Alt on/off Fn+ Left Keyboard Shift backlight Switches the display output between the display screen, external monitor (if connected) and both the display screen and external monitor NOTE When a DVD or VCD is playing, t
GoBook XR-1 Help 7 8 9 0 U I O P J K L ; M . / Enter Page 16 of 92 7 8 9 * 4 5 6 1 2 3 + 0 . / Carriage Return 72_0130_001 2006-07-10 © 2006 Itronix Corporation. All rights reserved. GoBook® XR-1 Help Lock Keys The keyboard has three lock keys which you can toggle on and off. Lock Key Caps Lock Num Lock Scroll Lock Description Pressing the Caps Lock key one time locks keys A through Z in the UPPER CASE position. Pressing the Caps Lock key again returns the letters to lower case.
GoBook XR-1 Help Page 17 of 92 The Scroll Lock LED lights when the keyboard is in Scroll Lock mode. 72_0130_001 2006-07-10 © 2006 Itronix Corporation. All rights reserved. GoBook® XR-1 Help Windows Keys The keyboard has two keys that perform Windows-specific functions. Key Windows Logo Key Icon Description Start button. Combinations with this key perform special functions.
GoBook XR-1 Help Page 18 of 92 and your computer is equipped with a Radio ON/OFF switch, please use it to turn your radios off during flight. If you have radios and you do not have a switch to turn the radios off, either leave your computer off during flight or contact your help desk for assistance. The wireless Radio ON/OFF switch is the middle button above the keyboard. This switch toggles the power on and off to all radio devices. Radio devices include GPS, Bluetooth, WLAN, and WWAN radios.
GoBook XR-1 Help Page 19 of 92 3. Default Internet browser 4. Default email application 5. Notepad 6. Application of your choice with a .exe, .com or .bat extension. 3. If selecting your own application, press the "..." button and browse to the application and select Open. 4. Select the check mark button to save and close. Select the X mark button to cancel and close. 72_0130_001 2006-07-10 © 2006 Itronix Corporation. All rights reserved.
GoBook XR-1 Help Page 20 of 92 3. Select the Tools tab. 4. Select the 4 pts Calibration button for basic touch screen calibration. Select the Linearization button for better touch screen linearity. 5. Touch and hold the tip of the pen to the center of each blinking symbol as they appear on the screen until calibration is complete. 6. Select OK to save and exit. 72_0130_001 2006-07-10 © 2006 Itronix Corporation. All rights reserved.
GoBook XR-1 Help Page 21 of 92 5. Use the down arrow to select Extended Configuration and press Enter. 6. Use the down arrow to select Auto DIM and press Enter. 7. Choose Enabled or Disabled and press Enter. 8. Press F10 to save this setting and exit CMOS Setup. 72_0130_001 2006-07-10 © 2006 Itronix Corporation. All rights reserved. GoBook® XR-1 Help Adjusting Display Resolution To Adjust Display Resolution 1. Right click on the desktop. 2. Select Properties and then select the Settings tab.
GoBook XR-1 Help Page 22 of 92 To set this up: 1. Right click on the desktop. 2. Select Properties to open the Display Properties Dialogue box. 3. Select the Settings tab. 4. Click on the "2" in the Monitors section. 5. Check "Extend my Windows desktop onto this monitor". 6. Select Apply and OK to save and exit. 7. Now you can drag the programs you want to view onto the external monitor. 72_0130_001 2006-07-10 © 2006 Itronix Corporation. All rights reserved.
GoBook XR-1 Help Page 23 of 92 5. Check the Wakeup box if you want the computer to resume when you open the display lid. 72_0130_001 2006-07-10 © 2006 Itronix Corporation. All rights reserved. GoBook® XR-1 Help LCD Heater The GoBook XR-1 has an CCFL heater to improve display brightness in a cold environment. The heater includes a film and heater strip that is bonded over the CCFL area of the display. It is designed to turn on when the temperature is cold enough to impact display brightness.
GoBook XR-1 Help Page 24 of 92 Display Hinge LEDs - visible when the display lid is closed # Icon Function Power 1 2 Wireless Modem LED Description Lit Power is ON Flashing Suspend to RAM Lit LED off One or more installed radios are ON All installed radios are OFF LEDs above keyboard # Icon Function Power 3 Battery 4 5 6 LED Description Lit Power is ON Flashing Suspend to RAM Lit Battery charging Flashing Low Battery LED off No battery / battery fully charged (will always be OF
GoBook XR-1 Help 7 Page 25 of 92 Communication WLAN Communication Media Bay Lit Disk Status (HW) Lit Wireless LAN, Bluetooth, and/or GPS radio(s) are on The computer is accessing the DVD/CDRW Combo, the CD-ROM, or the DVD-ROM The hard disk drive is being accessed Caps Lock Lit The keyboard is in Caps Lock mode Number Lock Lit The keyboard is in Num Lock mode Scroll Lock Lit The keyboard is in Scroll Lock mode Lit 8 9 10 11 12 72_0130_001 2006-07-10 © 2006 Itronix Corporation.
GoBook XR-1 Help Page 26 of 92 2. Gently move your thumb across the touchpad in the direction you want the cursor to move. Adjust the touchpad settings by selecting Settings, Control Panel, Mouse, Buttons. These settings allow you to change the orientation from right-handed to left-handed, and fine-tune the pointer movement and timing of clicks. To Select Objects 1. Use the touchpad to position the cursor over the object you want to select. 2.
GoBook XR-1 Help Page 27 of 92 speakers are located above the display. The microphone is on the front of the computer to the left of the display latch. You can attach external audio devices via the audio in and out jacks on the left side of the computer. 1. Integrated Speakers 2. Audio Jacks 3.
GoBook XR-1 Help Page 28 of 92 To Install a Card 1. The top of a PC Card is usually identified with a label. Insert the card into the slot with the top up and the edge with pinhole contacts going in first. You will feel some resistance as the card slides into the back of the slot. 2. PC Cards require drivers, or a program that allows the operating system to use a specific device. Many drivers are included with Windows, but if not, you will be prompted to install the driver included with your card.
GoBook XR-1 Help Page 29 of 92 72_0130_001 2006-07-10 © 2006 Itronix Corporation. All rights reserved. GoBook® XR-1 Help Smart Card or ExpressCard Slot (option) Your computer comes with a Smart Card Reader or ExpressCard slot (option) that supports ExpressCard/34 and ExpressCard/54. This slot is located on the Left Side of the computer. To insert a card Insert the compatible card with the label side up into the slot until it clicks into place.
GoBook XR-1 Help z Page 30 of 92 One ExpressCard/54 or ExpressCard/34 slot OR One Smart Card slot (option) The Hard Disk Drive Your computer features a removable, shock-mounted hard disk to provide high-capacity storage and fast access. Windows and most programs are stored here. Your GoBook XR-1 computer identifies the hard disk drive as drive C. See the BIOS Setup Utility to password protect your removable hard disk drive.
GoBook XR-1 Help Page 31 of 92 To install the hard disk drive 1. You should print these instructions before continuing. They will not be available after you shut down the computer in step two. 2. Shut down the computer and remove external power. 3. Turn the computer over so you are looking at the bottom. 4. If installed, use a Philips screwdriver to remove the two optional screws in the hard disk drive cover. 5. Flip open the HDD locks and turn both of them toward the center of the computer. 6.
GoBook XR-1 Help Page 32 of 92 If you have the media bay battery, it extends your unplugged runtime. Your notebook identifies the drive with the letter following the hard drive letter. If your hard drive is C, then the media bay will be D. To Change your swappable media bay device 1. Make sure the computer is not accessing the media bay drive. 2. Open the media bay door cover. 3. Double-click the "Safely Remove Hardware" icon the Windows tray taskbar. 4. Select the Media Bay device, then select Stop. 5.
GoBook XR-1 Help Page 33 of 92 11. Re-insert the next media bay device by firmly pushing it back into the slot until it clicks into place. To Insert a Disk 1. Open the media bay door cover. 2. Insert the disk into the media bay slot. To Remove a DVD or CD 1. Make sure the computer is not accessing the DVD drive. 2. Press the eject button. The disk will automatically eject. 3. Pick up the disk by the edges and remove it from the slot.
GoBook XR-1 Help z z Page 34 of 92 Extremes in temperature may damage disks. Store disks in a cool dry place Do not use benzene, thinners, or cleaners with detergent. Only use cleaning kits designed for DVDs or CDs z Do not bend or drop the disks z Do not place objects on top of disks PC Card Slot See the PC Card Slot section for information. EXPRESS Card or Smart Card Slot See the EXPRESS Card and Smart Card Slot section for information. 72_0130_001 2006-07-10 © 2006 Itronix Corporation.
GoBook XR-1 Help z z Page 35 of 92 Supervisor Password secures your computer against unauthorized entry to critical parameters in the BIOS Utility User Password secures your computer against unauthorized use, and allows limited access to the BIOS Utility NOTE Do not forget to set your password! If you forget your password, please get in touch with your dealer or an authorized service center.
GoBook XR-1 Help Page 36 of 92 security. Trusted Platform Module (TPM) Enable or disable TPM in the System BIOS. TPM provides a platform root of trust which uniquely identifies a particular platform and provides various crypto capabilities including hardware-protected storage. 72_0130_001 2006-07-10 © 2006 Itronix Corporation. All rights reserved. GoBook® XR-1 Help Ports and Connectors Icon Ports and Connectors RJ-11 RJ-45 DC-in 3 USB 2.
GoBook XR-1 Help Page 37 of 92 72_0130_001 2006-07-10 © 2006 Itronix Corporation. All rights reserved. GoBook® XR-1 Help Making Connections Your computer is equipped with a full array of ports, connectors and bays, offering advanced communications technology. This section describes how to connect peripherals and hardware options that help you maximize your computer's features. Before connecting peripherals, first read the manual included with the peripheral for connection and operation instructions.
GoBook XR-1 Help Page 38 of 92 2. Connect the AC adapter to the DC power port on the left side of your computer. 3. Connect the AC adapter power cord to a properly grounded AC outlet. NOTE It is recommended you use a quality surge protector. To Use the Vehicle Adapter (optional) 1. Insert the vehicle adapter’s power cord into the DC-in jack on the left side of the computer. 2. Insert the 12V (cigarette lighter) adapter into the vehicle’s 12V socket, turning it slightly to make a good connection.
GoBook XR-1 Help Page 39 of 92 © 2006 Itronix Corporation. All rights reserved. GoBook® XR-1 Help Attaching an External Monitor or Video Device The notebook has a VGA monitor port on the left side so you can connect an external monitor. You may use an external monitor simultaneously with your notebook's display, instead of your notebook's display, or as an extension of your notebook's display. To attach an external monitor, perform the following: 1.
GoBook XR-1 Help Page 40 of 92 72_0130_001 2006-07-10 © 2006 Itronix Corporation. All rights reserved. GoBook® XR-1 Help Attaching USB Devices Your computer comes with three Universal Serial Bus (USB) 2.0 ports on the right side of the computer. This enables you to attach various devices such as a keyboard, mouse, scanner, or printer. USB devices can be chained together on a single cable. 72_0130_001 2006-07-10 © 2006 Itronix Corporation. All rights reserved.
GoBook XR-1 Help Page 41 of 92 © 2006 Itronix Corporation. All rights reserved. GoBook® XR-1 Help Fax/data modem You can use the fax/modem to connect to the Internet to send and receive data using the 56 Kbps V.92 protocol. When used with fax software, it can be used as a fax at 14.4 Kbps. In some countries, local regulations may not permit the use of the fax/modem designed for this system. In this case, you may use a PC Card modem.
GoBook XR-1 Help Page 42 of 92 72_0130_001 2006-07-10 © 2006 Itronix Corporation. All rights reserved. GoBook® XR-1 Help External keyboard or pointing device This computer has a keyboard with full-sized keys and an embedded numeric keypad. If you feel more comfortable using a desktop keyboard, you can connect a USB external keyboard to one of the USB ports. You can also connect a USB mouse or other pointing device to one of the USB ports. 72_0130_001 2006-07-10 © 2006 Itronix Corporation.
GoBook XR-1 Help Page 43 of 92 72_0130_001 2006-07-10 © 2006 Itronix Corporation. All rights reserved. GoBook® XR-1 Help WLAN radio option Your computer may include an integrated Wireless Local Area Network (WLAN) capability. See the radio help file on your desktop for more information. FCC Radio Frequency Interface Requirements for WLAN. This device required the product to be used indoors for the frequency range of 5.15 to 5.
GoBook XR-1 Help Page 44 of 92 CRMA Express is upgradeable and when WWAN radio technology changes, you an change with it. These radios are ideal for the mobile worker. The fast speeds from EV-DO/1xRTT/ and HDSPA/UMTS/EDGE facilitate greater productivity with fast email retrieval and fast and secure access to your information and applications. Refer to the installation instructions included with your CRMA Express module(s).
GoBook XR-1 Help Page 45 of 92 constellation of satellites and their ground stations. GPS uses these satellites as reference points to calculate positions accurate within five meters. 72_0130_001 2006-07-10 © 2006 Itronix Corporation. All rights reserved. GoBook® XR-1 Help Bluetooth (option) About Bluetooth Bluetooth is a short range, wireless technology. Bluetooth systems create a Wireless personal-area network (WPAN).
GoBook XR-1 Help Page 46 of 92 which an intentional radiator is authorized may be used with the intentional radiator. This device may contain a WLAN radio transmitter , a WAN radio transmitter and a PAN radio transmitter. To comply with FCC RF exposure requirements when using the WAN radio transmitter, a minimum separation distance of 20 cm must be maintained between the between the center of the display screen and all users/bystanders.
GoBook XR-1 Help Page 47 of 92 5. Try not to hold the unit. If possible, place it in vehicle, on a cabinet or desk. 6. If holding the unit, turn the unit in 90-degree increments to avoid shielding it with your body. 7. The signal is 1-2 feet across; therefore, moving several feet in any direction may give different results. Inside a Building 1. Move toward windows. 2. Signals do not penetrate ground; therefore, there will probably be no signal in basements. 3.
GoBook XR-1 Help Page 48 of 92 Be sure to read the Battery Safety and Precautions section. Frequently Asked Battery Questions Does it harm the Li-Ion battery pack to frequently “top off” the batteries? What constitutes a charge cycle? Where can general battery charge state information be obtained? What effect will temperature have on battery life and performance? 72_0130_001 2006-07-10 © 2006 Itronix Corporation. All rights reserved.
GoBook XR-1 Help Page 49 of 92 used for a long time. If the computer is to be stored for more than two weeks, we recommend you remove the battery. Battery and Temperature The battery is most efficient at room temperature. It operates in a wide temperature range but the battery capacity is affected by higher or lower temperatures.
GoBook XR-1 Help Page 50 of 92 off the computer. 2. Turn over the computer so you are looking at the bottom. 3. Slide the battery locks toward the inside of the computer to unlock the battery. 4. Gently slide the battery out of the computer. 72_0130_001 2006-07-10 © 2006 Itronix Corporation. All rights reserved. GoBook® XR-1 Help Battery Charging When you use the AC adapter to connect your GoBook XR-1 to a power outlet, the internal battery begins to recharge automatically.
GoBook XR-1 Help Page 51 of 92 System Off (suspend to RAM) 4 hours — NOTE a fully charged Li-Ion battery can power the GoBook XR-1 for approximately four to five (4-5) hours, depending on usage patterns. If your computer also has the optional Media Bay battery, it will power the GoBook XR-1 for an additional two to three (2-3) hours. Power Saving Modes Adjust the default power management settings in the Power Saver utility. Suspend Mode There are several possible settings for suspend mode.
GoBook XR-1 Help Page 52 of 92 while operating under any situation, resulting in the loss of any unsaved information. When to Replace the Battery Over time, the battery’s capacity gradually decreases. We recommend that you replace your battery if it no longer provides 70% of its original rated capacity. WARNING There is danger of explosion if the battery is incorrectly replaced. Replace only with the same or equivalent type recommended by the manufacturer.
GoBook XR-1 Help z Page 53 of 92 if the gas gauge has become inaccurate. Windows Battery Calibration To run the Battery Calibration program select Start, All Programs, Mobile Computer Tools, Battery Calibration. Then select Start to begin calibration the battery. After starting calibration, the Battery Calibration application requires no further input from the user. The calibration consists of four steps: 1. Partial Discharge - the battery is drained to a level below 85 %. 2.
GoBook XR-1 Help Page 54 of 92 GoBook® XR-1 Help Monitoring Battery Power To see how much power the battery has left, move the cursor to the Power Saver icon ( or ) in the System Tray area of the Taskbar. The status will show as a pop-up when you mouse-over the icon. Low Battery Alarms How your computer responds to a low battery condition can be set by going to Start, Settings, Control Panel, Power Options, Alarms.
GoBook XR-1 Help Page 55 of 92 Normal battery profiles by pressing Ctrl+Space. There is also an option to keep the computer awake, while at the same time, saving battery power. To Set the Power Saver Mode 1. On the System Tray area of the Taskbar, right-click the Power Saver icon (see table). Power Saver Icons Icon Description Icon The computer is on battery power and set to use the Max Life battery 2. Select the desired power profile. profile.
GoBook XR-1 Help Page 56 of 92 When the computer returns from hibernation, the desktop appears with the same files and programs open as when the computer was suspended. Hibernation saves more power than Standby, but takes slightly longer to resume. Power Off All applications are closed and the system is shutdown. To Enter Low-Power States There are various ways to initiate these low-power states.
GoBook XR-1 Help Page 57 of 92 this case, the Battery Power Indicator may indicate that the computer has stopped charging your battery; however, your battery may not be fully charged. z z If possible, turn off or suspend your computer while the battery is charging in a warm environment to avoid over-heating In warmer temperatures, your battery may take much longer to fully charge.
GoBook XR-1 Help z Page 58 of 92 Avoid or minimize using applications that keep the CPU busy a large percentage of the time. The following will help you determine if your system is running such applications: Identifying power wasting programs To determine if applications or processes are keeping the CPU busy 1. Start the Task Manager utility. To open Windows Task Manager, right-click an empty space on the taskbar, and then click Task Manager. 2.
GoBook XR-1 Help z Page 59 of 92 If you plan to store your computer for more than a few days, shutdown your computer or put it into hibernate mode. Remove the battery before storing the computer. Tip 6. Clean terminals z Dirty terminals can be a cause of charging problems. Clean battery terminals with a cotton swab dipped in isopropyl alcohol. Make sure that the alcohol has evaporated before reinstalling the battery. Tip 7.
GoBook XR-1 Help Page 60 of 92 booting. CAUTION It is recommended that you do not change any settings. If you set incorrect system option settings, the system may not run properly. 72_0130_001 2006-07-10 © 2006 Itronix Corporation. All rights reserved. GoBook® XR-1 Help Using the Setup Utility Starting the Setup Utility You can only start the Setup Utility shortly after the computer has been turned on or rebooted. To execute a controlled reboot, select Start, Shut Down, Restart.
GoBook XR-1 Help Page 61 of 92 right arrow keys to cycle through these menu screens: Main Displays basic system information and allows you to set the date and time Advanced Use to set the advanced features Boot Use to select the sequence of boot devices that are searched to load an operating system Security Use to set user and supervisor passwords Exit Use to exit the current Setup session The Field Help Window (2) is on the right side of each menu.
GoBook XR-1 Help Page 62 of 92 2006-07-10 © 2006 Itronix Corporation. All rights reserved. GoBook® XR-1 Help The Main Menu You can change the system date and time on the main menu, and view processor and memory information. Setting Field AMIBIOS N/A Version Processor N/A Function Displays the AMIBIOS version detected during boot up. This is a display only field. Displays the processor type and speed detected during boot up. This is a display only field.
GoBook XR-1 Help Page 63 of 92 72_0130_001 2006-07-10 © 2006 Itronix Corporation. All rights reserved.
GoBook XR-1 Help Page 64 of 92 Field Setting TPM Device Enabled Disabled Function Enable or disable Trusted Platform Module (TPM) device. TPM is the hardware for the TCPA (Trusted Computing Platform Alliance) specification. TPM provides a platform root of trust which uniquely identifies a particular platform and provides various crypto capabilities including hardware-protected storage. TPM Owner TPM is basically a secure micro-controller with added cryptographic functions.
GoBook XR-1 Help Page 65 of 92 Field Setting Function Serial Port1 Address Disabled Allows the BIOS to select Serial Port1 Base Addresses. 3F8/IRQ4 3E8/IRQ4 2E8/IRQ3 Serial Port2 Address Disabled Allows the BIOS to select Serial Port2 Base Addresses. 2F8/IRQ3 3E8/IRQ4 2E8/IRQ3 Serial Port2 Mode Normal Allows the BIOS to select the mode for Serial Port2.
GoBook XR-1 Help Page 66 of 92 Fan Learning Function Field Start Fan Learning Setting Start Fan Learning OK Cancel Elapsed Time N/A in Seconds Current N/A Learning Stage View Fan see screen Learning Result Function If FAN PWM shows N/A! the fan learning process has not been previously performed. To begin the learning process press Enter. It will take about 120 seconds to finish. The keyboard will not work during fan learning. NOTE Fan learning is not required for fan function.
GoBook XR-1 Help Page 67 of 92 Stealth Mode Configuration Stealth mode allows you to use the computer in an environment where sound and light could be dangerous or disruptive. If stealth mode is disabled, the LEDs, fan, system beeps, audio, and display brightness operate normally. NOTE An off setting indicates stealth mode is in effect for that option. For example, if stealth mode is enabled and the LED option is set to "off", the LEDs will NOT illuminate to indicate activity. file://C:\Documents and Set
GoBook XR-1 Help Page 68 of 92 Field Stealth Mode Setting Function Disabled Enable or disable stealth mode. If Enabled disabled, the computer functions normally and the options listed below are not accessible. LED Off LEDs are disabled LEDs function normally On Fan Off The fan is disabled. Heat management is then controlled solely through throttling. The fan functions normally On Audio Off Volume is set to 0 across suspend/resume and boot. Use the existing audio function keys to restore volume.
GoBook XR-1 Help Page 69 of 92 Radio Off On is restored to default when the brightness level is set at 0. The default level is mid-range. All wireless devices are set to off during a suspend/resume or boot. The radio on/off switch can be used to manually turn the radios on or off. The radio on/off switch functions normally and radio device power states are held though suspend/resume and boot.
GoBook XR-1 Help Bluetooth Wakeup LID Open Wakeup LCD ON By Power Button Auto DIM Page 70 of 92 Enabled Disabled Enabled Disabled Enabled Disabled Enabled Disabled Enabled If enabled, the Bluetooth radio will wake up the system If enabled, opening the display lid will wake up the system If enabled, the power button will turn on the LCD if it is off Use this option to conserve battery life. When enabled, the display will dim automatically when AC power is removed.
GoBook XR-1 Help Device 2nd Boot Device 3rd Boot Device Network Boot (PXE) Quiet Boot Page 71 of 92 CD/DVD:SM-MATSHITACD-RW CW-812 USB:USB Hotplug FDD Disabled SATA:PM-HTS541080G9SA00 CD/DVD:SM-MATSHITACD-RW CW-812 USB:USB Hotplug FDD Disabled SATA:PM-HTS541080G9SA00 CD/DVD:SM-MATSHITACD-RW CW-812 USB:USB Hotplug FDD Disabled Disabled Enabled Disabled Enabled computer should boot from first. A device enclosed in parenthesis has been disabled in the corresponding type menu.
GoBook XR-1 Help Setting Change Enter New Supervisor Password Password Field Change User Enter New Password Password Clear User Clear User Password Password? OK Cancel Password Setup Check Always Boot Sector Disabled Virus Enabled Protection Page 72 of 92 Function Install or Change the Supervisor password. This field must be set before a user level password can be set. You will be prompted for the new password, and then again to verify it. Type in six or fewer keystrokes.
GoBook XR-1 Help Page 73 of 92 You use the exit menu to leave the BIOS Setup Utility. Setting Function Field Save Changes and OK Exit system setup after saving the changes. The F10 key can be used Exit Cancel for this operation. Discard Changes OK Exit system setup without saving any changes. The Esc key can be and Exit Cancel used for this operation. Discard Changes OK Discards changes done so far to any of the setup questions. The F7 key Cancel can be used for this operation.
GoBook XR-1 Help Page 74 of 92 through your system vendor. If you use items that are not approved for use with this computer, you may cause your computer to malfunction, or to emit or receive electromagnetic radiation in excess of local regulations. For non-proprietary accessories such as PC Cards or printers, ensure that the accessory functions properly in your computer before making the purchase. Your system vendor may be able to recommend reliable brands and models.
GoBook XR-1 Help Page 75 of 92 Selecting the Right Equipment There are a number of companies that sell quality surge suppressors such as Sutton Designs, APC, and Panamax. When you are looking for a surge suppressor, consider these things.
GoBook XR-1 Help Page 76 of 92 Temperature Charging Activity <5°C (<41°F) Battery will not charge >50°C (<122°F) Battery will not charge To connect the vehicle adapter 1. Insert the vehicle adapter’s power cord into the power port on the back of the computer. 2. Insert the cigarette lighter adapter into the vehicle’s cigarette lighter socket, turning it slightly to make a good connection. The power light illuminates to indicate that current is reaching the vehicle adapter.
GoBook XR-1 Help Page 77 of 92 Charging Batteries The vehicle dock is designed to charge the computer’s battery with voltage from the vehicle battery while you are traveling. Follow the procedure below to charge a battery. To charge a battery installed in the computer 1. Place the computer onto the vehicle dock, making sure it is securely latched. 2. If charging is required it begins automatically. The Battery Power Indicator lights. 3.
GoBook XR-1 Help Page 78 of 92 1. Measure and identify an area 20 cm (8 inches) in from the edges of the vehicle roof. 2. Place the antenna within that area. To maximize RF performance, position the antenna in the center of the vehicle roof. CAUTION Do not place any metal objects on top of the dock that might make contact with the metal pins of the contact connector. Doing so may cause an electrical short and subsequent damage to the dock. 72_0130_001 2006-07-10 © 2006 Itronix Corporation.
GoBook XR-1 Help z Page 79 of 92 Shoulder Strap For a complete list of current options, click here. 72_0130_001 2006-07-10 © 2006 Itronix Corporation. All rights reserved. GoBook® XR-1 Help Maintenance and Storage The GoBook XR-1 is ruggedized and weather resistant. Handle it with the normal care required by any sophisticated electronic equipment and the computer will provide reliable service even under harsh field conditions. Follow the guidelines in this section to care for your computer.
GoBook XR-1 Help z z z z z Page 80 of 92 Slots and openings in the unit's case are for ventilation purposes. Do not block or cover these openings or the system could overheat.
GoBook XR-1 Help Page 81 of 92 any cables away from all potential traffic z z When unplugging the power cord, do not pull on the cord itself but pull on the plug The total ampere ratings of the equipment plugged in should not exceed the ampere rating of the cord if you are using an extension cord. Also, the total current rating of all equipment plugged into a single wall outlet should not exceed the fuse rating.
GoBook XR-1 Help Page 82 of 92 © 2006 Itronix Corporation. All rights reserved. GoBook® XR-1 Help Battery Maintenance Taking care of your battery pack z z Read and follow all battery precautions in the Safety section Use only batteries of the same kind as replacements. Turn the power off before removing or replacing batteries z Do not tamper with batteries.
GoBook XR-1 Help z z z Page 83 of 92 Do not intentionally drop the computer. The unit is designed to withstand the day to day rigors of the mobile environment and provide years of reliable service. The useful life of the product can be enhanced by not intentionally abusing it Whenever possible, suspend the unit by pressing Fn+F3 before moving it from one location to another.
GoBook XR-1 Help Page 84 of 92 Outside Case 1. Disconnect external power and turn off the computer. 2. Remove the battery. 3. Add a small amount of water to a soft cloth and clean the computer case. Do not use paper products because they can scratch the surface. 4. Wipe off any excess liquid with a soft cloth. 5. Reinstall the battery. CAUTION Aerosols, solvents, or strong detergents are not recommended cleaning solutions and may void your warranty.
GoBook XR-1 Help Page 85 of 92 Backup Utility to run automatically. ► Save Important System Information (WinXP only) By default, your computer is set up to automatically save certain critical information, such as the registry, on a regular basis. This information is saved as a Restore Point. You can also create Restore Points manually by using the System Restore utility. Select Start, All Programs, Accessories, System Tools, System Restore. Then, follow the instructions on the Wizard.
GoBook XR-1 Help Page 86 of 92 information. NOTE The Hard Disk Backup and Recovery Utility is only available on computers configured with a Recovery Partition. If it is not available, you will either need to contact your company's help desk about obtaining a Recovery CD or return your unit for service. 72_0130_001 2006-07-10 © 2006 Itronix Corporation. All rights reserved.
GoBook XR-1 Help Page 87 of 92 2006-07-10 © 2006 Itronix Corporation. All rights reserved. GoBook® XR-1 Help Battery Troubleshooting The battery does not charge The batteries take much longer than seven hours to charge The batteries don’t last very long The gas gauge isn’t full after charging the battery The gas gauge reads “full,” but the charging indicator light is still on My battery seems to have less and less capacity 72_0130_001 2006-07-10 © 2006 Itronix Corporation. All rights reserved.
GoBook XR-1 Help Page 88 of 92 © 2006 Itronix Corporation. All rights reserved. GoBook® XR-1 Help Hard Disk The hard disk will not spin up so the computer can’t boot up 72_0130_001 2006-07-10 © 2006 Itronix Corporation. All rights reserved.
GoBook XR-1 Help Page 89 of 92 The computer shuts off unexpectedly The speaker volume is too high or too low The computer won’t turn on The computer won’t turn off The computer enters suspend mode too quickly The computer doesn’t automatically suspend The system date and time are incorrect I receive an “out of memory” error message Holding down the Power button to reset the computer doesn’t always work The LED's, backlight, and/or keyboard backlight don't illuminate The computer doesn't make any sounds, e
GoBook XR-1 Help Page 90 of 92 I've heard that cleaning up and rearranging files on the hard drive will improve the startup speed of my programs. How do I do this? How do I adjust the volume? How do I change the battery? How long will the battery last? How do I change the display brightness? How do I clean the display? How do I calibrate the optional touch screen? 72_0130_001 2006-07-10 © 2006 Itronix Corporation. All rights reserved.
GoBook XR-1 Help z RMA status checks on service unit and warranty/service parts orders z New and refurbished platform, accessory, and add-on orders z Trial unit orders and status updates z Proof of delivery status updates for service and new unit orders z International new unit and accessory, peripheral and service parts orders z Centralized access for all invoicing and finance related issues Page 91 of 92 The majority of the above deliverables are also available through Itronix's icareServeNe
GoBook XR-1 Help Page 92 of 92 Please include the following information when submitting feedback: z Product name z Place and date of purchase z Name of online Help or other document z Topic title (for online Help) or page number z Localized document language (such as English, French, German, Spanish) z Type of feedback (for example, need for clarification, grammatical errors, incorrect information) z Your suggestion for how to improve the document 72_0130_001 2006-07-10 © 2006 Itronix Corpor
Notices and Compliance Page 1 of 3 Identification GoBook XR-1 (IX270) Help Copyright Notice © Copyright 2006. All rights reserved. No part of this document may be reproduced, transmitted, transcribed, stored in a retrieval system, or translated into any other language or computer language in whole or in part, in any form or by any means, whether it be electronic, mechanical, magnetic, optical, manual, or otherwise, without the prior written consent of Itronix Corporation, 12825 E.
Notices and Compliance Page 2 of 3 If this equipment causes harm to the telephone network, the telephone company will notify you in advance that temporary discontinuance of service may be required. If advance notice isn’t practical, the telephone company will notify the customer as soon as possible. Also, you will be advised of your right to file a complaint with the FCC if you believe it is necessary.
Notices and Compliance Page 3 of 3 Warnings and Cautions WARNING It is important that only authorized personnel service and attempt repairs on the equipment. Unauthorized service or repair may void the warranty and any maintenance contract in effect for the equipment. Unauthorized service personnel might be subject to shock hazard on some equipment if removal of protective covers is attempted. There is danger of explosion if the battery is incorrectly replaced.