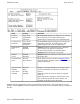
GoBook Pro Help Field Set User Password Page 38 of 74 Password on boot Setting Up to seven alphanumeric characters Up to seven alphanumeric characters Enabled Disabled Diskette access fixed disk boot sector Enabled Disabled Normal Write Protect System backup reminder Virus check reminder Disabled Daily Weekly Monthly Set Supervisor Password Function Pressing Enter displays the dialog box for entering the user password. In related systems, this password gives restricted access to SETUP menus.
GoBook Pro Help Page 39 of 74 NOTE In some systems, the User and supervisor passwords are related; you cannot have a User password without first creating a Supervisor password. In other systems, you can create and use them independently 79_0100_001 © 2001 Itronix Corporation. All rights reserved. 6. Customizing Your BIOS Topics GoBook Pro Help The Power Menu The options available in power management depend upon the hardware installed in your system. Those shown here are from a typical system.
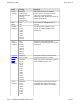
GoBook Pro Help Field Power Savings Idle Mode Standby Timeout Auto Suspend Timeout Suspend Mode Hard Disk Timeout Video Timeout Page 40 of 74 Setting Disabled Customized Maximum Power Savings Maximum Performance On Off Off 1 min 2 min 4 min 6 min 8 min 12 min 16 min Off 5 min 10 min 15 min 20 min 30 min 40 min 60 min Suspend Save to Disk Disabled 10 sec 15 sec 30 sec 45 sec 1 min 2 min 4 min 6 min 8 min 10 min 15 min Disabled 10 sec 15 sec 30 sec 45 sec 1 min 2 min 4 min file://C:\WINDOWS\TEMP\~hh63
GoBook Pro Help Resume On Modem Ring Resume On Time Resume Time Page 41 of 74 6 min 8 min 10 min 15 min Off On Off On XX:XX:XX Wakes up system when an incoming call is detected on the modem. Wakes up system at predetermined time. Predetermined time to wake up the system 79_0100_001 © 2001 Itronix Corporation. All rights reserved. 6.
GoBook Pro Help Field Removable Devices Hard Drive CD-ROM Page 42 of 74 Setting N/A N/A N/A Function Shows removable devices Shows hard drive(s) Shows CD-ROM(s) 79_0100_001 © 2001 Itronix Corporation. All rights reserved. 6. Customizing Your BIOS Topics GoBook Pro Help The Exit Menu You use the exit menu to leave the BIOS Setup Utility . ESC does not exit this menu. You must select on of the items from the menu or menu bar to exit. file://C:\WINDOWS\TEMP\~hh6357.
GoBook Pro Help Field Exit Saving Changes Exit Discarding Changes Use Setup Settings Load Setup Defaults Page 43 of 74 Function After making your selections on the Setup menus, this option stores the selections displayed in the menus in CMOS, a special section of memory that stays on after your turn your system off. It then exits the SETUP program. The next time you boot your computer, the BIOS configures your system according to the Setup selections stored in CMOS.
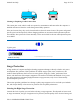
GoBook Pro Help Page 44 of 74 7. Optional Equipment and Accessories Topics GoBook Pro Help Vehicle Adapter The Vehicle Adapter is an optional device that supplies power from the vehicle battery to operate the computer and charge the battery installed in the unit. It typically connects to the vehicle battery using the cigarette lighter socket. To prevent possible damage to the battery, the system will not allow the battery to charge at extreme temperatures.
GoBook Pro Help Page 45 of 74 Vehicle Cradle The vehicle cradle is a vehicle-based docking station designed to safely secure the computer in the vehicle. A standard key lock located on the front of the cradle locks the computer onto the cradle for security purposes.
GoBook Pro Help Page 46 of 74 charging process is trying to put a little more capacity into the battery. External power can be removed at this time since the battery is virtually full. l If your battery is new or has not been used for several weeks, rely on the indicator light to determine when the battery is fully charged. The gas gauge is unreliable in these cases; it may read 100 percent, but the actual capacity is only 10 percent.
GoBook Pro Help Page 47 of 74 Cleaning or Replacing Cradle Contact Pins The contact pins on the vehicle cradle are exposed to contamination and stress when the computer is installed and removed from the cradle during normal daily operation. If the pins become dirty, they can be cleaned with an electrical contact cleaner. The power and ground pins are pins 3 and 8 respectively.
GoBook Pro Help Page 48 of 74 service. Surge Environment Surge environment refers to the damage potential from electrical surges in a particular geographical area. A high quality suppressor should be used if there is frequent lightning activity in the area and the location service is fed by overhead utility poles. Type of Equipment to be Protected If the computer is equipped with a modem, the modem should also be surge protected.
GoBook Pro Help Page 49 of 74 79_0100_001 © 2001 Itronix Corporation. All rights reserved. 7. Optional Equipment and Accessories Topics GoBook Pro Help Parallel Adapter 79_0100_001 © 2001 Itronix Corporation. All rights reserved. Maintenance and Storage The GoBook Pro is ruggedized and weather resistant. Handle it with the normal care required by any sophisticated electronic equipment, and the computer will provide reliable service even under harsh field conditions.
GoBook Pro Help Page 50 of 74 They could damage the screen. l To clean the touch screen panel, apply a household glass cleaner to a soft, clean, dry cloth and wipe the screen. 79_0100_001 © 2001 Itronix Corporation. All rights reserved. 8. Maintenance and Storage Topics GoBook Pro Help Hard Drive Care and Handling All hard drives contain media for data storage in the form of a rotating disk, read/write head(s), a motor, and electronics for interfacing and control.
GoBook Pro Help Page 51 of 74 another. This will unload the read/write heads and spin down the disk. l Maintain the environmental seal of the computer by keeping PC Card access door closed and latched. Also avoid exposing the unit to extreme temperatures or moisture when the door is open. l Periodically backup or archive important files and data. External PC Card Hard Drives Each PC Card hard drive manufacturer provides specific guidelines for the care and handling of the product.
GoBook Pro Help Page 52 of 74 Battery Maintenance and Storage Maintaining Batteries Follow these guidelines to maintain performance of Lithium-Ion (Li-on) batteries. l Avoid exposing batteries to extremely hot or cold temperatures for long periods. To prevent possible damage to the battery, the GoBook Pro does not allow the battery to charge if the internal temperature of the battery gets too low (< 5°C or < 41°F) or too high (> 50°C or > 122° F).
GoBook Pro Help Page 53 of 74 l Charge the batteries daily or whenever their capacity is low. l Operate the computer within the recommended temperature ranges of 0°C to +60°C (32°F to +140°F). Care and Cleaning Physical Inspection Periodically inspect the computer and accessories for wear, damage, loose or missing parts. Identifying and correcting potential problems early can help reduce the need to return the unit for service.
GoBook Pro Help Page 54 of 74 If keyboard problems persist, the keyboard might need to be replaced. This can be done without returning the unit for service. Contact your local support person for more information. I/O Ports Make sure the video, serial, and audio ports are operating properly. Periodically inspect the ports for damage or contamination, and make sure the cover is attached to the computer. The I/O cover can be replaced without returning the unit for service.
GoBook Pro Help Page 55 of 74 Error Messages The following are possible error and warning messages you may encounter while operating the GoBook Pro computer. The messages described in this section are listed below. Error and warning messages are generated by several different sources including: l Power On Self Test (POST) l MS-DOS l Windows l Applications A. Error Messages Topics GoBook Pro Help POST Messages When the GoBook Pro computer restarts, it tests its hardware components.
GoBook Pro Help Page 56 of 74 Keyboard controller failed test. May require replacing keyboard controller. Keyboard locked - Unlock key switch Unlock the system to proceed. Monitor type does not match CMOS - Run SETUP Monitor type not correctly identified in Setup Shadow Ram Failed at offset: nnnn Shadow RAM failed at offset nnnn of the 64k block at which the error was detected. System RAM Failed at offset: nnnn System RAM failed at offset nnnn of in the 64k block at which the error was detected.
GoBook Pro Help Page 57 of 74 Previous POST did not complete successfully. POST loads default values and offers to run Setup. If the failure was caused by incorrect values and they are not corrected, the next boot will likely fail. On systems with control of wait states, improper Setup settings can also terminate POST and cause this error on the next boot. Run Setup and verify that the wait-state configuration is correct. This error is cleared the next time the system is booted.
GoBook Pro Help Page 58 of 74 ServerBIOS2 test error: Fail-Safe Timer takes too long. device Address Conflict Address conflict for specified device. Allocation Error for: device Run ISA or EISA Configuration Utility to resolve resource conflict for the specified device. CD ROM Drive CD ROM Drive identified. Entering SETUP ... Starting Setup program Failing Bits: nnnn The hex number nnnn is a map of the bits at the RAM address which failed the memory test. Each 1 (one) in the map indicates a failed bit .
GoBook Pro Help Page 59 of 74 nnnn kB Shadow RAM Passed Where nnnn is the amount of shadow RAM in kilobytes successfully tested. nnnn kB System RAM Passed Where nnnn is the amount of system RAM in kilobytes successfully tested. One or more I2O Block Storage Devices were excluded from the Setup Boot Menu There was not enough room in the IPL table to display all installed I2O block-storage devices. Operating system not found Operating system cannot be located on either drive A: or drive C:.
GoBook Pro Help Page 60 of 74 System BIOS shadowed System BIOS copied to shadow RAM. UMB upper limit segment address: nnnn Displays the address nnnn of the upper limit of Upper Memory Blocks, indicating released segments of the BIOS which can be reclaimed by a virtual memory manager. Video BIOS shadowed Video BIOS successfully copied to shadow RAM. 79_0100_001 © 2001 Itronix Corporation. All rights reserved. A.
GoBook Pro Help Page 61 of 74 Non-System disk or disk error Replace and press any key when ready This can occur if media is in the card socket and you restart the computer. Remove the media, and then press any key. Not ready reading drive X (where X is any drive letter) Abort, Retry, Fail? Make sure that the media is inserted fully into the card socket, then press r to retry. 79_0100_001 © 2001 Itronix Corporation. All rights reserved. A.
GoBook Pro Help Page 62 of 74 l First look through the categories in this section for a solution. l If you don’t find a solution for your situation here, try one of the resources listed below. l If you are having a problem with a computer application , use the online Help that comes with the application to find a solution. l If you still cannot resolve your problem, contact the help desk at your organization. B.
GoBook Pro Help Page 63 of 74 B. Troubleshooting Topics GoBook Pro Help Batteries The battery does not charge l To prevent possible damage to the battery, the system will not allow a charge if the battery temperature is extremely hot or cold (such as in a closed, unattended vehicle). If possible, charge the battery in a location with a moderate temperature of around 20°C (68°F). l If possible, turn off the computer while the battery is charging.
GoBook Pro Help Page 64 of 74 The gas gauge isn’t full after charging the battery l This may indicate that the charging process terminated prematurely. The gas gauge reads “full,” but the indicator light is still On l If you charge your battery daily, rely on the gas gauge reading to determine battery capacity. The charging process may continue even if the gas gauge reads full. External power can be removed because the battery is virtually full.
GoBook Pro Help l Page 65 of 74 Make the online hypertext jumps black by adding the line JumpColor=0,0,0 to the [Windows Help] section of WIN.INI. I can’t see the cursor while using the DOS editor l Press FN+insert to change from insert mode to overwrite mode to enable a block cursor. When it defaults to insert mode, the DOS editor uses an underline cursor which is less visible than the block cursor for overwrite mode.
GoBook Pro Help Page 66 of 74 79_0100_001 © 2001 Itronix Corporation. All rights reserved. B. Troubleshooting Topics GoBook Pro Help I/O Ports I can’t access a serial port l Make sure another application is not using the same port . l Make sure the correct COM port is selected in your application. Refer to the online Help for your application. 79_0100_001 © 2001 Itronix Corporation. All rights reserved. B.
GoBook Pro Help Page 67 of 74 79_0100_001 © 2001 Itronix Corporation. All rights reserved. B. Troubleshooting Topics GoBook Pro Help Landline Modems The modem doesn’t work l When you first try to use HyperTerminal or similar application , the system responds with a message asking if you want to install the modem. Answer “Yes” to this question and follow the instructions on the screen to install it. l Make sure the communication settings are correct in your application.
GoBook Pro Help Page 68 of 74 message asking if you want to install the modem. Answer “Yes” to this question and follow the instructions on the screen to install it. The modem dials and the answering modem generates tone, but our modem does not begin the training sequence to establish a connection Although the problem may appear to originate from the computer, the source of the problem is the answering modem. l Try setting up the answering modem to generate the correct V.
GoBook Pro Help Page 69 of 74 l Connect external power to charge the battery if it is not charged. l If you are using the AC adapter , check the electrical outlet you are using to make sure it is working properly. l If the GoBook Pro computer does not turn on, restart the computer by holding down both mouse buttons for at least 10 seconds and then release the buttons. The computer won’t turn off l Press and hold the FN+Q keys.
GoBook Pro Help l Page 70 of 74 Try resetting the computer again. If this doesn’t work, remove all power, and allow the unit to remain idle for ten minutes. After ten minutes, connect external power and retry. 79_0100_001 © 2001 Itronix Corporation. All rights reserved. B. Troubleshooting Topics GoBook Pro Help Mouse I have difficulty double-clicking the mouse fast enough l From the Start Menu, select Settings, Control Panel, and then choose Mouse.
GoBook Pro Help Page 71 of 74 I can’t remove the PC card l Press the ejector button located inside the PC card door on the side of the computer. The button will pop out. Press the ejector button again to eject the PC card. Slide the card out. l If the ejector button malfunctions when you press it, release the button and then press it again. Diskette Read Error l Any card in the PC Card socket except for a properly formatted memory card will cause this error since it is trying to read the PC Card.
GoBook Pro Help Page 72 of 74 2. Follow the instructions on the screen to calibrate the touch screen. The touch screen display warps or pillows in high humidity l The computer remains functional; however, moving the computer to a more suitable environment will allow the display to recover. 79_0100_001 © 2001 Itronix Corporation. All rights reserved. B. Troubleshooting Topics GoBook Pro Help Wireless Modems How can I tell if my CDPD radio is working? Try the following procedure: 1.
GoBook Pro Help Page 73 of 74 8. If a red X is displayed in the check box next to “Ping the network” then your CDPD radio cannot deliver a packet to itself through the CDPD network. Check with your CDPD network provider to verify your NEI and DNS are correct. If your NEI and DNS are correct, you may be at the edge of RF coverage or have a RF performance problem. Check your RF coverage and antenna position. Press Back to repeat test. 9.
GoBook Pro Help Page 74 of 74 MOTIENT & RAM/BSWD) R – Displays RSSI level in dBuV (dBuV - 107 = dBm). (ARDIS/MOTIENT & RAM/BSWD) D – Displays RF Modem system status. (ARDIS/MOTIENT & RAM/BSWD) P – Ping, which can be used to send a system check to yourself. (ARDIS/MOTIENT & RAM/ BSWD) N – Set the current network. (ARDIS/MOTIENT & RAM/BSWD) 7. Select an option from the menu for your session. For troubleshooting purposes, D, R, and P will generally establish if the RF Modem is functional.