
Use and Care Manual


49-2000707 Rev. 0 11
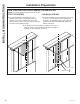
Installation Preparation
INSTALLATION PREPARATION
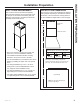
PLAN THE INSTALLATION
CAUTION
To reduce risk of fire and to
properly exhaust air, be sure to duct the air outside.
Do not vent exhaust air into spaces within walls or
ceilings or into attics, crawl spaces, or garages.
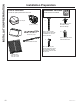
PARTS SUPPLIED FOR INSTALLATION
■ 1 Hardware Package
■ 1 Literature Package
■ 1 Installation Template
PARTS NEEDED FOR INSTALLATION
■ 1 Strain Relief
■ 1 Wall or Roof Cap (for vented installation only)
■ All Metal Ductwork
WARNING
PERSONAL INJURY HAZARD
Because of the weight and size of the rangehood
canopy. It is recommended that 2 people are used
to install the range hood. Failure to properly lift
rangehood could result in damage to the product or
personal injury.
NOTE: Before making any cuts or holes for
installation, determine which venting method will be
used and carefully calculate all measurements.
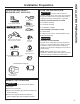
TOOLS AND MATERIALS
REQUIRED (NOT SUPPLIED)
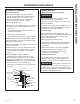
REMOVE THE PACKAGING
CAUTION
Wear gloves to protect against
sharp edges.
■ Remove the hood body.
■ Remove the hardware bag, literature package and
other boxed parts.
■ Remove and properly discard the protective
plastic wrapping and other packaging materials.
Wire cutter/stripper
Level
Aluminized
duct tape
Safety glasses
Phillips screwdriver with
at least 6" shank
Strain relief for
junction box, 1”
diameter knockout
Strain Relief I
Electric drill with #2 Phillips
with 1/8" and 5/16" drill bits
UL listed wire nuts
Wire Nuts
Pencil and tape measure
Gloves
12" round duct
8”x12” to 12” round
duct transition
Needed for back venting only
8” round duct for 30" and 36" models
10" round duct for 48" model