AeroFlo ® 20 Assembly Guide
AeroFlo 20 PARTS 13 1 16 4 14 15 5 6 3 2 12 17 10 11 9 8 7 AeroFlo 20 PARTS: assembled dimensions: 7’L X 1’6”W X 22”H Chambers Box: 1: Growing Chambers (2 ea) with Laser Spray Lines (2 ea) 2: Drain Level Tube (DLT) 3: DLT 4” Covers (2 ea) Parts Box: 4: Manifold 5: DLT Lubricant 6: SnapStand Cross Fitting (2 ea) 7: SnapStand Base (2 ea) 8: SnapStand Leg (2 ea) 9: SnapStand Support Tube 10: Reservoir (8 gal) 11: Reservoir Lid 12: Flexible Pump line 13: Mag Drive Pump 14: FloraSeries Nutrients 1
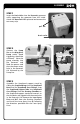
ASSEMBLY STEP 1 Insert the Drain Valve into the Reservoir grommet while supporting the grommet from the inside. Attach the Reservoir Lid as pictured and remove the tear away strip. pull tab drain valve STEP 2 Connect the Pump line to the Mag Drive Pump outlet (hand tightening should be sufficient). Place the pump assembly into the Reservoir and feed the power cord thru the center access hole in the Reservoir Lid followed by the Pump line.
ASSEMBLY STEP 4 Lubricate the end of the DLT with the Lubricant provided and insert into the Growing Chamber drain hole and align with the hole in the Reservoir Lid for each Growing Chamber. Adjust the water level in the Growing Chamber by raising or lowering the DLT STEP 5 Attach the Flexible Pump Line with the swivel hose fitting to the Manifold and then attach the Manifold to each of the Laser Spray Lines. Make sure there is a rubber gasket in the Laser Spray Line fitting and DO NOT OVER TIGHTEN.
ASSEMBLY STEP 6 Place the Net Pots with the CocoTek Liners into the growing sites and use the Clay Pebbles to support seedling plants. Always rinse the Clay Pebbles before use and see the Helpful Guidelines for planting and cleaning the system. * pictured above with AF30 HELPFUL GUIDELINES FILLING Before filling your system with water it is essential that you understand the system capacity. The reservoir should be drained first before draining the growing chambers.
ASSEMBLY HELPFUL GUIDELINES PLACEMENT Abundant light, proper temperature and adequate ventilation are crucial for fast growth, healthy plants and higher yields. Place the AeroFlo2 system in a warm, well-lit, well-ventilated location, such as an outdoor garden, sunlit window, patio or greenhouse. Keep your AeroFlo2 away from areas where the inevitable dripping that occurs during filling, draining and pH adjustment could cause water damage.
TROUBLE SHOOTING TROUBLE SHOOTING If white salt deposits form on the Clay Pebbles: 1. Try using a milder nutrient solution and topping off with plain water only. 2. Occasionally drain your system, refill with plain water and run the pump overnight. After the overnight rinse, empty reservoir and refill with fresh nutrient. If Plants are not growing well and you suspect “hard” water: 1. Use FloraMicro Hardwater in place of FloraMicro. 2. Try distilled or purified water.
waterPOWER® 85 & 120 The WaterPOWER magnetic drive pumps offered exclusively by General Hydroponics can be used in line or completely submersible. Used in our popular AeroFlo 18, 30 and 36 units, the WaterPOWER pumps come with 1” fittings and an extra sponge filter and impeller. RAPIDROOTER® Rapid Rooter’s breakthrough technology produces a unique matrix of composted organic materials bonded together with plant-derived polymers.