
Use and Care Manual
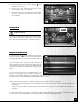
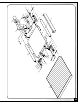


5. Remove the belts from the upper pulleys, , and
install new belts. (Fig. 11)
6. Lift the motor and install the other end of the
belts in the slot on the lower pulleys.
7. Put the motor back to its initial position, then retigh-
ten the lock and lock nut located on the motor po-
sitioning plate.
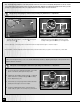
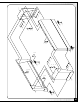
REPLACING MOTOR
Should the motor require replacement, remove the 4
nuts, washers and bolts on the bottom of the motor
base and remove the entire motor assembly.
(Fig. 12)
21
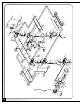
The 3 pressure rollers, , (front, middle and rear) main-
tain the workpiece on the conveyor belt, preventing it
from lifting up from the conveyor into the drums.(Fig.13)
They are factory set to provide a proper amount of
downward pressure to the workpiece. However, with use
and normal wear over time, it may eventually become
necessary to make minor adjustments to the pressure
rollers.
If you notice snipe (which is a small depression in the
surface of a workpiece across its width, caused by a
variation in the sanding depth during a given pass) either at one or both ends of your workpiece, the pressure on
the rollers must be reduced, either by adjusting their height or tension.
Refer to the following symptoms to determine which pressure rollers need to be adjusted:
-
If snipe occurs at the beginning of the board, reduce the amount of pressure on the front and/or middle pres-
sure roller(s).
-
If snipe occurs at the tail end of the board, reduce the amount of pressure on the middle and/or rear pressu-
re roller(s).
Increasing the amount of pressure is achieved by adjusting either the height or the tension of the pressure rollers.
In both cases, some experimentation may be necessary to achieve an ideal adjustment.
ADJUSTING THE PRESSURE ROLLERS
Fig. 11
Fig. 12
Fig. 13
BEHIND
Never attempt to repair motor yourself. Contact a
qualified technician.