
Use and Care Manual


M
N
N
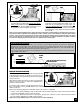
11. Loosen the nut
O
located on top of the knife (the one
on the side of the knife that need to be adjusted),
then adjust the set screw
P
to raise or lower the knife
until it
lightly touches the top of the gauge block
.
12. Re-tighten nut
O
then
re-check the height setting on
the other extremity of the knife and re-set if neces-
sary until the knife is parallel to the table.
13. Re-tighten the locking bolts
M and N.
SE
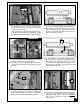
TTING THE HEIGHT OF THE SECOND KNIFE
UNDERSIDE VIEW
14.
Remove the T-handle wrench from the cutter head,
rotate the head 180° and re-install the wrench to
lock the opposite side of head in place.
16. Place your gauge block under the other extremity of
second knife and check for knife parallelism with the
table.
Should the knife not be set properly follow steps 11 to
13.
If the second knife is parallel to the table,
re-tighten nut
O and
locking bolts
M and N.
15. Place your gauge block onto the table, under one
extremity of the second knife.
If the second knife is
set higher or lower than the first knife, follow steps
10 and 11.
15
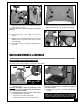
9. Loosen the 3 button head screws
K
using the supplied
4 mm T-handle wrench and draw the chip deflector
away
L
from the cutter head as shown, then secure it in
position.
K
L
10. Fully loosen the 2 middle locking bolts M using the
supplied 14 mm wrench, then slightly loosen the
end locking bolts N, so that they still hold the knife.
O
P