
Use and Care Manual


MAINTENANCE
PERIODIC MAINTENANCE
• Inspect/test the ON/OFF switches before each use. Do not operate the planer/molder with a damaged switch;
replace a damaged switch immediately.
• Keep the machine as well the table clean and free of saw dust, woodchips, pitch or glue. Vacuum or brush off
any loose debris and wipe down the machine and the table occasionally with a damp rag.
• An occasional light coating of paste wax can help protect the table surface and reduce workpiece friction.
Ask your local distributor for suggestions on aftermarket surface cleaners, protectant and dry lubricants based
on what is readily available in your area.
• Avoid using silicon based products that may affect or react with wood finishing products such as oil, solvent or
water-based stains, varnishes and lacquers.
• Periodically inspect the power cord and plug for damage. To minimize the risk of electric shock or fire, never
operate the planer with a damaged power cord or plug. Replace a damaged power cord or plug at the first
visible signs of damage.
• The motor and cutter head bearings are sealed and permanently lubricated – no further lubrication is required.
• The drive gears, chain and elevation screws should be cleaned of woodchips, dust, debris and old grease after
every 10-15 hours of use, or as neede, depending on frequency of use. After cleaning, re-apply a generous
coating of any common automotive bearing grease.
• Regularly inspect planed/molded workpieces for signs of knife damage or wear and replace damaged or
worn knives immediately.
MAKE SURE THE PLANER/MOLDER HAS BEEN TURNED OFF AND UNPLUGGED FROM THE POWER SOURCE BEFORE PERFORMING
ANY MAINTENANCE.
25
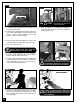
6. Loosen the jam nut K on the inner guide, turn the
adjustment knob L to align the bearings with the knife
and then tighten the jam nut to secure them in place.
7. With the workpiece flush against the inner guide bear-
ings M, loosen the button head screws N on the outer
idler guide bearing and adjust the bearing flush
against the outside face of the workpiece O. Then
tighten the screws to secure the bearing in place.
8. In preparation for the first pass, raise the cutter head
just enough to remove the workpiece, and then re-
adjust the cutter head downward by one full turn on
the handwheel to take than a 3/32” depth of cut.
K
L
WORKPIECE
TEMPLATE
M
N
O
BEFORE STARTING THE MACHINE AND FEEDING
THE WORKPIECE INTO THE CUTTER MAKE SURE
THAT THERE IS NO INTERFERENCE IN THE KNIFE
AREA THAT COULD CAUSE THE KNIVES TO MAKE
CONTACT WITH ANYTHING OTHER THAN THE
WORKPIECE. SERIOUS INJURY TO THE USER
AND/OR BYSTANDERS AS WELL AS DAMAGE TO
THE MACHINE, WORKPIECE AND KNIVES CAN
OCCUR IF DURING THE MOLDING PROCESS, THE
KNIVES COME INTO CONTACT WITH GUIDES,
BEARINGS, SCREWS OR ANY OBJECTS OTHER
THAN THE WORKPIECE.