
Use and Care Manual
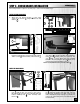


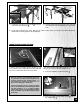

8. Install the two thumbscrews into the holes in the
front face of the cross cut fence.
Note: The thumbscrew is used to lock the fence extension
post in place.
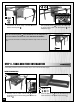
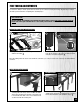
6. Slide the mitre clamp assembly along the fence
until the t-nut lines up with the t-slot on the angle
adjustment rail . If needed, adjust the height of
the mitre clamp post so it is flush with the bottom
of the mitre clamp bracket .
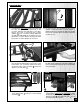
7. Remove the fence extension post from the end of
the fence . Slide the fence extension stop mount
on to the post and re-install the post in the same
end of the fence .
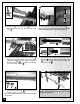
4. Side the t-nut on the miter clamp into the t-slot
approximately 2' from the opposite end of the
fence .
5. Fit the pivot post into the pivot post bracket .
Note: The pivot post should protrude an equal distance
from the top and bottom of its mounting bracket .
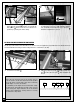
The cross cut fence may be stored on the fence storage
brackets as shown above.
16
Flush here