
Instructions / Assembly


9
The protective coating on the machine prevents rust
from forming during shipping and storage. Remove it
by rubbing with a rag dipped in kerosene, mineral spir-
its or paint thinner. (Dispose of potentially flammable
solvent-soaked rags according to manufacturer’s safe-
ty recommendations).
A putty knife, held flat to avoid scratching the surface,
may also be used to scrape off the coating followed
by clean-up with solvent. Avoid rubbing the machine's
painted surfaces, as many solvent-based products will
remove paint.
To prevent rust, apply a light coating of paste wax or
use regular applications of any after-market surface
protectant or rust inhibitor.
CLEANING
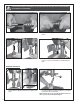
ASSEMBLY INSTRUCTIONS
INSTALLING THE DRILL PRESS ON A STABLE SURFACE
For your convenience this drill press is shipped from the factory partially assembled and requires only minimal
assembly and set up before being put into service.
The unit should be immobilized on a flat, level, sturdy
and stable surface, able to support the weight of the
machine and the workpiece with ease.
Note: Never install or operate the unit over the edge of a
table, workbench or other mounting surface.
If a permanent shop placement or installation is prac-
tical, consider using the mounting holes and drilling
matching through holes in your workbench or mount-
ing surface to bolt the drill press in place (hardware
not included) on your workbench.
If you prefer, an optional universal steel stand (item
#99-700) is available from your local General Interna-
tional dealer.
HEX HEAD BOLT (1)
FLAT WASHER (2)
LOCK WASHER (1)
NUT (1)
G
E
N
E
R
A
L
I
N
T
E
R
N
A
T
I
O
N
A
L
G
E
N
E
R
A
L
I
N
T
E
RN
A
T
I
O
N
A
L
BEFORE ASSEMBLING, MAKE SURE THAT THE SWITCH IS IN THE “OFF” POSITION AND THAT THE POWER CORD IS UN-
PLUGGED. DO NOT PLUG IN OR TURN ON THE MACHINE UNTIL YOU HAVE COMPLETED THE ASSEMBLY AND INSTALLATION
STEPS DESCRIBED IN THIS SECTION OF THE MANUAL.