
Use and Care Manual


1.
To limit the risk of damage to the saw blade or frame, remove the blade. Follow the instructions in section “Blade
Clearance” on page 17, then remove the blade as instructed in section “Removing/Installing the blade” on page 18.
ASSEMBLY INSTRUCTIONS
Serious personal injury could occur if you connect the machine to the power source before you have completed
the installation and assembly steps. DO NOT connect the machine to the power source until instructed to do so.
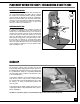
For your convenience this bandsaw is shipped from the factory partially assembled and requires only minimal
assembly and set up before being put into service.
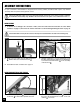
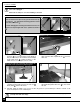
INSTALL THE TABLE
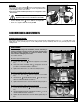
3. Using the supplied 10 - 13 open end wrench, secure
the table to the trunnions with the 4 hex head bolts,
lock washers and flat washers
,
in the assembly
order shown in
.
TABLE UNDERSIDE VIEW
This bandsaw table is heavy. Do not over-exert. The help of an assistant will be needed for the following step.
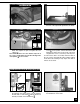
INSTALL AND ADJUST THE 90º TABLE STOP BOLT
4. Re-install the blade as instructed on page 19.
1. Loosen the locking lever then turn the adjust-
ment knob to tilt the table upwards as shown.
2. Thread the jam nut on the stop bolt then thread
the bolt in the theaded hole located on the saw
cabinet , 7 or 8 turns.
2. Gently lower the table onto the table tilt trunnion
, with the table slots oriented as shown .
12