
Use and Care Manual
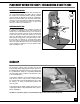


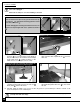


INSTALL THE LASER LINE MARKER
The laser line marker will allow you to easily mark a straight cut line on your workpiece.
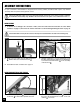
5. Using the supplied 3 mm Allen key, tighten the
longer button head screw , to secure the laser
line marker into it’s mounting bracket.
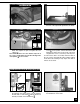
2. Attach the mounting bracket to the front of the saw
using the socket screw through the door and
the flange nut on the inside of the door.
OFF ON
Align the laser beam on the blade as follows:
1. Press on the ON/OFF switch button (located on top
of the laser line marker) to turn the laser ON.
2. Loosen the socket screw and move the laser left
or right along the elongated hole and/or loosen
the button head bolt and move the laser up or
down until the beam is aligned with the blade .
3. Press on the ON/OFF switch button once again to
to turn the laser OFF.
1. Thread the shorter button head bolt from the in-
side of the upper cabinet.
3. Loosely screw the longer button head bolt
.
4. Unscrew and remove the cap and install two AAA
batteries (not included), then fit the laser line
marker into the the hole in the mounting bracket
.
14