
Use and Care Manual


CONNECTING TO A POWER SOURCE
To avoid risk of shock or fire do not operate the unit with a damaged power cord or plug. Replace damaged
cord or plug immediately.
1. Uncoil the power cord and plug it into an appro-
priate outlet (refer back to section “Electrical Re-
quirements" and make sure all requirements and
grounding instructions are followed).
To avoid unexpected or unintentional start-up,
make sure that both of the power switches
are in the the OFF position before connect-
ing to a power source.
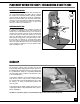
Never adjust the table angle while the bandsaw is
running. Turn off power first.
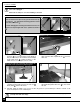
1.
Loosen the locking lever
.
2. Turn the knob to tilt the table until it is at the desired
angle. (Refer to the angle indicator .)
3. Tighten the locking lever to lock the table in position.
TILTING THE TABLE
The table can be tilted to any angle from 0° to 45° to the right and 0° to 5° to the left to allow for any type of bevel
(or angle) cutting. Refer to the table tilt angle indicator under the bandsaw table to set the angle of the table to
the desired position.
TABLE UNDERSIDE VIEW
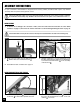
ADJUSTING THE BLADE GUARD FOR DEPTH OF CUT
The blade guard can be moved up or down to accommo-
date the height of the work to be cut . To prevent the
blade (which is flexible and which would not otherwise be
supported) from slipping out of position during cutting,
and to reduce risks of injuries, a minimum amount of
blade should be exposed.
The blade guard should be set 1/8” - 1/4” above the work-
piece to prevent the blade from flexing out of position or off-
line during cutting.
Adjust the height of the blade guard to suit the thickness of
the workpiece as follows:
1. Make sure the bandsaw is turned off and the power
cord is disconnected from the power source.
2. Loosen the lock knob .
3. Move the blade guide assembly up or down by turning
the handwheel . Then re-tighten the lock knob .
Note: The depth gauge on the front of the blade guard can
be used as a reference but it is not intended for high precision
measurements.
CLOSE UP
1/8” - 1/4”
LOWER
RAISE
16