
Use and Care Manual
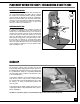


BLADE SELECTION
There are a variety of different types of bandsaw blades on the market to suit various cutting applications.Your
results may vary based on usage, experience and personal preference.
Standard size - 131 1/2” (3340 mm) - replacement blades for either wood cutting or metal cutting applications
can be found through your local tool dealer or bandsaw blade specialist.
Note: The use of any size outside of the saw’s specified length or width range is not recommended and can lead to
serious injury and/or damage to the machine. Generally speaking, because the upper wheel height is somewhat
adjustable (to allow for blade tensioning), a blade length variation of plus or minus 1/2” from the “ideal blade
length” can be accommodated.
Some general guidelines to consider when choosing bandsaw blades:
• Wider blades with fewer teeth per inch are best suited to cutting straight lines, re-sawing and for sweeping
curves, but will not turn tight radius curves. They will cut quickly and aggressively but do have a tendency to
bind (or get stuck in the cut) if turned too sharply.
• Narrower, thinner blades with more teeth per inch will cut more slowly but can turn much tighter corners for
cutting more intricate work.
Common causes of blade breakage:
• Poor guide bearing alignment and adjustment.
• Forcing or twisting a wide blade around a short radius.
• Feeding the workpiece too quickly.
• Dull teeth.
• Too much blade tension.
• Setting blade guard assembly too high above the workpiece.
• Lumpy or improperly finished braze or weld on the blade.
• Continuous running of blade when not cutting.
T
o ins
tall a blade:
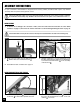
1. Turn off the bandsaw and unplug the power cord.
Beware of the blade popping open.
2. If you are installing a new blade, carefully remove the bla-
de from its package. Hold it firmly with one hand as you re-
move the twist ties. Slowly separate the coils of the blade until
it unravels into one hoop.
Note: Step 3 may be unnecessary if you’ve just removed a blade. (If
needed, refer back to the previous page.)
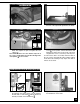
3. Remove the table alignment pin from the table slot and the
red insert from the center of the table.
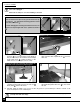
4. With the blade perpendicular to the wheels, guide it through
the table slot, then rotate the side of the blade nearest you
back toward the left side of the wheels.
5. Feed the blade into the left side slot, blade guard and
around the wheels. Make sure the blade teeth point forward
and down .
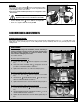
With the blade properly installed, proceed to blade tension adjustments and blade tracking adjustments, as per
instructions on the next few pages.
Note: You may want to use a thick shop towel to
handle the loose blade or wear a pair of heavy
duty work gloves for the following steps.
Proper installation
Improper installation
19