
Use and Care Manual


24
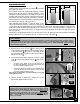
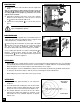
By simply changing the positioning of the drive belt from one set of pulleys to the other, the user can select a speed
range, Metal (100-650 FPM) or Wood (540-3600 FPM), depending on the cutting application.
The 90-320 is factory set for Wood cutting applications. The drive belt is positioned to allow a 540-3600 FPM speed
range and the blade installed is a wood cutting blade.
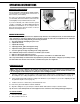
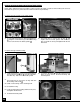
To switch from wood to metal cutting:
1. Remove the wood cutting blade and install a metal cutting blade, adjust the blade tension and tracking, then
adjust the upper and lower blade guides and thrust bearings.
CHANGING BLADE SPEED RANGE – SWITCHING FROM WOOD TO METAL CUTTING
To avoid injury, make sure that the switch is in the “OFF” position and that the power cord is unplugged before
performing any adjustments on the bandsaw.
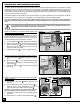
2. Loosen the lock lever that locks the motor pivot,
then, using the handle , lift the motor by hand
and tighten lever to lock the motor in position.
This will loosen the drive belt.
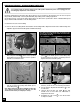
4. Install the supplied shorter belt (A27) on the out-
side groove of the drive pulley and outside groove
of the idler pulley, .
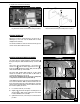
Note: When transfering belt A44 or installing belt A27, take
care in doing so not to touch the sensor (step 3) as this
would affect the blade speed display accuracy.
5. Loosen the cap screw using the supplied 8 mm
Allen key to unlock the belt tensioning mecanism.
6. Use the tension adjustment hand wheel to ten-
sion the belt.
7. Squeeze the belt with your hand . The belt
should move no more than 1/8". If needed, re-
adjust the belt tension.
8. Re-tighten the cap screw to lock the belt ten-
sioning mecanism.
Max 1/8”
3. Transfer belt A44 (factory installed) from the drive
pulley to the inside groove on the idler pulley
, then set the motor back to it’s initial position to
tighten the belt around the pulleys.
Note: When transfering belt A44, take care in doing so not
to touch the sensor as this would affect the blade
speed display accuracy.