
Use and Care Manual


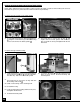

CUTTING CURVES
• When cutting curves, carefully turn the workpiece so the blade follows without twisting. If the curve is so sharp that
you repeatedly back up and cut new kerf, use a narrower blade, or a blade with more set (teeth further apart).
When a blade has more set, the workpiece turns easier but the cut is rougher.
• When changing a cut, do not withdraw the workpiece from the blade. The blade may get drawn off the wheels.
• To change a cut, turn the workpiece and cut your way out through the waste material area.
• When cutting long curves, make relief cuts as you go along.
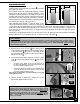
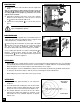
USING THE RIP FENCE
1. Set the fence down on the rail either to the left or right of the
blade.
Note: For short workpieces that fit between the frame of the saw
and the blade , position the fence at the left side of the blade.
For cutting longer or wider workpieces, position the fence, on the
right side of the saw blade.
2. Adjust the positioning of the fence on the rail so that the
distance from the inside face of the rip fence to the bla-
de matches the required width of cut.
3. Tighten the locking handle to lock the the fence in
place.
Make sure to lock the fence in place before start-
ing to cut against the rip fence.
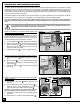
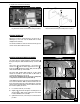
USING THE MITER GAUGE
Using the miter gauge supplied with your bandsaw allows for
easier and safer sawing by providing workpiece support when
cutting straight (90°) or angled ends (0° to 30°).
The miter gauge rides in the table slot to the right of the blade
and can be set to any angle up to 30° to the left or right. It
also acts as a feeder for advancing smaller workpieces
through the blade with reduced risk of injury to the hands.
To use a setting other than 90°, loosen the locking handle by
turning it counterclockwise. Rotate the miter head to the
required angle , shown on the angle indicator. Then turn the
locking handle clockwise to tighten it.
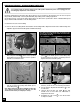
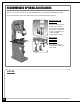
CUTTING CIRCLES
1. Adjust the blade guard assembly to 1/8" above the
workpiece.
2. Use both hands while feeding the work into the blade.
Hold the workpiece firmly against the table. Use gentle
pressure. Do not force the work. Allow the blade to cut.
3. The smallest diameter circle that can be cut is deter-
mined by the width of the blade. For example, a 1/4"
wide blade will cut a minimum diameter of approxi-
mately 1-1/2" .
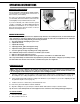
MIN. CIRCLE
DIAMETER
BLADE WIDTH
26