
Install Instructions


Model DRZ™ & Model DRZ-PH™
DO NOT USE TOO MUCH FORCE –
LET THE CUTTER DO THE WORK.
OPERATION
SET-UP
5
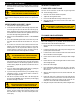
1. Position the machine at a distance not greater than two feet (.6m)
from drain opening so that the Guide Tube can be placed into the
drain opening without excessive bending of the Guide Tube. If
your model does not have a guide tube, or if you cannot get this
close to the drain, run the cable through a hose or pipe to prevent
cable whipping.
2. Note: Avoid sharp bends or kinking of the Guide Tube by reposi-
tioning the machine. The Model DRZ and DRZ-PH are designed
to be positioned either horizontally or vertically to facilitate this.
3. The cable may have an EL-Basin plug head on the end to help
the cable around tight bends, or it may have a female connector
for attaching cutters. (See Cable Application Chart to select the
correct cable size for the job.)
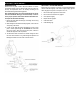
4. To attach a cutter, first unplug the machine. Then, remove the
screw and lock washer from the connector at the end of the ca-
ble. Slide the cutter into the slot, then replace the lock washer
and connecting screw. Tighten the screw firmly.
5. The Boring Gimlet and Arrow Head are good cutters to start with.
Change to the larger cutters after you've gotten the water flow-
ing.
8. If the cable starts to bend or build up too much twist, take your
foot off the pedal and rotate the drum in the opposite direction to
relieve the twist on the cable. Push any excess cable back into
the drum and then continue.
9. When the cable reaches the stoppage, put the feed in neutral.
Then allow the cable to progress slowly, chewing into the stop-
page as it goes. This slow forward movement will reduce stress
on the cable while doing a more thorough cleaning job. A back
and forth action usually works best.
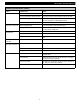
Cable Application Chart (Table 1)
Cable Size Pipe Size Typical Applications
1/4” 1-1/4" to 2" Small lines, tubs, and shower drains.
5/16" 1-1/2" to 2" Sinks, basins, and small drains.
3/8" 2" to 3"
Stacks, toilets, small drains (Not
Roots).
The 1/4" and 5/16" diameter cables with EL Basin plug heads can be spun
through most strainers and work well in lines blocked by soft stoppages such
as hair, soap, fats, etc.
Maximum Capacity: 50 ft. of 1/4” or 5/16” cable, or 35 ft. of 3/8” cable.
Cutter Application Chart (Table 2)
Cutter Catalog # Typical Applications
Arrow
Head
AH
Ideal for heavy cutting and
scraping.
Flexible Arrow
Head
FAH
More flexibility than Arrow
Head; can take sharp turns in
small lines.
Boring
Gimlet
BG
To remove or retrieve loose
objects.
Down Head
Boring
Gimlet
DHBG
Leads cable down drain line
rather than up vent or across
tee.
1-1/4"
Side
Cutter
1-1/4SCB
Works well in grease stop-
pages, scrapes walls of pipe.
DISCONNECT MACHING FROM POWER SOURCE
BEFORE ATTACHING CUTTER!
OPERATION WITH POWER CABLE FEED
1. Plug machine into a properly grounded outlet.
2. Make sure the Forward/Off/Reverse switch is in the FORWARD
position.
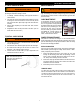
3. Tighten the feed pressure knob on top of the variable speed
power cable feed so that the feed roller presses against the ca-
ble. Be sure not to over tighten since this could cause excessive
cable wear.
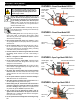
4. The feed lever controls the feeding rate and direction of the ca-
ble. Move the feed lever down to feed the cable out of the drum.
The farther the lever is moved downward, the faster the cable will
feed out. Move the lever up to retract the cable into the drum.
When the lever is in the middle (neutral) position, the cable will
spin in place.
5. Place the Guide Tube with the cable end and cutter protruding
from the end of the Tube into the drain opening.
6. With one gloved hand on the Guide Tube and one on the feed
control lever, start the machine by stepping on the foot pedal.
7. Move the feed control lever downward. Feed the cable slowly.
Use the feed lever to adjust feeding speed as resistance is
met. Don’t feed faster than the cable can go into the drain. Too
much cable between the guide tube and drain will cause whip-
ping and kinking.
DO NOT ALLOW TOO MUCH SLACK IN THE CA-
BLE BETWEEN MACHINE AND DRAIN OPENING
SINCE THIS CAN CAUSE CABLE WHIPPING.
Feed Control
Lever
Feed
Pressure
Knob
Neutral
Forward
Reverse