
Installation Guide

Step 1: (Framed Installation) Install Cement Board
Install cement board as per manufacture’s instructions. For new construction, install cement board in place
of sheet rock.
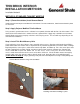
Step 2: Apply Polymer Modified Thin-Set Mortar
Using a trowel, spread mortar across substrate in an upwards direction with the flat side of the trowel. Run
notched side of the trowel across mortar to create a grooved finish. Apply only a workable area of mortar
that will allow veneer to be properly set before surface drying occurs. This area will vary depending on site
environmental conditions.
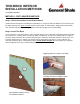
Step 3: Install Thin Brick Masonry Units
Clean unit backs of any dust, laitance, loose material and any excess film that could impede bond. With a
trowel “back-butter” the veneer units, if required to fill any surface irregularities or to ensure 100% coverage.
Beginning with the corner pieces, work either from the top-down, or bottom-up. Press the corner piece onto
the wall, rotating back and forth slightly, and forcing some of the mortar to “squeeze out”. Remove this
excess mortar with a square flat trowel and use the excess on the next piece of veneer. Remove
excess mortar from around or on the veneer units with a stiff brush. Check for 100% mortar coverage by
removing two stone units from the wall per bag of mortar used. Grout the joints using pointing mortar
(or mix shown on Page 4) using a grout bag. Tool joints when thumbprint hard using a metal jointing tool.
THIN BRICK INTERIOR
INSTALLATION METHODS
Installation Method 2
METHOD 2: STANDARD THIN-SET MORTAR
1
2
3
Installing Thin Brick and filling in joints
Framed Wall Installation Using Thin-Set Mortar