
Owner manual


4.4 Voltage Measurement
CAUTION: Maximum Input Voltage is 1000Vrms, do not
exceed this rating to avoid personal injuries or
damage to the instrument.
4.5.2 Continuity Test
Set the function selector knob to (Resistance). Insert the red test lead
into the positive input terminal (+), and the black test lead into the COM
terminal on the front of the instrument. Proceed to connect the test leads
tips across the component or circuit under test. If the resistance less is
than 100Ω,, the buzzer will emit a continuous tone.
4.6 Other Functions
4.6.1 Relative Measurements
By pressing the ZERO button, the instrument is entered into zero mode
and the indicator will appear on the LCD screen. The value in the
display immediately before pressing the button is stored into memory as
a reference value for future tests. To exit the Zero mode press the ZERO
button again.
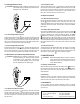
4.6.2 Data Hold and Peak Hold
Pressing the HOLD/PEAK button once, the present reading is held and
appears on the display. Press the switch again to return to normal mode
(continuous readings) and to release the data hold feature. The PEAK
HOLD function is enabled by pressing the HOLD/PEAK button until the
indicator appears on the screen. When in this mode, the instrument will
hold and display the highest reading obtained during the measurement.
To exit the peak/hold mode press the HOLD button for approx. 2 sec. until
the display indicator turns off. This function works with DCV, ACV, DCA
and ACA.
4.6.3 Auto Power Off
The meter will turn off automatically after approx. 30 minutes of no operation
to extend the battery life. Auto power off can be disabled by pressing
and holding down the HOLD button while turning on the instrument, when
auto power is off, the symbol on the screen will not appear.
5. MAINTENANCE
CAUTION: Before attempting battery removal or replace-
ment, disconnect test leads and remove the
instrument from any energized circuit to
avoid shock hazard.
5.1 Battery Replacement
When the battery needs replacement, the battery symbol will be ap-
pear in the upper left hand side of the LCD display. To replace the battery,
remove the screws at the back cover and replace with a 2 AAA 1.5 V
alkaline batteries.
5.2 Cleaning
Periodically wipe the case with a soft damp cloth and mild household
cleanser. Do not use abrasives or solvents. Ensure that no water gets
inside the instrument to prevent possible shorts and damage.
6. WARRANTY
One year limited warranty, excluding batteries and fuses. For details
see Standard Warranty Information in our webpage or you may request
a printed copy.
4.4.1 DC Voltage Measurement
Set the function selector knob to (DCV). Insert the red test lead into the
positive input terminal (+), and the black test lead into the COM terminal
on the front of the instrument. Proceed to connect the test leads across
the source or load under measurement. The polarity will be indicated when
the tip probe is connected. Read voltage in the display.
4.4.2 AC Voltage Measurement
Set the function selector knob to (ACV). Insert the red test lead into the
positive input terminal (+), and the black test lead into the COM terminal on
the front of the instrument. Proceed to connect the test leads across the
source or load under measurement. Read voltage in the LCD screen
4.5 Resistance and Continuity Measurement
CAUTION: Maximum Input Voltage is 660Vrms, do not
exceed this rating to avoid personal injuries
or damages to the instrument. Also ensure
there is no power applied to the circuit and
that all capacitors are discharged.
4.5.1 Resistance Measurement
Set the function selector knob to (Resistance). Insert the red test lead
into the positive input terminal (+), and the black test lead into the COM
terminal on the front of the instrument. Proceed to connect the test leads
across the component or circuit under test. Read resistance in Ohms on
the LCD screen
600V CATII
300V CATIII
600A
H
HOLD
OFF
A
A
V
V
ZERO
P
H
600V CATII
300V CATIII
600V
P
PEAK
Press
2 Sec
�
600V CATII
300V CATIII
600A
H
HOLD
OFF
A
A
V
V
ZERO
P
H
600V CATII
300V CATIII
600V
P
PEAK
Press
2 Sec
Battery
© Copyright 2001 General Technologies
General Technologies Corp.
#121 - 7350 72nd Street Tel.: (604) 952-6699
Delta, BC Fax: (604) 952-6690
Canada V4G 1H9 www.generaltechnologies.net