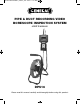
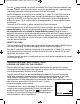
DPS16-Manual-FINAL_040312_awb 4/3/12 11:41 AM Page 1 PIPE & DUCT RECORDING VIDEO BORESCOPE INSPECTION SYSTEM USER’S MANUAL DPS16 Please read this manual carefully and thoroughly before using this product.
DPS16-Manual-FINAL_040312_awb 4/3/12 11:41 AM Page 2 TABLE OF CONTENTS Introduction . . . . . . . . . . . . . . . . . . . . . . . . . . . . . . . . . . . 3 Key Features . . . . . . . . . . . . . . . . . . . . . . . . . . . . . . . . . . 4 Safety Instructions . . . . . . . . . . . . . . . . . . . . . . . . . . . . . 4 What’s in the Case. . . . . . . . . . . . . . . . . . . . . . . . . . . . . . 5 Product Overview . . . . . . . . . . . . . . . . . . . . . . . . . . . 6 – 8 Setup Instructions . . . . . . . .
DPS16-Manual-FINAL_040312_awb 4/3/12 11:41 AM Page 3 INTRODUCTION Thank you for purchasing General Tools & Instruments’ (General’s) DPS16 Pipe & Duct Recording Video Borescope Inspection System. Please read this user’s manual carefully and thoroughly before using the instrument. The DPS16 has two components: the H16 Handheld Recording Video Borescope Console and the P16PIP Pipe & Duct Inspection Probe & Reel Set.
DPS16-Manual-FINAL_040312_awb 4/3/12 11:41 AM Page 4 KEY FEATURES • Ideal for examining the interior of water pipes, sewer pipes, and HVAC ducts. Especially tailored for 2, 4 and 6 in. I.D. pipes by included probe centering accessories • 72 ft. (22m) long probe with 1.1 in. (28mm) diameter camera head • Eight super-bright white LEDs give probe 640 x 480 pixel (VGA) resolution; superior optics yield excellent depth of field of 0.4 in.
DPS16-Manual-FINAL_040312_awb 4/3/12 11:41 AM Page 5 WHAT’S IN THE CASE The DPS16 comes in a custom hard plastic protective carrying case. Inside the case are: • The H16 console. The console integrates an LCD monitor, a connector for a highperformance camera-tipped probe from General, and front-panel controls for controlling the camera’s lights, adjusting system parameters, and recording and playing back videos and photos captured by an attached probe.
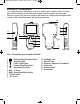
DPS16-Manual-FINAL_040312_awb 4/3/12 11:41 AM Page 6 PRODUCT OVERVIEW Fig. 1 shows the names and locations of all of the controls, ports and jacks of the H16. Table 1 details how the function of each front-panel changes with the console’s operating mode. Familiarize yourself with the labels, positions and functions of all buttons and connectors before moving on to the Setup Instructions and Operating Instructions. 14 8 9 11 10 4 5 12 7 6 15 2 1 3 LEFT SIDE 13 FRONT BACK RIGHT SIDE Fig. 1.
DPS16-Manual-FINAL_040312_awb 4/3/12 11:41 AM Page 7 Table 1. The H16’s multi-function buttons Button Label In Preview Mode In Playback Mode In Menu Mode ▲ Switches to Playback mode Selects next-oldest video or photo Moves up one line ▼ Switches to Playback mode Selects next-newest video or photo Moves down one line OK Switches to Menu mode Offers option to delete selected video or photo Executes highlighted command ESC Presssed briefly, enlarges target by 50% (zooms 1.
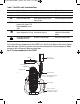
DPS16-Manual-FINAL_040312_awb 4/3/12 11:41 AM Page 8 Camera head Accessory mounting ring Fig. 3. Structures near the camera-tipped end of the probe Rubber probe cover Metal coil spring sleeve Joint ball Probe SETUP INSTRUCTIONS ATTACH PROBE TO CONSOLE Attach the P16PIP to the H16 by 1) inserting the H16 into the bracket at the top of the P16PIP and 2) plugging the P16PIP’s probe connector (see bottom of Fig. 2) into the connector at the top of the console (Fig. 1, Callout 14).
DPS16-Manual-FINAL_040312_awb 4/3/12 11:41 AM Page 9 Push the button and hold it for at least five seconds. The LCD will illuminate and briefly show the word “CAMERA” on the left and a battery icon on the right (both in green), superimposed on video being captured in real time by the camera at the end of the probe. Use the thumbwheel on the left side of the console (Fig. 1, Callout 12) to adjust the intensity of the camera’s lighting.
DPS16-Manual-FINAL_040312_awb 4/3/12 11:41 AM Page 10 Next, get used to manipulating your probe. Instructions for using the P16PIP probe and reel can be found beginning on p. 15 of this manual. If you plan to buy and attach one of General's conventional (non-pipe & duct) borescope probes to the H16, the following instructions for manipulating flexible-obedient and soft metal probes apply to you.
DPS16-Manual-FINAL_040312_awb 4/3/12 11:41 AM Page 11 To activate the connection in software and begin exporting H16 video to a TV, refer to the instructions for the VIDEO FORMAT and AV OUTPUT lines in the “Navigating the Main Menu” section of this manual. If you want to experience the quality of live video captured by the P16PIP now, skip ahead to the “Operating Instructions – P16PIP” section of this manual on pp. 15 and 16.
DPS16-Manual-FINAL_040312_awb 4/3/12 11:41 AM Page 12 While each photo and video is on-screen, pressing the OK button gives you the option to delete its file. Pressing the button calls up a dialog box with the word DELETE above the flashing word NO. Pressing the ▲ or ▼ button changes the flashing word to YES. When the correct answer (for you) appears, press the OK button to choose that action. ACCESSING SD CARD CONTENT Photos and videos stored on the SD card also can be viewed on a PC.
DPS16-Manual-FINAL_040312_awb 4/3/12 11:41 AM Page 13 The H16’s file-naming convention uses the letters A through C to represent the months October through December, and the letters A through V to represent days of the month from 10 through 31. For example, a file created on October 11 would begin with the letters AB (A for 10 and B for 11). As another example, a file created on November 30 would begin with the letters BU (B for 11 and U for 30.
DPS16-Manual-FINAL_040312_awb 4/3/12 11:41 AM Page 14 increase the value, press the button. To decrease the value, press the button. Once you have set the year, advance to the next field—the month—by pressing the ▼ button. Set the month as you did the year, by using the ▲ and ▼ buttons to increase or decrease the value by one unit per button press. Repeat this process until all six date and time components have been set. To back up from any field to the previous field, press the ▲ button.
DPS16-Manual-FINAL_040312_awb 4/3/12 11:41 AM Page 15 By default, the AUTO POWER OFF function of the H16 is disabled. To enable it, and to choose how quickly to power off the instrument following a period of inactivity, navigate to one of the four options (5, 10, 15 or 30 minutes) and press the OK button. To re-disable the function later, enter Menu mode, scroll down to the AUTO POWER OFF line, press the OK button, select DISABLE and press the OK button again to save the setting.
DPS16-Manual-FINAL_040312_awb 4/3/12 11:41 AM Page 16 Once you have played out a few feet of probe, lock the reel by fastening the Velcro closure around the reel frame, as shown below at right. You can now attach the 2 in. spherical ring, the 4 in. brush set or the 6 in. brush set to the probe tip. To attach the ring, slide its slightly larger open end over the camera head (it fits only one way) until the head protrudes about 1/8 in. past the ring’s other opening.
DPS16-Manual-FINAL_040312_awb 4/3/12 11:41 AM Page 17 SPECIFICATIONS CONSOLE Display Type Color TFT LCD Display Size 3.5 in (89mm) diagonal Display Resolution 320 by 240 pixels (QVGA) Video Recording Resolution 320 x 240 pixels (QVGA) Video File Format .asf Photo Recording Resolution 640 x 480 pixels (VGA) Photo File Format .
DPS16-Manual-FINAL_040312_awb 4/3/12 11:41 AM Page 18 SPECIFICATIONS PROBE & CAMERA Camera Head Diameter 1.1 in. (28mm) Probe Diameter 0.23 in. (6mm) Probe Length 72 ft. (22m) Probe Material Fiberglass Camera Light Source 8 white LEDs Camera Depth of Field 0.4 in. (10mm) to infinity Camera Field of View 150.8° (diagonal) Waterproof Depth (IP68) 50 ft. (10m) Operating Temperature 14° to 158°F (-10° to 70°C) Weight 4.9 lb. (2.2kg) REEL Frame Diameter 11.8 in.
DPS16-Manual-FINAL_040312_awb 4/3/12 11:41 AM Page 19 OPERATING, MAINTENANCE & TROUBLESHOOTING TIPS – H16 • Never remove the SD card while taking a picture or recording a video. Doing so may damage the card and erase or corrupt the photo or video. • If the LCD remains or goes dark, the first two things to check are the integrity of the console’s connection to the probe and the charge of the console’s battery.
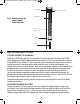
DPS16-Manual-FINAL_040312_awb 4/3/12 11:41 AM Page 20 OPERATING & MAINTENANCE TIPS - P16PIP The reel operates equally well in a horizontal or vertical position. The bracket for the H16 (DCS1600) borescope console at the top of the P16PIP has a flexibleobedient stem that allows the console’s screen to be angled to a comfortable viewing position. DO NOT BEND this stem at an angle greater than 90° (see figures immediately below).
DPS16-Manual-FINAL_040312_awb 4/3/12 11:41 AM Page 21 COMPATIBLE PROBES The table below describes and compares all probes compatible with the H16. Model No. (SKU) Probe Description P16ART-1SM Soft Metal Soft Metal Articulating Probe P16ART-2SM P16ART-3SM P16HPART VGA Resolution Articulating Probe Flexible-Obedient Probe Camera Head Diameter 01418 9 Probe Length 2m (6.6 ft.) 6mm (0.23 in.) 3m (9.8 ft.) 01579 9 1m (3.28 ft.) 01408 0 1m (3.28 ft.) 01409 7 2m (6.6 ft.
DPS16-Manual-FINAL_040312_awb 4/3/12 11:41 AM Page 22 WARRANTY INFORMATION General Tools & Instruments’ (General’s) DPS16 Pipe & Duct Recording Video Borescope Inspection System is warranted to the original purchaser to be free from defects in material and workmanship for a period of one year. Subject to certain restrictions, General will repair or replace this instrument if, after examination, the company determines it to be defective in material or workmanship.
DPS16-Manual-FINAL_040312_awb 4/3/12 11:41 AM Page 23 NOTES ______________________________________________________________________ ______________________________________________________________________ ______________________________________________________________________ ______________________________________________________________________ ______________________________________________________________________ ______________________________________________________________________ _________________________
DPS16-Manual-FINAL_040312_awb 4/3/12 11:41 AM Page 24 GENERAL TOOLS & INSTRUMENTS 80 White Street New York, NY 10013-3567 PHONE (212) 431-6100 FAX (212) 431-6499 TOLL FREE (800) 697-8665 e-mail: sales@generaltools.com www.generaltools.com DPS16 User’s Manual Specifications subject to change without notice ©2012 GENERAL TOOLS & INSTRUMENTS NOTICE - WE ARE NOT RESPONSIBLE FOR TYPOGRAPHICAL ERRORS.