
Instructions / Assembly


EYELET PLIERS, #71
Instructions:
1. Prior to eyelet installation, create a design layout by measuring and marking the
desired spacing and positioning of the eyelets on the work material surface.
[Photo 1: “Smooth” side of the work]
2. Select the “smooth” side of the work material (ex: the smooth side vs rough side of
leather). Eyelets should be installed so that the more “finished” side of the eyelet is
seen on the “smooth” side of the work material. (See photo 1)
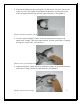
3. Cut an eyelet hole in the work material that
is just big enough to push your eyelet
through. If it is too big, the eyelet will fall out.
We recommend General’s #72, Revolving
Punch Plier pictured below. (See photo 2)
[Photo 2: Punch or cut a hole]