
Use and Care Manual


7
English
UNPACKING AND CONTENT
IMPORTANT: Due to modern mass production techniques, it is unlikely the tool is
faulty or that a part is missing. If you find anything wrong, do not operate the tool until
the parts have been replaced or the fault has been rectified. Failure to do so could result
in serious personal injury.
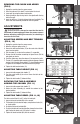
CONTENTS IN PACKAGE: (FIG 2)
Item Description Q'TY
Item Description Q'TY
WARNING: If any parts are missing or damaged, do not attempt to assemble
the saw, plug in power cord or turn the switch on until the missing or damaged parts are
replaced.
ASSEMBLY
WARNING: Always be sure that the tool is
switched off and unplugged from the power source
before adjusting, adding accessories, or checking a
function on the tool.
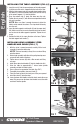
ATTACHING COLUMN TO BASE (FIG 3)
1. Set the Base (D) on a level, flat surface.
2. Place the Column & Support (C) on the Base (D), align the three
holes in the column support with the holes in the base.
3. Install a set of Bolts and Washers (N) in each column support
hole and tighten with a wrench.
FIG 3
C
N
D
A
B
D
C
FIG 2
K
H
O
M
E
JF
N
I
L
A Head Assembly 1
B Table Assembly 1
C. Column & Support 1
D. Base 1
E. Spindle Feed Handles 3
F 5/8" Chuck 1
G. Operator's Manual (not shown) 1
H. Crank Handle 1
I. Chuck Key 1
J. Drift Key 1
K. Rack 1
L. Column Ring 1
M. Housing Cover Knob 1
N. Bolts and Washers 3 Sets
O. Allen Wrenches 2