
Operation Manual


4
1. Getting Started
Step 1: Unpack all components from the shipping box. Please save
the original packaging material in case you ever need to return
the system since the Limited Warranty does not cover shipping
damages.
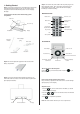
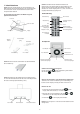
Step 3: Connect the enclosed external telescopic antenna. You
will nd the antenna connector in the Geneva Sound System back
panel (see picture below).
The shipping box should contain the following system
components:
Step 4: Connect the AC power cable to the AC power plug on the
back panel (see picture). Then connect the other end of the AC
power cable to an AC outlet. „12:00“ will blink on the display,
indicating an invalid time setting.
Step 2: Remove the protection paper from the remote control
battery compartment.
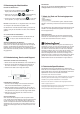
Line In
Antenna connector AC plug
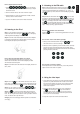
Touch Panel:
Turn on the Geneva Sound System:
Press the key on the remote control or touch the key on
the touch panel.
How to verify that the remote control works?
Every time a key is pressed on the remote control, a small red light
quickly lights up on the display.
Adjust the clock:
1. Press the key on the remote control. The letter „C“ should
start blinking on the display.
2. Use the and keys on the remote control or the wheel to
set the correct time.
3. Press to complete the procedure.
Note: the clock remains valid for up to 1 hour of power loss.
Remote Control:
Telescopic
Antenna
iPhone adapter
Power cord
Line cable
Remote control
Treble control
Bass control
Play / Pause
Fast reverse/
skip backward
FM/
radio presets
Power On / Off
Volume control
Clock control keys
Fast forward/
skip forward
iPod
Line in
FM Radio
iPod Menu key
Fast reverse / skip
backward
Power On / Off
Play / Pause
Fast forward/skip
forward
iPod control and volume
Mode selector
Dock adapter
iPod dock
Touch panel
ON / OFF key
Display