GARAGE DOOR OPENER MODELS PowerMax® 1200/1500, SC 1200/1500, TriloGTM 1200/1500, PowerLift® 900, GPowerTM 900, SilentMax® 1000/1200, CB 1000/1200, IntelliG® 1000/1200 SCREW/BELT/CHAIN DRIVES OPERATION & MAINTENANCE MANUAL Includes INTELLICODE® 2 Remote Control. Safe-T-Beam® System must be installed to close door. For use only with residential sectional or one piece overhead garage doors. Homelink®and Car2U® compatible. Need help or have questions? DO NOT RETURN to the store.
Table of Contents TRANSMITTER COMPLIANCE STATEMENT Transmitters comply with all United States and Canadian legal requirements as of the date of manufacture. No warranty is made that they comply with all legal requirements of any other jurisdiction. If transmitters are to be used in another country, the importer must determine compliance with any local laws and regulations which may differ from United States and Canadian requirements prior to use.
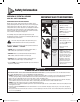
1 Safety Information Important Safety Instructions OVERVIEW OF POTENTIAL HAZARDS READ THIS SAFETY INFORMATION CONVENTIONS USED IN THESE INSTRUCTIONS Garage doors are large, heavy objects that move with the help of springs under high tension and electric motors. Since moving objects, springs under tension, and electric motors can cause injuries, your safety and the safety of others depend on you reading the information in this manual.
2 Features Begin here only after completing assembly and installation of the opener. Review the Assembly and Installation poster to ensure all steps have been performed. Contact your Genie® Professional Dealer for an installation poster, if needed, or call 1-800-35GENIE. You may also visit www.geniecompany.com to download a PDF file. SAFETY FEATURES opener features Safe-T-Beam (STB) Non-Contact Reversing System Puts an invisible beam across the door opening.
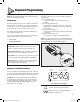
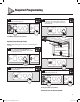
3 Required Programming NOTE: Before you begin programming, check to make sure there are no objects in the garage door opening. INTRODUCTION Now that your Genie garage door opener is installed, you will want to program the opener so that the door opens and closes properly and all remote devices operate correctly. The following steps guide you through setting your opener so it functions properly for you. The following information will take you through programming your opener’s functional settings for use.
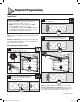
3 Required Programming TRAVEL LIMITS WA R N I N G 3 • Make sure doorway is in view and clear of obstacles and people to avoid injury or damage to property. • DO NOT operate this unit from wall console before LIMITS are set. Severe damage to the opener can occur. • The shuttle MUST be engaged to carriage BEFORE setting limits. See Installation Poster (if provided) or call Customer Service at 1-800-35GENIE or visit www.geniecompany.
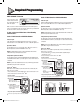
3 5 Required Programming 8 Press and release the Program Set button (both LEDs flash blue and go off). PROGRAM PROGRAM Press and hold the up arrow button (+) until door is fully open, then release. Watch carriage as it approaches the power head to avoid contact with powerhead. PROGRAM – SET + SET SET – + HOLD The DOWN (closed) limit is programmed. Opening Garage Door (Up Limits) NOTE: Beginning with garage door closed is recommended but not necessary.
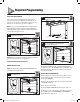
3 Required Programming Wall Console / Overview This opener has a serial number sticker in which the serial numbers begin with 10 or higher. MODEL AC SR3 FCC ID: B8Q AC SR3 IC: 2133A-CSD1D Series III Wall Consoles with Black Buttons THE GENIE COMPANY Residential Door Operator 120V. 60HZ. 5A S/N:10XXXX XXXXXXX Indicator Light Indicator light will display Red when wall console is properly wired and Sure-Lock™ is OFF. When Sure-Lock™ is ON, indicator light flashes.
3 Required Programming Force and Speed Control 12 These controls are factory programmed and automatically set themselves when you use the Wall Console to open and close the garage door for the first time. The door MUST complete a full cycle from open to close and close to open before it is fully set. Lay a 2” x 4” board flat under the center of the door opening. Note: Force or Speed controls DO NOT require programming. Force and Speed Limits are factory set and rarely require adjustments.
3 Required Programming REMOTES / New Intellicode 2 Openers 16 Remove protective film for battery from remote. PULL NOTE: The following instructions are for the remote control transmitters (“Remotes”) provided with this opener. This Remote is preset for use with the Intellicode 2 Access Security System. Refer to page 14 for additional information on Intellicode 1 and 2 Remotes and how to switch from Intellicode 2 to Intellicode 1. See page 14 for programming instructions using Intellicode 1 Remotes.
3 18 Required Programming The Remote button is now programmed. Press and release the same button on the remote (both LED’s flash blue and then turn off). Repeat as necessary for additional Remotes. To program the same Remote for other garage door openers, repeat the steps above using one of the other two Remote buttons. Each Remote can be programmed for three door openers.
4 Optional Programming Setting Up a PIN Opener 4. Press Up/Down key again. Opener LEDs will turn off. 5. Press Up/Down key again. Door opener will run. Note: Pressing any key will stop or start the opener while the door is in motion. The door will automatically stop fully open or closed. When the door has stopped moving, pressing on any single button will activate door until backlight goes off (30 seconds) Note: Rapid blinking of the red LED on the Powerhead indicates an error.
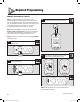
4 Optional Programming Clearing Memory FOR Remotes 1 4 Press the Program Set button on the Powerhead and hold 2 seconds, round LED comes ON. PROGRAM To verify that the memory is cleared, press a remote button that was previously programmed to the Powerhead. PROGRAM – SET + SET HOLD 2 seconds 2 Release the Program Set button, round LED goes off and the long LED flashes purple. PROGRAM SET 3 – + If the memory has been cleared, the Remote will not activate the door opener.
4 Optional Programming Intellicode 1 REMOTES Remotes provided with this unit can operate other (Intellicode 1) models of Genie garage door openers. The default Intellicode 2 setting must be changed to Intellicode 1. (Follow these same steps to change Intellicode 1 back to Intellicode 2.) NOTE: The button directly above the logo on the transmitter is preset to Intellicode 1.
5 One-Piece Doors Attaching door bracket to door 1 Using bracket, mark holes on door or frame and drill 5/32" hole completely through door frame. Attaching door arm to door bracket 1a Screw drive models: One-Piece Doors will only accept a straight door arm. Curved door arm 3/8"-16 x 7/8" Bolt Door centerline 3/8" Lock nut Straight door arm (not included) NOTE: Center bracket on door as high as possible, preferably top edge.
6 Maintenance and Adjustments If you have any questions, please do not hesitate to contact customer service at: 1-800-35-GENIE or visit www.geniecompany.com A. Contact Reverse Test See page 9. Important Safety Instructions WA R N I N G TO REDUCE THE RISK OF SEVERE injury or death, READ AND FOLLOW ALL INSTRUCTIONS. 1. NEVER let children operate or play with the door controls. 2. Keep remote away from children. 3.
6 Maintenance and Adjustments REGULAR MAINTENANCE (continued) • S crew drive models: Verify shuttle release lever is in ENGAGED (UP) position (pull release handle toward opener and let go) • Chain/belt drive models: Verify bullet is engaged to carriage. Pull/release cord down and back towards opener and let go. Screw Drive Belt/Chain Drive Opener Opener Reset Open/Close Travel Limit Performing all eleven (11) Limits/Force setting steps (see pages 6-8) erases previous Limits/Force settings.
6 Maintenance and Adjustments Adjustment Guides Force Level 1 Purple Red Blue Powerhead LEDs ROUND LED LONG LED BLUE Off Force Level 2 BLUE Off Force Level 3 BLUE BLUE Force Level 4 Off PURPLE Force Level 5 PURPLE Off Force Level 6 PURPLE PURPLE Force Level 7 Off RED Force Level 7 RED Off Force Level 9 RED RED LED indicator colors: CAUTION Force Level Door closing force is FACTORY set and requires no adjustment for normal operation.
6 Maintenance and Adjustments Adjustment Guides (continued) LED indicator colors: Speed Settings (DC motors only) Speed settings are pre-programmed at the factory for the maximum speed. Speed settings should not need adjustment with this unit. However, travel speed for the opener can be adjusted to a slower speed in both the Open and Close directions, to minimize wear on heavier sectional doors.
7 Wiring Diagram Opener circuit wiring diagram. This wiring diagram is for reference only. WA R N I N G OPENING COVER MAY CAUSE ELECTRIC SHOCK. Disconnect power from opener prior to removing cover.
8 Troubleshooting OPERATION Problem Opener does NOT run from wall console. Opener runs, but door does not move. Opener works from wall console, but NOT from remote. Remote has less than 25 feet operating range or no operation. Door starts down, then STOPS and goes back up. OR Safe-T-Beam® System malfunction. Need help or have questions? DO NOT RETURN to the store. Call us: 800-354-3643 What to do • Check power source. – Plug a lamp into outlet used for powerhead. If lamp works, power source is OK.
8 Troubleshooting OPERATION (continued) PROBLEM Noisy operation. Door opener runs slow. WHAT TO DO • Be sure all door fasteners are tight. • Be sure garage door is in good repair, properly lubricated and balanced. • Be sure opener is in good repair. • Check operating condition of door. Door may need professional repair/adjustment. • Is this opener installed on a one-piece door? Normal speed for one-piece door is lowest speed setting.
9 Warranty PowerMax® 1200/1500, SC 1200/1500, TriloG™ 1200/1500, PowerLift® 900, GPower™ 900, SilentMax® 1000/1200, CB 1000/1200, IntelliG® 1000/1200 LIMITED WARRANTY GMI Holdings, Inc.
Garage Door Opener Accessories Looking for Leading-Edge Technology or the Perfect Update/Replacement? Genie Has the Answer! ® Did your garage door close? Genie-Net technology “tells” you! ™ Closed Confirm™ Wireless Remote Leading-Edge Technology (Works with Revolution Series 1500, 1200 and 1000 Models) • Sleek and compact design • Beeps and flashes green when garage door closes.