
Replacement Part List
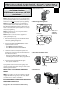
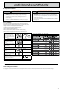


15
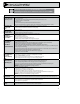
MAINTENANCE & ADJUSTMENTS
G. Adjustment Guides
Force Settings
Force settings are pre-programmed at the factory and applied
during the Open/Closed Limit settings steps. For normal use, these
settings should not need adjustments with this unit.
H. Resetting Travel Limits
See pages 8-9 to reset travel limits. Force setting and contact reverse test must be performed in the event of a travel limit change.
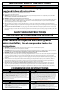
AVERTISSEMENT
!
Pour éviter les blessures ou des dommages
• NE JAMAIS régler la force pour compenser des dommages,
y compris une porte mal équilibrée, un rail de porte coinçant
ou des ressorts cassés.
• Tous les mois, EFFECTUEZ LE TEST D’INVERSION AU CONTACT.
Voir page 10.
WARNING
!
TO AVOID INJURY OR DAMAGE
• NEVER adjust the force settings to adjust for damage,
including an unbalanced door, binding door track or
broken spring.
• Perform a CONTACT REVERSE TEST monthly. See page 10.
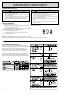
Conditions possibly requiring adjustments are:
1. Doors with very sti weather seals.
2. Doors that start down, STOP, and reverse before closing.
3. Doors that start up, but STOP before they completely open.
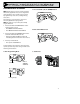
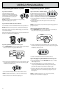
Press and hold both up and
down arrow buttons until
round LED turns RED, release
buttons. Round BLUE LED will
ash 3 times.
LEDs will now display current UP force setting (See chart).
Press either arrow button until
desired UP force setting is
reached.
See Chart
Once setting is chosen, press
and release. This will lock the
UP force setting.
LEDs will now show current DOWN force setting. (See Chart).
Press either arrow button until
desired DOWN force setting is
reached.
See Chart
Once setting is chosen, press
and release. This will lock the
DOWN force setting.
The LEDs will now turn BLUE then o . This con rms
that both force settings have been set and unit is
ready for normal operation.
Repeat “Learn Force Limits and Contact Reverse Test” page 10.
OFF
BLUE
BLUE
OFF
Flashes
3 Times
OFF
RED
BLUE
PRGM
SET
PRGM
SET