
Replacement Part List


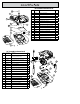
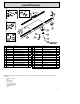

23
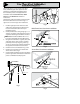
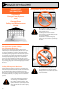
One-Piece Door Installation
Installation Poster Supplement
H + 6 inches
This model opener can be installed on a One-
Piece (California) style door up to 8 feet tall.
Follow the recommended installation from
the installation poster and supplement the
installation of the HEADER BRACKET, DOOR
BRACKET, and POWERHEAD with these
instructions.
Note that the powerhead will be mounted lower
than the header bracket as shown in Fig. 1 as
opposed to a sectional type door installation.
1. Find the highest point of door travel and
add 6 inches to determine header bracket
location and install header bracket per
installation poster.
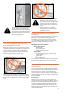
2. Install powerhead to ceiling using Fig. 1 as a
guide to its position and installation poster as
a guide to mounting and hardware needed.
NOTE: Bottom of rail should be between 1 to
1-1/2 inches from highest point of door travel.
3. Using the door bracket as a guide, mark, drill
and install on the door as high as possible
preferably on the top edge. Fig. 2. Use lag
screws or carriage bolts and nuts suitable for
the application to fasten bracket to door.
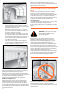
4. Install door arms as illustrated in Fig. 3 & 4
5. Install clevis and cotter pin to attach door
arm to door bracket. Fig. 5
6. Continue with installation per the installation
poster if applicable. Download an installation
poster at: www.GenieCompany.com
1” to 1-1/2”
Door Arm
Door Centerline
Clevis Pin
Door Bracket
Cotter Pin
Straight Door Arm
Belt/Chain Drive Door Arm Installation
Screw Drive Door Arm Installation
Fig. 1
Fig. 2
Fig. 3
Fig. 4
Fig. 5
7