
Replacement Part List


Testing The Genie Battery Backup
NOTE: It is recommended that the battery backup be allowed to charge for 24 to 48 hours prior to testing. Initally, the opener may not
operate from the battery backup mode if battery is not fully charged.
1. Run the opener using the wall control or remote to ensure it is working properly.
2. Turn o power to opener by unplugging from outlet or turning o breaker.
3. Press wall control or remote control. Opener will run at a slower speed than normal.
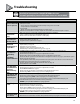
NOTE: See troubleshooting guide (pg. 20) in this manual if any of the steps above fail.
Work light will not operate while in battery backup mode. (Courtesy white LED’s will illuminate.)
4. After successful test, reconnect powerhead to power source.
Replacing The Battery in the Genie Battery Backup
Proper care should be used when handling a battery. Eye protection should be worn.
NOTE DO NOT reverse polarity (+) and (-) as this will damage the powerhead.
1. Unplug powerhead from power source.
2. Unplug battery backup from harness
connection.
3. Remove both mounting screws from
rear of battery backup.
4. Detatch battery backup from back of
opener by tilting the BBU approximately
45 degrees and lifting up towards the
ceiling.
5. Remove 4 screws from battery hold
down bracket.
6. Remove battery.
7. Disconnect harness wires from the (+)
and (-) terminals.
8. Replace in reverse order
NOTE: Allow 24-48 hours to charge battery
before testing.
9. Test as noted above.
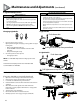
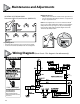
Completed Assembly
WHITE(+)
See page 20 for
Condition LED’s
That will illuminate once
Genie Battery Backup is
operational.
Genie Battery Backup (BBU)
Battery backup devices from other manufacturers will not operate with this opener.
Use only Genie Battery Backup type battery that was provided. Genie P/N 111658-0002
21
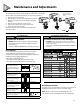
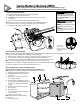
Installing Genie Battery Backup
For units that included with optional battery backup (BBU)
1. Unplug powerhead from power source.
2. Tilt BBU approximately 45 and lower into slots in the top rear of the
powerhead.
3. Fasten to powerhead with 2 supplied self tapping screws.
NOTE: There are no holes in rear cover. Self Tapping screws will drill through cover.
4. Plug battery harness into plug located at the top of the powerhead.
5. Reconnect powerhead to power source.
TO PREVENT POSSIBLE
SERIOUS INJURY or DEATH
from electrocution AND REDUCE RISK of FIRE
— Disconnect ALL electric power sources and battery
power BEFORE performing ANY service or maintenance.
Install only in DRY locations - NOT INTENDED FOR OUTDOOR USE.
Use only 12V, 5AH, SLA replacment battery
(Genie P/N 111658-0002).
CAUTION
Installer uniquement dans des endroits secs—NE DOIT PAS ÊTRE
UTILISÉ À L'EXTÉRIEUR.
Utiliser uniquement une pile de remplacement de 12V, 5AH, SLA
(réf. Genie 111658-0001).
POUR ÉVITER LES BLESSURES
GRAVES VOIRE MORTELLE PAR
ÉLECTROCUATION POUR RÉDUIRE ES LES RISQUES
D'INCENDIE
—Débrancher toutes les sources d’alimentation électriques et
la pile avant d'eectuer des opérations de réparation ou
d'entretien.
ATTENTION
45