English -i- English - ii -
English - iii - English - iv -
2.0 Cautions Do not try to disassemble the camera by yourself, which may damage the camera or cause electric shock. User Manual Do not fire the flash in a close distance (less than 1 meter); it may hurt your eyes. Keep the camera away from the reach of children or animals to prevent them from swallowing the batteries or small accessories. Stop using the camera if any kind of liquid or foreign object enters the camera. If it happens, power off the camera and contact your dealer for help.
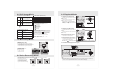
.0 Getting Ready 3.0 Overall Introduction 3.2 External View LCD Montior Back Flash LED Front LED indicator Wide/ Tele Button Mode Button Key Function Button Lens Key Function Button Voice Memo / Up Button Tripod Socket Play / Pause / Up Button OK / Menu Button Top Strap Eyelet Self- timer / Left Button Down/Exposure/ Delete Button 1 - + X 8.
.0 Buttons & Function 5.0 Buttons & Function 5.9 Down/Delete & +/- 5.4 Playback Select the Playback Mode by pressing the Playback Button ( ). 100-0001 Playback Mode will show still images and movie clips . Press the Down Button ( & +/- ) to move the cursor to the down tab. In Shooting Mode, you can press Delete Button ( ) to adjust the EV and Night Scene Long Time Shutter. In Playback Mode, you can press Delete Button to delete the Still Image, Movie Clips or Voice Clips. 5.9.
9.0 Playback Mode 6.0 Still Image Mode 6.2.3 Sharpness (Default: Normal) VIVID 6.2.6 W. Balance (Default: Auto) This effect can turn the edges of The captured image look sharper but may result in more image noise. NORMAL This effect can turn the edge of the captured image look sharp, which is suitable for printing out. SOFT This effect can turn the edge of the captured image look smoother, which is suitable for image editing on PC. Turn the image into yellowish brown.
9.0 Playback Mode 9.0 Playback Mode 9.4 Exploring an Image 9.7 Delete 100-0021 100-0021 100-0021 X 1.6 X 1.6 Menu Slide Protect Delete Copy to Card DPOF Delete Single Image 1.Select the image you'd like to delete and press the Delete Button ( ). 2.Press OK/Menu Button to proceed or press left button to cancel the request. Back Delete All Image(s) 1.Select “ALL" & “Execute” and press the OK/Menu Button. 2.Press OK/Menu Button to confirm the request or press left button to cancel the request. 1.
10.0 SETUP Mode 10.0 SETUP Mode You can enter SETUP Mode by press the OK/Menu Button and select SETUP. Setup Operation Steps Setup Auto Language Format Date Input Imprint 3.Min. English Net Menu Net Menu off Beep Light Freq. Q.View Sys. Reset USB On 60Hz On Net Menu Printer Back Execute : OK Back Execute : OK 1. MENU 2. or 3. OK 4. or 5. OK Note: 1.Auto Off 2.Language 3.Format 4.Date Input 5.Imprint 6.Beep 7.Light Freq. 8.Q. View 9.Sys. Reset 10.USB 10.8 Q. View 10.
12.0 Software Application 11.0 PictBridge Mode 11.1 Connecting the Camera to a PictBridge-supported Printer 12.1 ArcSoft MediaImpression™ 1. Power On both the camera and the printer. 2. Press the MENU Button to go to SETUP Mode. 3. Go to USB and select PRINTER for printer connection. 4. Use the supplied USB Cable to connect the camera to the PictBridge-supported printer as shown above to print out the stored images. 11.
13.0 Appendix 14.0 Specification Error Message Table Messages CARD FULL MEMORY FULL Image Causes Solutions There is insufficient card memory capacity for storing an image. There is insufficient internal memory capacity for storing an image. CARD LOCKED (ICON BLINKING) The memory card is under protection. LOCK The Image can not be deleted under protection. Type 1/2.3″ 9M CMOS Sensor Sensor Effective Pixels Approx. 9.12 Mega Pixels (3,488 x 2,616) Lens Lens Type Fixed Focus F No. F3.