
Operation Manual


13
14
12.0Software Application
11.0PictBridgeMode
11.1ConnectingtheCameratoaPictBridge-supportedPrinter
11.2SelectPicturestoPrint
Opera tion
Steps
1.or
2.OK
PictBridge
Execute:OK
ImagesNextMenu
SizeDefault
LayoutDefault
Print
Images
BackExecute:OK
SelectNextMenu
AllNextMenu
Select
Execute:OK
PrintNum00
11.3CustomSet
You can select the Paper Size and Layout before print out the images.
Operation
Steps
1.or
2.OK
PictBridge
Execute:OK
ImagesNextMenu
SizeDefault
LayoutDefault
Print
PictBridge
Execute:OK
ImagesNextMenu
SizeDefault
LayoutDefault
Print
Default
2LFormat
4X6
Default
Index
Borderless
SIZE
LAYOUT
Setting the size of the printing paper. The size formats will depends on the printer
supported function.
Setting the number of pictures to be printed on a sheet of paper.
[SELECT]: The PictBridge function will be applied only to the picture currently
displayed on LCD Monitor.
[ALL ] : The PictBridge function will be applied to all pictures
1.Select [SELECT] or [ALL] where you can set the number of copies to print.
2.Press the Up/Down Button to select the number of print out copies. Maximum 30 prints.
3.Use the Left/Right Button to select images and select the number of prints for another picture.
4.Press OK Button to save.
5.Go back to PictBridge main menu and select PRINT to start printing.
SettingtheNumberofCopiestoPrint
.
All
Execute:OK
PrintNum00
Opera tion
Steps
1.or
2.OK
3.OK
PictBridge
Execute:OK
ImagesNextMenu
SizeDefault
LayoutDefault
Print
A4
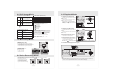
1. Power On both the camera and the printer.
2. Press the MENU Button to go to SETUP Mode.
3. Go to USB and select PRINTER for printer
connection.
4. Use the supplied USB Cable to connect the camera
to the PictBridge-supported printer as shown above
to print out the stored images.
12.1 ArcSoftMediaImpression™
Click “ ”Extra
12.2EasyLinkWith YouTubeby Arcsoft
Be a Movie Maker by login & upload with Legal and Safety Software.
Browse & Upload in YouTube with ArcSoft MediaImpression by follow the steps
below:
!
!
1. Select “YouTube Account Setup”.
2. Select “Step 1” to login YouTube account.
3. Select “YouTube Account” or “Google Account” to login.
4. Select “Step2” to get authorization.
5. Click “Allow” to get permission.
6. User will see “User Name” after login.
7. Select the file you want to upload and click “Upload to YouTube”
!
!
!
!
!For more information click to http://www.arcsoft.com/ .
ArcSoft MediaImpression™ manages your media for you, and gives you
tons of fun and exciting ways to create and share projects featuring your
photo, video, and music files. Edit, enhance and add creative effects to
your photos.
Create your own movies or photo slide shows,complete with soundtrack.
Upload your files easily to YouTube™!
Or share them through simple email attachments or popular photo printing.