
Quick Start Guide


ArcSoft Total Media™
HDCam
Quick Start Guide
Introduction
ArcSoft Total Media™ HDCam is a desktop software that combines
media management and playback capabilities.
Media management
You can import the media files from the device to edit, upload,
and produce photo books and album pages.
Playback capability
You can view pictures and play video clips using ArcSoft Total
Media™ HDCam.
System Requirements
Operating System : Windows XP SP2, Vista, and Windows 7
CPU: Intel / AMD Dual-Core or above
Memory: At least 1GB
Graphic Card: DirectX 9 or DirectX 10 (recommended)
Interface: Standard USB 1.1 port or higher
Hard Disk: At least 2GB of available disk space
Installation
If the CD does not automatically run, follow the steps below to install
the software:
1. Double click My Computer.
2. Use the mouse to point to the DVD-ROM/CD-ROM drive.
3. Right click the mouse then click Open.
4. Double click StartHDCam.exe.
5. A wizard appears to guide you through the installation procedure.
6. Follow the instructions to complete the installation.
To Uninstall
1. Click Start > Programs > ArcSoft TotalMedia HDCam > Uninstall.
2. A wizard appears to guide you through the uninstall procedure.
3. Follow the instructions to complete the uninstall.
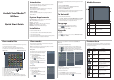
Media Browser
#
1
2
3
View Mode Area
Preview Area
Function Bar
Area
Function
Provides three modes to view media files.
Selects and displays file thumbnails and
detailed information.
Lists main function buttons.
View media files
Preview Area
Follow the instructions below to view the media files in your device:
1. Connect the device to the computer.
2. The device code appears on the top of View Mode Area.
3. Click the device code to display all media files in the device.
View modes
1
3
2
• To play a video clip, double click the clip or click .
• To pause / stop / continue a video clip, click / / .
• To play the previous or next clip, click / .
• To delete a file, select the file then click .
• To trim a video clip, click .
Three view modes are available to view media files: Library View,
Calendar View, and Browser View.
Note: To view media files in your device using Library or Calendar
View, you need to import media files first.
Library View
The Library View lists My Creation folder and
other folders created while importing files.
• To switch to Library View
1. Click Camcorder Libraries to expand
Libraries window.
2. Select the desired folder.
3. Click to switch to Library View.
• To view or edit a folder's properties, select
the folder then click .
• To delete a folder, select the folder then
click .
Calendar View
The Calendar View uses the file creation date
to organize media files.
• To switch to Library View
1. Click Camcorder Libraries to expand
Libraries window.
2. Select the desired folder.
3. Click to switch to Calendar View.
Three modes are available in Calendar View: Ye a r , Month, and
Day mode.
To switch between different modes:
• Click the picture under the desired year to enter Month mode.
• Click to change to the previous or next year if available.
• Click the picture under the desired month to enter Day mode.
• Click to change to the previous or next month if available.
• Click to return to the previous mode.
Browser View
The Browser View enables you to browse for media files in your
computer using the tree view.
To switch to Browser View:
1. Click Computer to expand Computer window.
2. Select the desired folder in your computer to view media files.
3. To refresh the list of media files, click .
Rating filter
Name
Function
In Preview Area, several options are available to select and display
file thumbnails and detailed information. See the table below for a
description of each option:
Option
Type filter
New filter
Thumbnail
Thumbnail slider
Details
Quick search
Displays the media files according
to the selected rating.
Displays the media files which are
new.
Displays the media files according
to the selected type.
Displays the media files according
to the typed characters.
Adjusts the thumbnail size by
moving the slider.
Displays file thumbnails.
Displays file thumbnails with
detailed information.
To install Total Media™ HDCam:
1. Insert the installation CD into the DVD-ROM/CD-ROM drive.
2. The CD runs automatically.
3. Select the installation language and accept the License Agreement.
4. Follow the instructions to complete the installation.
Language
1. Click > Preferences on the main screen.
2. Select a language then click OK.
To change the interface language after installation:
To uninstall Total Media™ HDCam:
Upgrade
1. Click on the main screen to connect to Information Center.
2. Select Upgrade or Patches.
To upgrade:
Device code
Media files in the device
• To rate a file, click on the file.
• To view a file's properties, click on the file.
• To preview a picture in a new window, double click the picture.
• To preview the previous or next picture, click the right/left button.