
Installation Manual
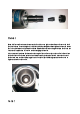
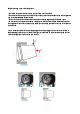


The left photo shows a correct alignment with the collet aligned with the nut and the bottom
taper sitting on the corresponding part of the nut. On the right the collet is not aligned with the
nut, the bottom taper is resting on the retaining ring rather than it being in the slot of the collet.
When tightened from this position the collet will be forced out of alignment and damage to the
nut, collet and tool holder could result.
For ease of use I have purchased an ER-
A clamping nut
(https://www.sainsmart.com/products/genmitsu-
pcs-er
-a-collet-clamping-nut) for each
collet. This means I can just leave the collet permanantly in the nut.
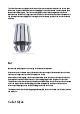
Inserting a bit
Make sure the nut is slack on the tool holder.
Make sure the shank of the bit is clean.
Slide the shank into the collet, the maximum depth of the bit the collet will clamp is
mm
(some collets may have a shorter clamping distance). There is a gap between the top of the collet
in the tool holder so a bit can be inserted further if required.
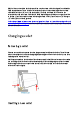
Using the spanners
fi
rmly tighten the nut onto the holder, compressing the collet around the
bit. This does need to be tight.
Checking everything
After mounting a bit, especially after changing the collet, manually rotate it and ensure the
rotation of the tip of the bit is straight and true.
If it is not check:
The collet is seated correctly in the nut.
A dirty bit shank or collet interior is not throwing things out of true
The tool holder taper and collet exterior are clean
The collet is the correct size for the bit shank
The collet has been tightened enough and holds the bit securely
The bit is not bent or damaged.
•
•
•
•
•
•
•
•
•
•