
Installation Guide


Plan Like a Pro
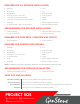
SHIPLAP AREA
Do Not Include in Your
Overall Measurements
COVERAGE AREA
Include in Your
Overall Measurements
PREPARATION
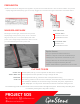
GenStone Products are designed to be applied to any at structural substrate that is clean and free of debris. The positive
shiplap edge (red below) always goes on the top. Stagger the connections throughout the wall to avoid visible seams.
Working from left to right, measure from the positive
shiplap edge of the previous panel, corner or nished
edge and mark your cut on the at (back) side of the
panel. Use a straight edge and marker to draw a cut line
you can follow with your hand or power saw.
MEASURE AND MARK
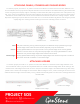
CUTTING TO SIZE
Circular Saw Panel at (back) side up, be sure to protect the face (front) of the panel
Table or Miter Saw Place the panel front side up before running it through the saw
Hand Saw
Place the panel at side up, protect the face of the panel while cutting
Small Cuts When making precise cuts to account for hose bibs, electrical boxes, electrical outlets and
other installation obstacles, we recommend using a hand saw, utility knife, drywall saw or
jig saw. Sandpaper or a rasp can be used to le a small area to size after making the cuts.
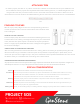
The manufacturing process can leave strands of foam on the face and at the edge of the panels. These are easily removed by hand
or corrected by trimming with a utility knife or sanding.
Tips for Success
• Let your panels acclimate for 48 hours
• Wait for a days of consecutive moderate temps
• Always paint exposed raw material left by cuts
• Snap a chalk line, do not level with the ground
• Unpack and Organize Panels by Number
• Watch Install Videos on genstone.com or YouTube