
Installation Guide

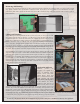


Fitting the last panel:
Measurethegapbetweenthelastinstalled panelsfromlefttoright.Measurefromtheinside
groutline(forrandomrock)orfromtheinsideproductedge(forstackedstone)totheinside
negativelipedgeoftherightendpieceorcorner.(Yourtapewillneedtogetbehindthepanelto
accomplishthis).Thismeasurementrepresentstheoverallpanellengthcutoff.
• Layingoutandmarking:Usingadarkcoloredmarkingpenandsquare,markontheback
sideofthepaneltheoverallpanellengthcutoffasmeasuredinthepreviousstep.Makesure
youhavemeasuredfromthepointsdesignatedbythearrows.Checkthatyouaremeasuring
from the correct end of the panel.
• Forthescorecut(toprovideaproperoverlap)subtractthewidthofthepositivelipfrom
theoverallpanellengthcutoffmeasurement.Markasecondlineparalleltotherstlineto
indicate this measurement.
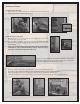
Score cutting and cutting the panel to length:
• Scorecutting:Beforemakingtherst(scorecut),settheripdepthtomatchthedepthofthe
panel’sexistingnegativelipdepth.
• Cutting panel to length: reset your blade to the appropriate (manufacturer’s
recommended)through-cutsettingsothatyoucansafelycutthepaneltolength.(Pleasenote:
Followallsafetyprecautionsprovidedbythemanufactureroftheequipmentortoolsyou
workwith.Weshowthismodelandripdepthadjustmentstyleforillustrationpurposes.)
Score cut:
• Thescorecutshouldcloselymatchthedepthofthenegativelip.
• Cuttolengthpanelend.
Final cut:
• Standthepanelonend.
• Alignthehandsawbladebetweentheedgeofthenegativeandpositivelipsatopposingtop
andbottompanelsides.Cutthroughuntilthesectionfallsout.
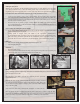
Inside Corners:
Using a framing square or straight edge, mark a line on the back of the panel consistent with where you
want the inside corner to be.
Set your saw at 45°. Make your rst cut, following the line previously
marked in step one.
Keepingthesamesideup,rotatethepanel180°.Preparetomakeyournext
cut,usingthepreviouscutonthesurfaceofthepanelasaguide.Keepyour
sawsetat45°.Youmaychoosetoclampapieceofwoodorsimilarstraight
edge to use as a guide.
Nowremoveanyburrsusingautilityknife,sandpaper,oranetoothsaw.
Placethenewlycutpiecestogetherandtrimthejointasnecessarytoachieveatightt.This
process is very similar to making miter cuts when doing trim work. Use caulk and touch up
paintasnecessaryforthenerdetailstohelpachieveanished,professionallook.