
Installation Guide

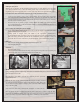

Asyoulayoutyourwall,youwilltyourGenStonepanelstothebuilding,whichwillrarelybesquare,true,orasasmallmodication
tothepanels(especiallyonyourrst/bottomrowandcorners)maybenecessary.Thesecompensationscanbemadebytrimming
withautilityknifeorsandertoensureanaccurateinstallation.Tobeginthelayout,usealeveltomarkalineacrossthesubstrate
atorabovethetopedgeofyourbottomrowofpanels.Thiswillgiveyouareferenceasyourunyourpanelsandallowyoutokeep
yourinstallationsquare.Repeatingtheselinesasyouprogressupthewallwillallowyoutomakeanynecessaryadjustmentsand
maintainanaccurateinstallation.Beginyourinstallationinthelowerleftcornerandproceedtotherightdownthewallwiththat
row.Itiscriticalthatthisrstrowbeastrueaspossiblebecauseallotherpanelsbuildfromthispoint.IfyouareusingGenStone
cornersstartbyttingthecornerrstandthenthepanelnexttoitforyourrstrow.
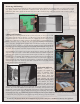
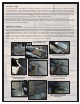
Outside Corners:
GenStone offers the following solutions for outside corners which are available to match all varieties of GenStone panels and are
thebestwaytonishacorner.Theseincludea“Z”shapedcornerpiece,leftcornerpanelandrightcornerpanel.Wheninstallinga
corner piece mark a plum line on both sides of the corner far enough away from the actual corner so they are visible for reference
whentesttting.Startatthebottomtesttandtrimtherstcornerforthebestoveralltonbothsideskeepinginmindthatcorners
haveapositiveedgethatgoestothetop.Becausecornersareoftenoutoftrue,thismayincludeshavingminimalamountsfromthe
backsideofthepanel,beingcautiousnottoreducethethicknesstoomuch.Forsomeoutsidecornersthatarenot90degree(such
as45or22½degreeturns)andforinsidecorners,miteringisanoption.Ifpossible,whenmitering,itisbesttomiterclosertothe
middleofthepanelasopposedtotheend,thusachievingamoresolidstoneappearance.Thesecornerscanbelightlysandedand
lledwitheitherGenStonegroutorapaintableexteriorgradellerandthen,ifneeded,touchedupwithSherwinWilliamsSuper
Paint.
Installrstcornerpieceatthebottom.With“z”shapedcornerpieces,youmaycontinueinstallationupthecornerofthewallto
the desired height. With corner panels, you will want to alternate left and right panels as you move up the wall in order to achieve
a staggered, natural random pattern.
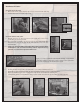
• Measure, mark and cut to length the
rstcornerpieceorpaneltobeinstalled
at the lower left of the building or wall
area.
• Fit the rst piece using the chalk line
asyourhorizontalguide.(Note:Ifusing
a wood rasp, it takes very little time to
customteachpiecetothewall.)
• Makesuretouseadequatesealantsand/
ornisheswhenjoiningotherproducts
and around penetrations, windows or
doors.