
Installation Guide
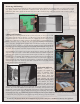


Installation of Panels:
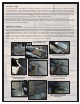
Secure the top of the panel:
• Placescrewsinthepositiveshiplapedgeevery8"nearthebottomoftheedge.
• Countersinkscrewstoadepthofupto1/8".
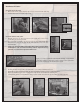
Secure the bottom of the panel:
• Startinganinchortwoabovethebottomofthepanel,place3or4screws
evenly along the nearest grout line.
• Ifnogroutlineisavailable,youmayscrewintothefaceofthepanel.Sink
these screws in hard to see areas of the panel and hide these with color
matched caulk.
• Apply color matched caulk to screw holes using a glove-protected nger
to blend in the caulk to match surrounding contours. Optional touch up
paint kits are available to help blend caulked areas.
Applya¼"beadofGenStonecolormatchedcaulkingorpolyurethane
construction adhesive to all positive edges to ensure a water-tight barrier.
Thispositiveshiplapedgeshouldalwaysbeupright.
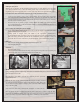
• Workingfromlefttoright,followthechalklineasyoucontinuetobuildtherstrow.
• Remembertoselectandarrangepanelsbycolorandpatterntoachievethebestoverallappearance.
• Repeattheinstallationprocessbyworkinglefttorightforthesecondandeachremainingrow.
• Customttingpanelsisaccomplishedbyusingapowercircularsaw,handsaw,jigsaw,utilitysawandwoodrasp.