
Installation Guide


Measuring and Marking:
Ifyouplantouseacircularorhandsaw,itisbesttomeasureandmarkontheback,atsideofthepanel.Usealevelorotherstraight
edge, pencil or marker, and a tape measure to mark the cut line. If you plan to cut using a table saw, it would be better to mark a
pointonthepanelsurfaceandusetheatsidedownonthetable.Sealallcutedgeswithcolormatchedcaulkortouchuppaintto
protect from UV.
Cutting and Trimming:
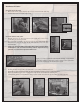
Afterfollowingthemarkinginstructionsaboveyouarenowreadytocut.Touseacircular
saw, cutting along the mark on the back, you will need to protect the face of the panel as
youholditinplaceonasmoothattable.Placingthepanelatsidedownonthesawworks
bestifusingatablesaw.Forcuttingofledgersandsmallerpiecesacompoundmitersawis
bestbutahandsaworjigsawwillalsowork.Forapplicationsrequiringcutoutsforitems
such as hose bibs, electrical plates, or lights mark from the back and then cut out using a
keyholesaw,jigsaw,oraholesawonadrill.BecauseGenStoneproductsarehandmadeand
go through a manufacturing process there are occasionally minor blemishes at the edge of
thepanels.Theseareeasilycorrectedbyslighttrimmingwithautilityknifeorbysanding.
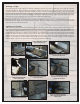
Someinstallationsmayrequireanewnegativeshiplapedgebecutintoaside.Thiscanbe
done with a table saw, a router or router table, or if neither of these is available a circular saw
preferablywithaguide.Useapaneltodeterminetheheight(onatablesaw)ordepth(with
acircularsaw)tosettheblade.Thisshouldbeequaltothehorizontalcutoftheshiplapedge
(approximately1").Oncethebladeisset,makethecutthenresettheheight(ordepth)to
matchthedepthcutoftheshiplapedge(approximately½")effectivelycuttingarectangle
of material out of the corner. A router or router table can also be used to remove this material
leaving the new negative ship lap edge.
Application and Prep:
GenStone products are
designed to be applied to a
variety of substrates. These
include concrete wall, CMU
(cinder block), brick, hard
stucco, cement backer boards,
OSB, plywood, at board
siding,anddrywall.Regardless
of the substrate, the surface
should be clean and free of
debris or loose pieces. If your
application includes adhesive on the back side make sure that the substrate is free from
residues, oils, or any other substance that would cause poor bonding. It is imperative to use
ahighqualityexteriorgradescrewwithadequatecompositionorcoatingtoattachthepanel.
GenStonepanelshavebothapositiveshiplapedgeandanegativeshiplapedge.Thepositive
shiplapedgeistheedgethatprotrudesfromthepanelformingalip.Thenegativeshiplapedgeisanundercutinthepanelforming
avoidthatthepositiveedgetsinto.Thepositiveedgealwaysneedstogouptothetopside.
It’s best not to sit panels in the hot, direct sunlight for longer periods of time prior to installation as this may cause expansion.