
Product Manual


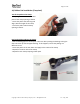

Table Of Contents
- We are happy to double check your installation at no cost and offer any additional adjustment advice or tips. Simply email your pics to support@gentent.com, include your original GenTent.Com order number, or let us know the make and model of your gene...
- Product Registration
- If you purchased from www.gentent.com, your product is already registered. If you purchased from one of our partners, please visit www.gentent.com/register so that we can establish your purchase date and keep you informed of any periodic updates. IMP...
- Limited Three Year Warranty
- Package Contents
- Installation Overview
- Install GenTent Clamps on Generator Frame
- Install GenTent Frame on the GenTent Clamps
- Secure GenTent Canopy over GenTent Frame
- Important GenTent Usage Tips
- GenTent Accessories and Spare Parts Catalog

Page: 9 of 16
Copyright © 2013 GenTent Safety Canopies, LLC – All Rights Reserved V5 – July, 2013
2) Assemble Clamp parts (if required)
If your clamps came unassembled, please follow these simple steps.
It is very important that the washer always be used between the
knob and the clamp body.
- Slide telescoping rods into clamp bodies.
- Install set pins through clamp bodies and telescoping rods
- Install carriage bolt through one end and seat into clamp
- Loosely install washer and self-locking knob onto carriage bolt
3) Install Clamp on Generator Frame (or Frame Adapter)
- Locate the first clamp to be installed just below the electrical panel on your generator
- If required, slide rubber sleeve over frame member (1” and 1 ¼” frames only –
adapter not for use on 1 ½” frames)
- Position rubber adapter opening to face outward toward clamp opening (fig. A).
Alternatively the rubber adapter opening can face away from the clamp opening if it is
not possible to face it toward the opening.
- Push clamp opening straight onto frame opening (fig. A). The clamp will pop over the
frame. Then slide up and over rubber adapter (fig. B) (if used)
- Position clamp diagonally from sides of the generator frame (fig. C);
- Tighten knob, centered on washer until clamp is firmly in place. This usually requires
2-4 full turns once the knob/washer seat to the clamp body. If the clamp is over
tightened, the clamping strength is reduced as you will notice the clamp mouth begin to
pull away from the frame. In this case, slightly release the tension on the knob
- Repeat procedure on remaining three sides; position clamps at generally the same
height.
Fig. 3-A Fig. 3-B Fig. 3-C