
Product specifications


3
U BEFORE USING FOR THE FIRST TIME
Wipe the grill plates with a damp cloth.
C PREPARATION
1 Prepare any garnish (cheese, tomato, etc.), and split your buns or rolls.
2 Centre the drip tray under the front of the grill, to catch run-off.
C PREHEAT
3 Put the plug into the power socket.
4 The light will come on, then cycle on and off as the thermostat operates to maintain
the temperature. When the light goes off, the grill is ready for use.
C FILL THE GRILL
5 When the light goes off, use an oven glove to open the grill.
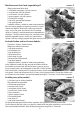
6 Lay the food on the bottom grill plate with a spatula or tongs, not fingers.
7 Close the grill. The hinge is articulated to cope with thick or oddly shaped foods.
8 The grill plates should be roughly parallel, to avoid uneven cooking.
9 Wait while the food cooks.
C REMOVE THE FOOD
10 Check that the food is cooked. If you’re in any doubt, cook it a bit more.
11 Use the oven glove to open the grill.
12 Use wooden or plastic tools to remove the food.
C FINISHED?
13 Unplug the grill.
C MORE?
14 Put on the oven glove, empty the drip tray into a heatproof bowl, give it a wipe with
kitchen paper, and replace it under the front of the grill.
C CARE AND MAINTENANCE
1 Unplug the grill and let it cool before cleaning and storing away.
2 Wipe all surfaces with a damp cloth or sponge. Use a paper towel with a dab of
cooking oil to remove stubborn stains.
3 Wash the drip tray in warm soapy water, or in the top rack of the dishwasher.
4 Take extra care with the non-stick cooking surfaces.
5 Don’t put the grill in water or any other liquid.
6 Don’t use harsh or abrasive cleaners, solvents, scourers, wire wool, or soap pads.
, Where the top and bottom plates make contact, the non-stick surfaces may show
signs of wear. This is purely cosmetic, and will not affect the operation of the grill.