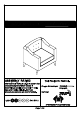
ASSEMBLY INSTRUCTIONS ASSEMBLY RATING The Assembly Rating is a 5-point system that shows the degree of effort needed in assembling a specific product (with 1 being easy and 5 being difficult). For most products,two persons are recommended.
Thank you for your purchase! We hope you will enjoy your new product for many years to come. Our commitment to providing quality products does not simply end when a purchase is made. We stand behind our products and will provide any support needed in order for you to fully enjoy your purchase. Your satisfaction is the greatest recognition we could have. Because we value your trust in our company,we will do our best to meet your service expectations.
ASSEMBLY & CARE ADVICE FOR YOUR FURNITURE TO LAST,CORRECT ASSEMBLY AND PROPER MAINTENANCE ARE NECESSARY PLEASE FOLLOW THE INFORMATION PROVIDED BELOW TO FULLY ENJOY YOUR FURNITURE. BASIC ASSEMBLY TECHNIQUES It Is highly recommended that the Position sate part correctly and insert Use cardboard or carpet area when assembly should be done near the craws or bolts into their respective assembling furniture to prevent area of its intended location. Make holes by hand tighten or using the scratches.
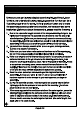
PER-ASSEMBLY INTRODUCTION Unless you are particularly adept at assembling furniture, we understand building ready-to-assemble furniture can be a frustrating experience for some. To help avoid confusion and to make the assembly process quicker and smoother, we have provided some helpful tips. Before you begin the assembly, please read the following : 1.
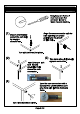
CAM LOCK FASTENER ASSEMBLY INSTRUCTIONS Note:Every cam lock bolt must have a cam lock connector in order to fasten the parts together. Align the cam connector with its (1 ) Secure the threaded side opening (or arrow) end °_f the cam bolt 1 pointing to the small by using a drilled hole. screwdriver. Tun right (clockwise) to tighten. (2) (3) Two parts should fit snugly l Insert the cam lock against each other. bolt into the per-drilled hole l < above the cam @ connector.
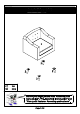
HARDWARE LIST HOW Cam Bolt %& Q 180° Cam Lock 1. Screw Cam Bolt into |2. insert Cam Bolt into insertions Cam Lock. 4, Gently turn Cam panel. bolt hole of joining arrow facing bolt. Lock clockwise to panel. lock position. Due to the size and/or weight of this product,it is highly recommended that the assembly should be done near the area of its intended location.Make sure you have enough space to move around during the assembly.
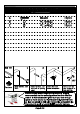
PARTS LIST Care Introduction"and Before you begin,please read"Assembly and "Cam Lock Fastener Assembly Instructions™.